


ZDW103 Instructions, Release 1.1
P/D 102406
HomePro
by ADVANCED CONTROL TECHNOLOGIES, INC.
0703-01
3
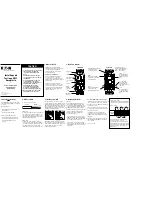
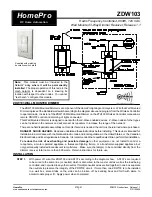
• Tapping top of the switch turns the load attached ON.
• Tapping bottom of the switch turns the load attached OFF.
•
Pressing and holding the top of the paddle switch will brighten the load attached, and pressing and holding
the bottom of the switch will dim the load. When OFF, pressing and holding the bottom of the switch will
cause the load will go to the minimum dim level.
Note: Upon restoration of power after a power loss, the ZDW103 returns to previous known state.
LED indication
The LED on the ZDW103 will turn on when the load attached is ON. However, the LED can be user configured
to turn ON when the load attached is OFF, if so desired, to act as a night light.
The ZDW103 will flicker its LED when it is transmitting to any of its 4 groups. This can be changed if desired.
Auxiliary Switch
The ZDW103 supports 3 and 4-way control using the AS101 auxiliary switch.
Remote Control
The ZDW103 will respond to BASIC and MULTILEVEL commands that are part of the Z-Wave system. Refer to
your controller’s instructions as to whether your controller can transmit those commands.
All On/All Off
The ZDW103 supports the ALL ON/ ALL OFF commands.
The ZDW103 can be set to respond to ALL ON and ALL OFF commands 4 different ways.
Refer to your controller for information on how to set the ZDW103 to operate in the manner you desire. Some
controllers may be only able to set certain settings of ALL ON/ALL OFF response.
The 4 different ways the ZDW103 can be setup to respond to ALL ON and ALL OFF commands are:
•
ZDW103 will not respond to ALL ON or the ALL OFF command.
•
ZDW103 will respond to ALL OFF command but will not respond to ALL ON command.
•
ZDW103 will respond to ALL ON command but will not respond to ALL OFF command.
•
ZDW103 will respond to ALL ON and the ALL OFF command (default).
Association
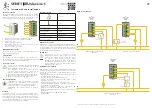
The ZDW103 supports the Association command.
The ZDW103 can be set to control other Z-Wave devices.
Those devices must be installed in their permanent
location
. You can turn on and off, and even dim other Z-Wave devices once they are “
associated
” into 1 of 4 groups
within the ZDW103.
Each group is turned on or off (or dimmed) by tapping or holding the switch a differing amount of times.
Group 1
If you
associate
a Z-Wave device into Group 1, you can turn that device on and off by tapping the switch on or
off
once
. The load attached to the ZDW103 will also turn on or off. Associating nodes into group 2 or 3 will cause
a very slight delay before the command is transmitted to group 1 nodes.
You can brighten the controlled device by pushing and holding the top of the switch, dim by pushing and holding
the bottom of the switch.
Group 2
If you
associate
a Z-Wave device into Group 2, you can turn that device on and off by tapping the top or bottom
of the switch
twice
. You can brighten or dim devices by tapping the top or bottom of the switch once and then hold
it down. The load attached to the ZDW103 is not affected.
Group 3
If you
associate
a Z-Wave device into Group 3, you can turn that device on by tapping the top of the switch
three
times
or off by tapping the bottom of the switch
three times
. You can brighten devices by tapping the top of the
switch twice or dim devices by tapping the bottom of the switch twice and then hold it down. The load attached
to the ZDW103 is not affected.