background image

Après avoir brancher électriquement votre amplificateur, mettre l’interrupteur principal ON/OFF situé 

sur la face arrière en position ON. Le bouton de standby situé sur la façade avant de votre 

amplificateur s’allume en rouge. Appuyer sur ce bouton pour mettre en marche l’appareil, le standby 

s’allume alors en blanc, l’afficheur indique le niveau sonore.

Votre X-i1100 affiche alors sur l’affichage      la dernière source écoutée et sur l’affichage      le   

dernier volume sonore sélectionné que vous pouvez augmenter ou diminuer en tournant ce bouton.

Un appui successif sur ce bouton indiquera dans l’afficheur      les différents menus auxquels vous 

pouvez accéder. Lorsque vous êtes sur le menu choisi, tourner le bouton pour changer le réglage.

Prenons un exemple, appuyez sur le bouton successivement jusqu’à ce qu’apparaisse sur           

l’affichage 

w

 le mot INPUT (entrée), tournez alors ce bouton et les différentes sources s’afficheront. 

Sélectionner en appuyant à nouvreau sur ce bouton ou attendre 3 secondes la validation 

automatique. Le principe est identique pour toutes les fonctions.

BOUTON MULTIFONCTIONS: SON UTILISATION

Plug your amplifier on the outlet, then switch ON the general power supply button located on the 

rear panel. The standby button located on the front panel will light on in red. Push the standby but-

ton (front panel) and the light will become white. The display      will indicate the last listened source 

and on display      the last volume level that you can increase or decrease by turning the knob.

By pushing successively on the button,     , the display      will indicate the different menus of your 

amplifier. When you are on the selected menu, then you can turn 

t

 to select your choice in the 

display      . To confirm your choice, press again      or wait about 5sec. and your choice will be 

automatically validate.

Exemple: Push on the multifunctions button      until INPUT appears on display 

w

 then turn the 

button to choose the source that you want to play: CD, CD-BAL, TUNER, AUX1, AUX2, OPT1, 

OPT2, USB, CO1, CO2, AES/EBU or PHONO. Push the multifunction      to confirm and memorize 

your choice (or wait 5 sec.). Same method could be used for all menus.

Schließen Sie Ihren Verstärker an die Steckdose und schalten Sie anschließend den Hauptnetz-

schalter auf der Rückseite auf ON. Die Standby-Taste auf der Frontplatte leuchtet in rot.

Drücken Sie die Standby-Taste (Frontplatte) und das Licht wird weiß. 

Das Display zeigt die zuletzt gehörte Quelle und die letzte Lautstärke auf dem Display, welche Sie 

durch drehen des Knopfes erhöhen oder verringern können.

Durch mehrfaches Drücken auf den Knopf zeigt das Display nacheinander die verschiedenen Menüs 

des Verstärkers. Wenn das gesuchte Menü angezeigt wird können Sie durch drehen Ihre Auswahl 

zur Anzeige bringen.  Zur Bestätigung  Ihrer Auswahl können Sie  erneut drücken  oder Sie warten 

etwa 5 Sekunden und Ihre Wahl wird automatisch aktiviert.

Beispiel: Drücken Sie auf den Multifunktionsknopf, bis auf dem Display INPUT erscheint, drehen Sie 

dann die Taste, um die Quelle, die Sie spielen möchten wählen: CD, CD-BAL, TUNER, AUX1, AUX2, 

OPT1, OPT2, USB, CO1, CO2, AES / EBU oder Cinch. Drücken Sie den Multifunktionsknopf zum 

Bestätigen und speichern Sie Ihre Wahl (oder warten Sie 5 Sek.). Das gleiche Verfahren kann für alle 

Menüs verwendet werden.

Collegare l’amplificatore alla presa di corrente, poi attivarlo col pulsante generale che si trova sul 

pannello posteriore. Il tasto Standby del pannello frontale diventerà rosso. Premere il pulsante di 

accensione e la luce diventerà bianca. 

Il display      indicherà l’ultima sorgente ascoltata e sul display      l‘ultimo livello del volume impost-

ato che è possibile aumentare o diminuire ruotando la manopola. Premendo successivamente il 

tasto, il display      indicherà i vari menu del vostro amplificatore. Quando si è nel menu selezionato, 

allora si può selezionare la propria scelta sul display    . Per confermare la scelta, premere nuova-

mente      o attendere circa 5 secondi e la vostra scelta sarà automaticamente convalidata.

Esempio: Premere il tasto multifunzione     fino a visualizzare INPUT sul display    , poi ruotare 

il tasto per scegliere la sorgente che si desidera riprodurre: CD, CD-BAL, TUNER, AUX1, AUX2, 

OPT1, OPT2, USB, CO1, CO2, AES/EBU or PHONO.  Premere il tasto multifunzione     per confer-

mare e memorizzare la vostra scelta (o attendere 5 sec.). Lo stesso metodo può essere utilizzato 

per tutti i menu.

t

MULTIFUNCTIONS BUTTON

MULTIFUNKTIONSKNOPF

I TASTI MULTIFUNZIONE

w

e

w

w

t

w

t

t

t

w

e

e

e

t

w

e

t

t

w

t

Summary of Contents for X-i1100

Page 1: ...ADVANCE PARIS QuickStart i1100 ...

Page 2: ......

Page 3: ...a reciclagem na Uniào Europeia Para mais informaçôes queira contactar as autoridades locais ou o revendedor onde adquiriu o produto Märkningen av produkter och fôrpackningar med denna symbol betyder att elektrisk och elektronisk utrustning maste tasom hand séparât fràn hushàlissopor nàr utrus tningen har förbrukats EU har sàrskilda àtervinningsan làggningar för denna typ av utrustning Kontakta de ...

Page 4: ...parabili o sostituibili dal utente finale Per problemi fare riferimento a personale qualificato LE POINT D EXCLAMATION vous indiquera la présence d informations importantes tant au niveau utilisation que mainte nance de votre appareil THE LIGHTNING FLASH with arrow head symbo is intended to alert the user to the presence of uninsulated dangerous voltage within the product s enclosure that may be o...

Page 5: ...du personnel compétent et qualifié Afin de connaitre la sta tion technique la plus proche merci de contacter votre distributeur national LEGGERE ATTENTAMENTE TUTTE LE ISTRUZIONI sulla sicurezza e sul funzionamento prima di utilizzare l apparecchio CONSERVARE QUESTE ISTRUZIONI per consultazioni future ATTENERSI ALLE AVVERTENZE E SEGUIRE TUTTE LE ISTRUZIONI sul funzionamento dell apparecchio ACQUA E...

Page 6: ...ken Spülbecken Waschwannen in feuchten Kellern oder an Swimmingpools ver wendet werden Achten Sie bitte darauf dass keine Gefäße die Flüssigkeiten enthalten wie z B Vasen auf dem Gerät abgestellt werden BELÜFTUNG Das Gerät muss so aufgestellt werden dass eine ordnungsgemäße Belüftung gewährleistet ist Beispielsweise darf das Gerät nicht auf einem Sofa Teppich oder einer ähnlichen Oberfläche aufges...

Page 7: ...ANDBY OFF the main power is cut off and the unit is no longer fully operational except for the micro controller The standby indicator s light becomes red STANDBY EIN AUS TASTE Drücken Sie zum Einschalten des Geräts diese Taste daraufhin wird es mit Strom versorgt und ist betriebsfähig die Beleuchtung des Standby Knopfes wir weiß Der Hauptnetzschalter befindet sich auf der Geräterückseite und muss ...

Page 8: ...erenti informazioni a seconda dell impostazione data Di base indica il livel lo del volume In modalità INPUT indica la sorgente d ingresso selezionata In modalità BALANCE indica il livello destro e sinistro In modalità BPA se disattivata sono disponibili le regolazioni di medi bassi e alti In modalità ON il segnale arriva direttame PRISE CASQUE 6 35MM La sortie casque de votre amplificateur permet...

Page 9: ... Schließen Sie Ihren Verstärker an die Steckdose und schalten Sie anschließend den Hauptnetz schalter auf der Rückseite auf ON Die Standby Taste auf der Frontplatte leuchtet in rot Drücken Sie die Standby Taste Frontplatte und das Licht wird weiß Das Display zeigt die zuletzt gehörte Quelle und die letzte Lautstärke auf dem Display welche Sie durch drehen des Knopfes erhöhen oder verringern können...

Page 10: ...ff Nur wenn BY PASS Off Arborescence des menus et options Options and menus arborescence Menüstruktur und Optionen menu e le opzioni CD OFF ON 48 0 Display w e Display GO TO INPUTS VOLUME 00 TO 80 INPUT SELECT THE INPUT GO TO BALANCE BALANCE BALANCE ADJUSTMENT R 01 R 20 and L 01 L 20 GO TO BY PASS BY PASS GO TO DIMMER DIMMER DIMMER ADJUSTMENT DIM1 DIM2 DIM3 ...

Page 11: ...er sur le bouton Den Knopf drücken Premere il tasto SPEAKER SELECTION PAIR A OR PAIR B GO TO SPEAKER SPEAKER AMPLIFIER SEPARATE OFF OR ON GO TO AMPLIFI AMPLIFI SELECTION BY SWITCH ON THE REAR PANEL ONLY GO TO HIGH BIAS HIGH BIA GO TO INFO INFO VER 1 0 GO TO RESET REST RESET SELECTION YES OR NO ...

Page 12: ...NOTES ...

Page 13: ...nalogiques Elles ne doivent pas être raccordées à la sortie numérique d un lecteur de CD ou d un autre appareil à sortie numé rique INPUTS You can connect your stereo sources on those inputs These inputs are suitable for any line level source equipment such as tuners CD players DVD MP3 players etc Note These inputs are only for analogue audio signals They should not be connected to the digital out...

Page 14: ...ung INGRESSO PHONO e TERMINALE DI MASSA Collegare il vostro giradischi ai connettori RCA sinistro L e destro R I giradischi normalmente sono dotati di un cavo di massa che va collegato al terminale di massa di questo apparecchio Svitare il terminale per permettere l immissione del cavo inserirlo e riavvitare per assicurarlo PRE OUT SORTIES PREAMPLIFICATEUR Si vous souhaitez utiliser un amplificate...

Page 15: ... R en s assurant que R est reliée à la borne de l enceinte et R est reliée à la borne de cette même enceinte Brancher le haut parleur gauche aux bornes repérées L et L en procédant de la même manière Pour la deuxième paire d enceinte B procéder de la même façon que la paire B On peut utiliser les bornes serre fils pour courants élevés comme bornes à vis pour les câbles com portant des cosses plate...

Page 16: ...n das Loch und sichern Sie die Verbindung durch Anziehen der Mutter BANANENSTECKER können mit diesen Terminals ebenfalls verwendet werden TERMINALI DEI DIFFUSORI si possono collegare due coppie di diffusori solo al modello X i90 SPEAKERS A Collegare i diffusori da 4 Ohm o superiori e collegare il diffusore destro ai terminali marcata R e R accertandosi che R sia collegato al terminale sul diffusor...

Page 17: ...all connections have been made You can listen music files that are on your computer Compatible with Window 2000 Window XP Vista 7 Linux and Mac OS X Some operating systems don t include the USB B driver also you need to download it on our website www advance acoustic com and install it During installation of this driver the X Preamp must be disconnected from the PC or MAC USB B Eingang Ermöglicht ...

Page 18: ...lizzato per il trasporto di segnali audio digitali tra vari dispositivi È stato sviluppato dalla Audio Engineering Society AES e l European Broadcasting Union EBU e pubblicato nel 1989 Watkinson 1989 poi riveduto nel 1995 1998 e 2003 AES3 utilizza un cavo schermato intreccia to a coppie da 110 ohm STP con connettori XLR fino ad una lunghezza di 100 metri Se la vostra sorgente ha questo tipo di pre...

Page 19: ... your X i1100 switch ON the front StandBy button of the front paneL NETZKABEL NETZSPANNUNG ANZEIGE LED HAUPTNETZSCHALTER Eine eingebaute Spannungserfassungsschaltung wählt automatisch die richtige Netzspannung 115 oder 230 V aus Diese wird mit den blauen LEDs auf der Rückseite 115 oder 230 V angezeigt Schließen Sie das Netzkabel des Verstärkers an dann schalten Sie den Hauptnetzschalter auf der Ge...

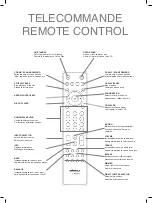
Page 20: ...la lecture du cd CONFIRMATION Selects to confirm a choice Appuyez pour valider un choix CD PLAYER Repeat function cd player Pour répéter la lecture CD BYPASS Bypass tone control Direct signal Désactive les contrôles de tonalité VOLUME Increase decrease the volume level Augmente diminue le volume sonore INFO Displays informations Affichage d informations MUTING Mutes or unmutes the preamplifier Act...

Page 21: ......

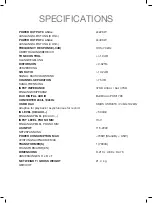
Page 22: ...7KΩ Unbal bal 47KΩ EINGANGSIMPEDANZ DAC DIGITAL AUDIO BurrBrown PCM1796 CONVERTER 24bit 192kHz USB B DAC XMOS USB3318 24bits 192kHz Adaptive for playback asynchronous for record IN LEVEL CD AUX 500mV EINGANGSPEGEL CD AUX INPUT LEVEL PHONO MM 7mV EINGANGSPEGEL PHONO MM AC INPUT 115 230V NETZSPANNUNG POWER CONSUMPTION MAX 700W StandBy 0 5W LEISTUNGSAUFNAHME MAX TRANSFORMER S 1 700VA TRANSFORMATOR EN...

Page 23: ...tive 2014 30 EU et RED 2014 53 EU KONFORMITÄTSERKLÄRUNG Wir erklären in alleiniger Verantwortung dass das Gerät auf das sich diese Erklärung bezieht sich in Übereinstimmung mit den folgenden Europäischen Richtlinien befindet RoHS2 2011 65 EU LVD directive 2014 35 EU EMC directive 2014 30 EU und RED 2014 53 EU DICHIARAZIONE DI CONFORMITÀ Si dichiara sotto la nostra responsabilità che questo prodott...

Page 24: ...ADVANCE PARIS 13 rue du coq gaulois 77170 Brie comte Robert Tel 33 0 1 60 18 59 00 Fax 33 0 1 60 18 58 95 www advance acoutic com email info advance acoustic com ...

Reviews: