NetVanta 3000 Series Hardware Installation Guide
Unit Installation
61200860L1-34L
Copyright © 2006 ADTRAN, Inc.
63
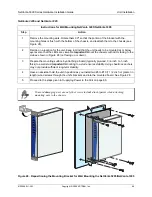
Mounting Options
The NetVanta 3120, NetVanta 3130, and NetVanta 3200 can be installed in a wallmount or tabletop
configuration. The NetVanta 3205 and NetVanta 3305 can be installed in a tabletop, wallmount, or 19-inch
rackmount configuration. The NetVanta 3430 and NetVanta 3448 can be installed in a tabletop or
rackmount configuration.
For tabletop mounting, you can attach rubber mounting feet to the bottom of the unit if desired. The
following sections provide step-by-step instructions for rack mounting and wall mounting.
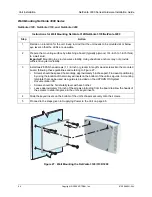
Rack Mounting NetVanta 3000 Series
The NetVanta 3205, NetVanta 3305, NetVanta 3430, and NetVanta 3448 are 1U-high, rack-mountable units
which can be installed into 19-inch equipment racks. Follow these steps to mount the NetVanta 3000 Series
unit into a rack:
If you have purchased P/N 4200368L1, which includes the VPN Accelerator Card with the
NetVanta 3305, install the card before mounting the unit. See
Accelerator Card (included in P/N 4200368L1)
Instructions for Rack Mounting NetVanta
Step
Action
1
To allow proper grounding, scrape the paint from the rack around the mounting holes where the
NetVanta 3000 Series will be positioned.
2
Position the NetVanta 3000 Series in a stationary equipment rack. This unit occupies 1U of
space.
3
Have an assistant hold the unit in position as you install two mounting bolts through the unit’s
brackets and into the equipment rack using a #2 phillips-head screwdriver.
4
Proceed to the steps given in
Be careful not to compromise the stability of the equipment mounting rack when installing
this product.
The rackmount kit for the NetVanta 3430 and NetVanta 3448 is not included in shipments
of these products. You must order the rackmount kit separately:
NetVanta 3430/3448 Series Rackmount Kit, part number 1200827E1

