background image

Voice Messages (Cont'd) 

44 


SCREEN ACTION 

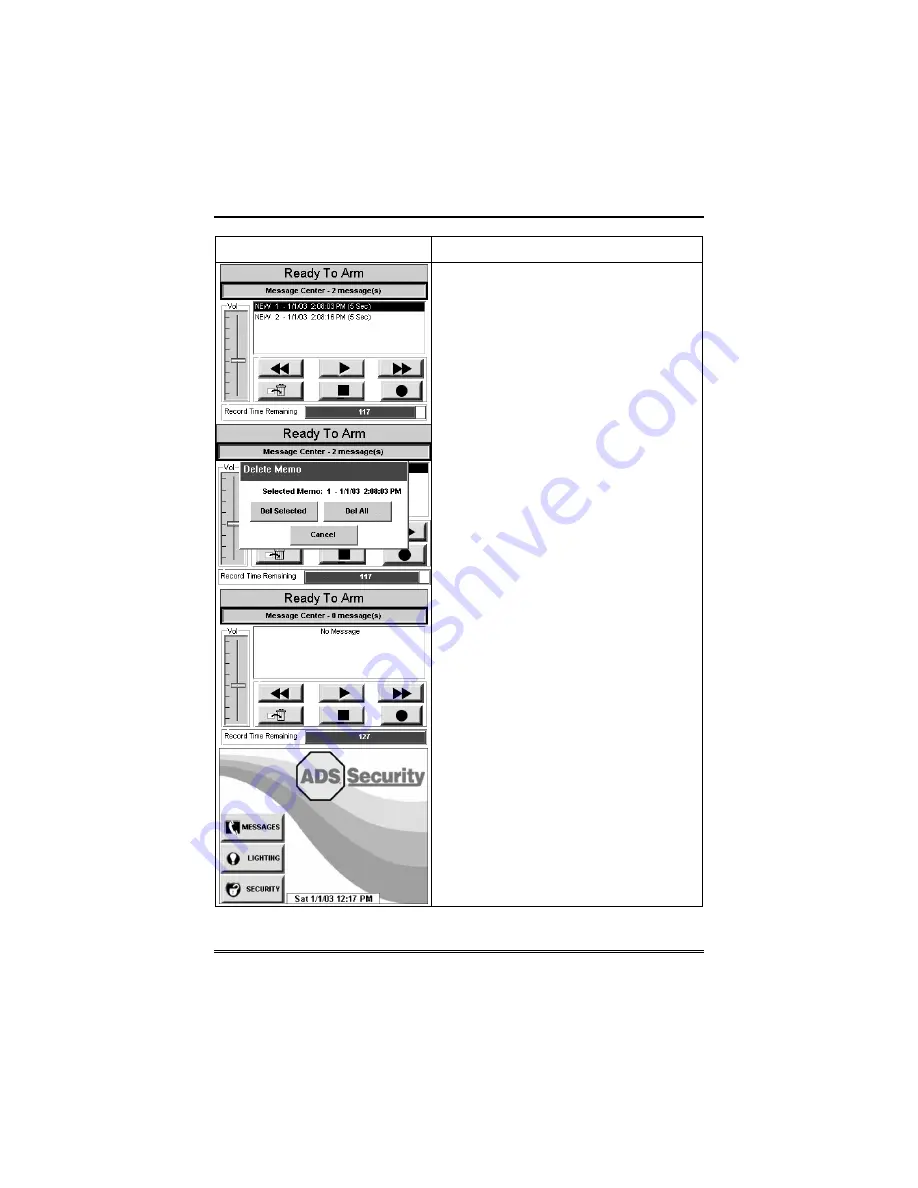
2.  Select the message you wish to listen 
to by touching it in the message list and 
then pressing the 

Play Message

 button.  

As the message is being played, a “Play 
(x): Voice Message…” message is 
displayed above the message list window. 
When the end of the message is reached, 
the playback will stop. 
3.  To listen to the next message, press 
the 

Advance One Message and Play


button. 
4.  If you wish to delete messages, press 
the 

Delete

 button. The “Delete Memo” 

screen will be displayed. You can press 
the 

Del Selected

 button to delete only the 

currently selected message and return to 
the “Message Center” screen, 

Del All


button to delete all messages and return 
to the “Message Center” screen, 
or the 

Cancel

 button to return to the 

“Message Center” screen without deleting 
any messages. 

5.  To exit, depress the 

BACK

 or 

HOME


button and the “Home” screen will be 
displayed. 

Summary of Contents for FA700KP-ADS

Page 1: ...o o ou u u u u u u uc c c c c c c ch h h h h h h hC C C C C C C Ce e e e e e e en n n n n n n nt t t t t t t te e e e e e e er r r r r r r r K K K K K K K Ke e e e e e e ey y y y y y y yp p p p p p p...

Page 2: ...ffect the operation of the system or could cause damage to the system Please read each warning carefully This symbol also alerts the user to the possibility of physical harm if instructions are not fo...

Page 3: ...des 12 Extended Functionality 12 SECURITY SYSTEM OPERATION 13 Introduction to Security System Operation 13 How to Arm the System 13 How to Arm Multiple Partitions 15 How to Bypass Zones 17 How to Remo...

Page 4: ...ieving and Deleting a Voice Message 43 SUMMARY OF AUDIBLE NOTIFICATION 45 SUMMARY OF FA700KP ADS LED OPERATION 47 FA700KP ADS LED Operation 47 FA700KP ADS SETUP 48 How to Access FA700KP ADS Setup Opti...

Page 5: ...tion detectors Lighting switching devices UL The home lighting feature has not been evaluated by UL The system uses microcomputer technology to monitor all zones and provides appropriate information f...

Page 6: ...by touching buttons or icons to perform the function you desire About Your Home Screen Your Home screen is the gateway to your FA700KP ADS TouchCenter Keypad From this screen you can access messages...

Page 7: ...ain devices on and off if installed and programmed by your installer Home screen Accesses Arming screen Note The lock symbol in the shield indicates security system status Unlocked system disarmed Loc...

Page 8: ...e enter through the entrance door but must disarm the system with your User Code within the entry delay period or an alarm will occur STAY Press this button to arm when you are staying home but might...

Page 9: ...o authorized When the Arm Multi Partitions circle does not contain a check mark each partition must be armed individually MORE CHOICES Press this button for more Security Lighting and FA700KP ADS setu...

Page 10: ...alerting users to the opening and closing of doors and windows even while the system is disarmed Partitions This system may be configured to arm and disarm more than one area each as if it had its own...

Page 11: ...ll occur The keypad will beep during the entry delay period reminding you to disarm the system Ask your installer about the delay times programmed into your system Alarms When an alarm occurs the FA70...

Page 12: ...al user setup location that provides the specific questions for authorization level partition assignment and RF button assignment UL RF buttons MUST NOT be used in UL installations Extended Functional...

Page 13: ...Yes Yes Stay Yes Yes Yes No Night Yes Yes set for Away or Stay Mode No set for Instant or Maximum Mode Yes Yes set for Away Mode No set for Stay Instant or Maximum Mode Your installer may have config...

Page 14: ...ars stating which zones are arming and whether or not there is an exit delay o the screen changes to display the remaining exit delay time and o an open lock appears next to the pressed button to indi...

Page 15: ...ple partitions SCREEN ACTION 1 From the Home screen press the SECURITY button to display the Arming screen 2 Make certain the Multi Partitions button is checked 3 Press the appropriate arming mode but...

Page 16: ...titions that the user has access to Note A user may have access to some but not all of the available partitions You have two arming options To arm one or more partitions highlight the partition s to b...

Page 17: ...ot cause an alarm when violated while your system is armed The system will not allow you to bypass fire or emergency zones To bypass zones the system must be disarmed first To bypass zones do the foll...

Page 18: ...g the zone data from the control panel the screen displays Please Wait Then the zones along with their current status are displayed 4 Highlight the zone s to be bypassed by touching it on the screen w...

Page 19: ...y System Operation Cont d 19 SCREEN ACTION 6 Enter your 4 digit user code The More Choices screen is displayed showing the system status as Ready Bypass 7 Press the BACK button to return to the Arming...

Page 20: ...d a zone is bypassed you can remove the bypass as follows SCREEN ACTION 1 View bypassed zones by pressing the SHOW ZONES button While the FA700KP ADS is requesting and receiving the zone data from the...

Page 21: ...is displayed with the instructions To Clear Bypasses Enter Code Note A zone cannot be unbypassed while the system is armed Enter your 4 digit user code The More Choices screen is displayed showing th...

Page 22: ...e system as follows SCREEN ACTION 1 Press the DISARM button on any Armed screen The User Authorization screen is displayed with the instructions To Disarm Enter Code 2 Enter your 4 digit user code The...

Page 23: ...ome Page After time has expired This time is selected on the Setup screen How to Check the Status of Other Partitions This system supports between one and eight Partitions as configured by your instal...

Page 24: ...n control the entire system If a user is so authorized a FA700KP ADS or other keypad in one partition can be used to perform system functions in another partition Note that only those partitions autho...

Page 25: ...A code may have access to some but not all of the available partitions This screen displays the available partitions in this case Partitions 1 2 and 3 and their current status The current partition i...

Page 26: ...e Emergency screen The Emergency screen can be accessed by activating the PANIC button located below the screen Once the Emergency screen is accessed perform the following to send an emergency message...

Page 27: ...h the time and date of its occurrence The control panel must be programmed to record various system events in installer programming mode To view the Event Log perform the following SCREEN ACTION 1 Fro...

Page 28: ...ting and receiving the event log data from the control panel the Event Log screen displays Please Wait To view additional events press the up down arrows to scroll through the event log To view all it...

Page 29: ...programmed by the installer and hold down for at least 2 seconds 2 Evacuate all occupants from the premises 3 If flames and or smoke are present leave the premises and notify your local Fire Departme...

Page 30: ...l The system can be programmed to lock the keypad display with the first zone that produced an alarm Ask your installer if your system has been activated with this feature To display the other zone s...

Page 31: ...p location that provides the specific questions for authorization levels assigned to different users You may want these users to be the same but there are situations in which you may want a user to ha...

Page 32: ...r Code Setup cont d 32 SCREEN ACTION 3 Press the SETUP button on the More Choices screen The Setup screen is displayed 4 Press the USER SETUP button on the Setup screen The User Setup screen is displa...

Page 33: ...button The User Authorization screen is displayed with the instructions Enter Authorized Code 2 Enter your Authorized code The User Options screen is displayed Note The authorized code for adding use...

Page 34: ...uthorization screen is displayed with the instructions Enter 4 Digits 6 Enter the 4 digit code for this user The User Options screen is displayed with the user s name and code displayed 7 Select the p...

Page 35: ...number for this user The User Options screen is displayed with the user s name number and code displayed 10 If this user is assigned an RF button zone touch the box below the RF Button Zone The RF But...

Page 36: ...User Code Setup cont d 36 SCREEN ACTION 11 Press the SAVE button The system will save the configuration When the save is complete the User Setup screen is displayed with the new user s name shown...

Page 37: ...E USER button The User Authorization screen is displayed with the instructions Enter Authorized Code 2 Enter your Authorized code The User Options screen is displayed Note The authorized code for dele...

Page 38: ...he user to be edited and press the EDIT USER button The User Authorization screen is displayed with the instructions Enter Authorized Code 2 Enter your Authorized code The User Options screen is displ...

Page 39: ...r Code Setup Cont d 39 SCREEN ACTION 3 Select whatever options you wish to select for this user and press the SAVE button The configuration changes are saved and you are returned to the User Setup scr...

Page 40: ...ures not supported by the FA700KP ADS refer to your Control Panel User Guide Console Emulation Mode Console Mode allows you to use a FA700KP ADS interface just as you would a regular system keypad All...

Page 41: ...Advanced System Features Cont d 41 SCREEN ACTION 3 Press the CONSOLE MODE button on the More Choices screen The Keypad screen is displayed 4 Perform functions as you would from a regular alpha keypad...

Page 42: ...e lost if the unit loses power or if it is reset Voice messages are recorded and retrieved using the Message Center screen The below illustration identifies the various areas and buttons on the Messag...

Page 43: ...Press the Stop button when you are done recording the message The message indicator will be flashing and the message will be listed in the message list window 4 To record additional messages repeat s...

Page 44: ...to the next message press the Advance One Message and Play button 4 If you wish to delete messages press the Delete button The Delete Memo screen will be displayed You can press the Del Selected butt...

Page 45: ...is heard for each zone displayed Subsequently the following is displayed DISARMED BYPASS Ready to Arm One Short Beep once every 15 sec Keypad only System is in test mode Opened Zone identifications w...

Page 46: ...b Exit delay warning if programmed a DISARM SYSTEM OR ALARM WILL OCCUR is displayed Exceeding the delay time without disarming causes alarm b ARMED AWAY or ARMED MAXIMUM is displayed along with You M...

Page 47: ...en Each LED s on and off state has different meanings as described below LED DESCRIPTION ARMED ON Security system is armed OFF Security system is not armed READY ON Security system is disarmed and rea...

Page 48: ...ced Setup screen if enabled by your system installer or Clean Screen maintenance mode from the Setup screen by pressing the corresponding button The Advanced Setup button will only be active if enable...

Page 49: ...FA700KP ADS Setup Cont d 49 SCREEN ACTION 3 Press the SETUP button on the More Choices screen The Setup screen is displayed...

Page 50: ...se contrast move the slide bar below the current contrast setting another adjustment or selection is to be made go to the corresponding paragraph in this section no additional adjustment or selection...

Page 51: ...r on the TouchCenter slide bar associated with the Volume scale and doing the following If Then you want to increase volume move the slide bar above the current volume setting you want to decrease vol...

Page 52: ...cted To select the screen backlight time do the following SCREEN ACTION 1 On the Setup screen press the Backlight Off After arrow button A pop up window displaying the time period options is displayed...

Page 53: ...p window is displayed asking Settings Changed Remember New Settings Select Yes to save the change or No to discard the change When the Update is complete the FA700KP ADS goes to the Home screen or Mor...

Page 54: ...ime When selected the next time the 1 hour timer expires the new value will be sent to the control panel IMPORTANT This means that the FA700KP ADS setting will override and overwrite the control panel...

Page 55: ...2 3 3 30 4 4 30 5 E F F G H I I 5 30 6 6 30 7 8 9 9 30 K K L L M M M 10 10 30 11 11 30 12 13 14 N O P P Q R S 1 2 3 3 30 4 5 6 T U U V V W X Y 7 8 8 30 9 9 30 10 11 12 h h h h h m m m m m No Standard...

Page 56: ...FA700KP ADS Setup cont d 56 When all settings have been completed select Ok to save the settings or Cancel to discard the settings that have been entered...

Page 57: ...ADS whenever a change in zone status occurs How to Access Operating Modes Access the Operating Modes feature as follows SCREEN ACTION 1 From the Home screen press the SECURITY button The Arming screen...

Page 58: ...ng Modes screen is displayed 5 Touch the Chime Mode button to turn the Chime Mode on or off A checkmark appears in the button when the Chime Mode is ON Press the HOME or BACK button after making your...

Page 59: ...g your FA700KP ADS or damage to the TouchCenter may occur Clean the FA700KP ADS as follows SCREEN ACTION 1 From the Home screen press the SECURITY button The Arming screen is displayed 2 Press the MOR...

Page 60: ...ed clean of fingerprints using a mild soap solution and a soft cloth When the counter reaches zero the window automatically closes and the touch screen is active Note Do not spray cleaning agent direc...

Page 61: ...de and an alarm during the armed NIGHT mode Delay Zone An area of protection containing doors most frequently used to enter or exit typically a front door back door or door from the garage into the bu...

Page 62: ...e also User Code Messages Button A button on the Home screen that allows you to record and retrieve voice messages Night An arming mode for the system Your system installer set the type of arming and...

Page 63: ...NOTES...

Page 64: ...NYONE FOR ANY CONSEQUENTIAL OR INCIDENTAL DAMAGES FOR BREACH OF THIS OR ANY OTHER WARRANTY EXPRESS OR IMPLIED OR UPON ANY OTHER BASIS OF LIABILITY WHATSOEVER EVEN IF THE LOSS OR DAMAGE IS CAUSED BY TH...

Reviews: