18
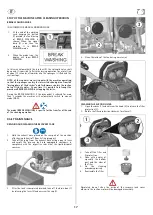
AUTOMATIC DISASSEMBLY OF THE BRUSHES
With the brushes base lifted
from the floor and the
manipulator of the direction in
central position press the
brushes base button (1) for a
few seconds.
CLEANING THE BRUSHES
Take off the brushes to clean them with a water jet (to read how to
do it see chapter “AUTOMATIC DISASSEMBLY OF THE BRUSHES”).
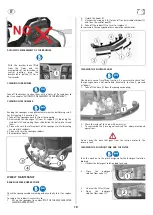
CLEANING THE SQUEEGEE
Keeping the squeegee clean guarantees always the best drying result.
For its cleaning it is necessary to:
1.
Take off the squeegee hose (4) from the coupling.
2.
Disassemble the squeegee (3) from its support (1) loosening the
stud bolts (2) and making them slide inside the slots up to release
them.
3.
Clean with care the internal part of the squeegee inlet eliminating
eventual dirt residuals.
4.
Clean with care the squeegee rubbers.
5.
Reassemble all parts.
WEEKLY MAINTENANCE
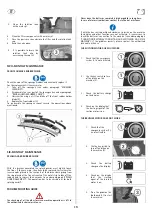
REAR SQUEEGEE RUBBER CHECK
Check the squeegee rubber wearing and eventually turn it or replace
it.
To replace the rubber it is necessary to:
1.
Lift up the squeegee (see under “STOP OF THE MACHINE AFTER
CLEANING OPERATION”).
2.
Unlock the hooks (1).
3.
Unscrew the wing nuts (2) to take off the outer rubber blades (3)
and then the central one (4).
4.
Take off the rubber (5) to turn it or replace it.
To reassemble the squeegee do these operations backwards.
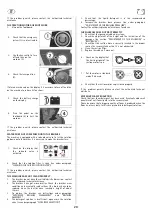
CLEANING THE SQUEEGEE HOSE
Weekly or in case of insufficient suction, it is necessary to check that
the squeegee hose is not obstructed. Eventually, to clean it, proceed
as follows:
1.
Take off the hose (1) from the squeegee coupling.
2.
Wash the inside of the hose with a water jet.
3.
To reassemble the hose repeat inversely the above-mentioned
operations.
Do not clean the hose that goes from the suction motor to the
recovery tank.
CLEANING THE SOLUTION TANK AND THE FILTER
Take the machine to the place assigned for the detergent solution
draining.
1.
Unscrew the detergent solution load tank cap.
2.
Close the detergent
solution flow valve (1)
3.
Unscrew the filter (2) cap.
4.
Open the detergent
solution flow valve (1).


