10
ADJUSTING THE SQUEEGEE
In order to have a perfect drying result through the squeegee, the rear
rubber must have the lower bending uniformly adjusted in all its length.
For the adjustment, it is necessary to put oneself in working condition
and therefore the suction motor has to be switched on and the brushes
have to function together with the detergent solution.
The lower part of the rubber is too much bent
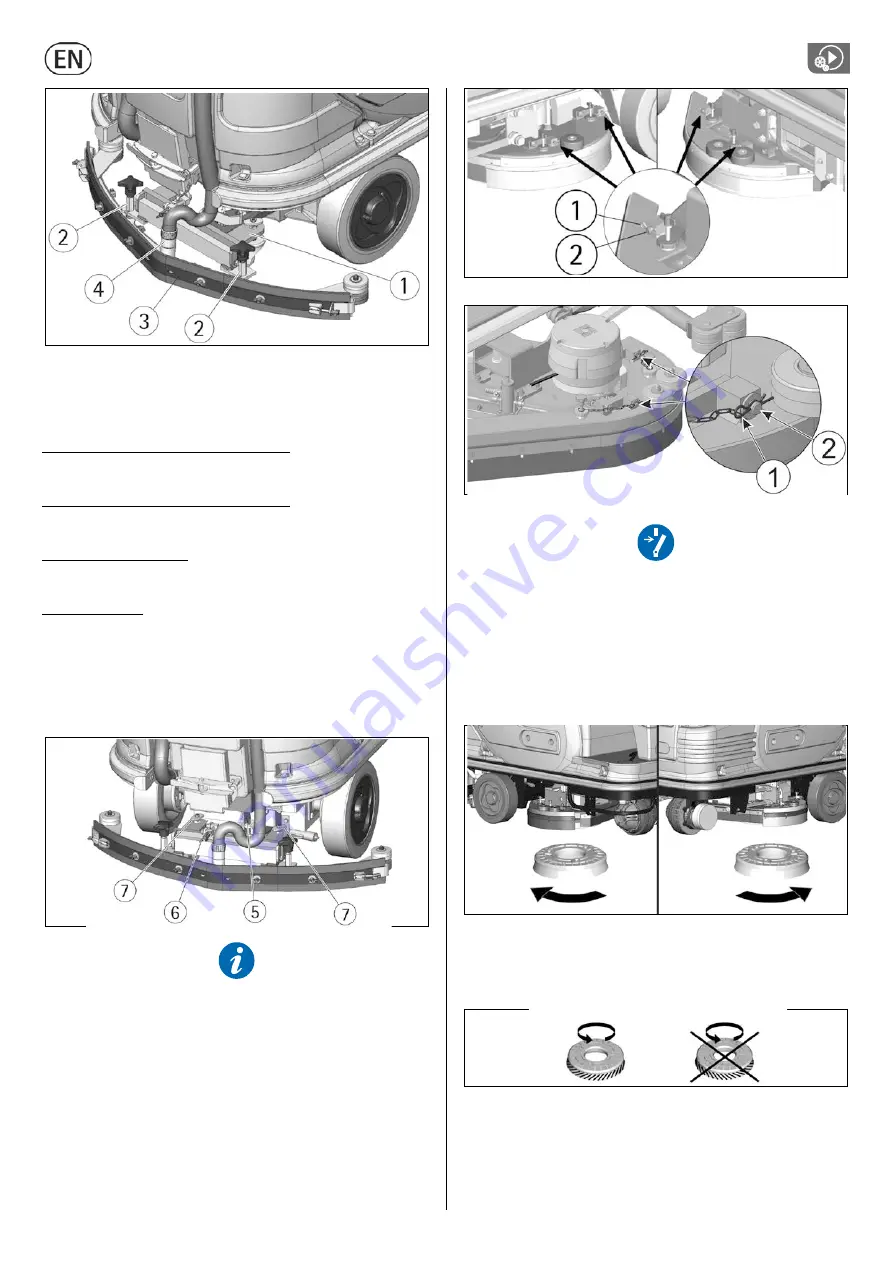
Take off the pressure rotating the wing nut (5) counterclockwise.
The lower part of the rubber is not much bent
Increase the pressure rotating the wing nut (5) clockwise. Check that
the wheels which adjust the height do not rest on the floor, in this case
adjust them as indicated in paragraph "Height adjustment".
The bending is not uniform
Adjust the squeegee inclination rotating counterclockwise the wing nut
(6) to increase the bending in the central part, or clockwise to increase
the bending on the extremities.
Height adjustment
Once that the pressure and inclination of the squeegee have been
adjusted, it is necessary to fix this optimum condition making touch
slightly the wheels onto the floor. Rotate clockwise the registers (7) to
lower the wheels or counterclockwise to raise them. Both wheels must
be adjusted in the same measure. To act upon the register (7) loosen at
the same time the two milled ring nuts, adjust the height acting on the
upper one and then fix the adjustment screwing and blocking the lower
one.
Every type of floor requires a specific adjustment. For example, concrete
floors (where the friction results to be high) need little pressure, while
smooth floors (ceramics) need higher pressure.
If the cleaning operations are made always on the same type of floor,
the adjustment can change only in function of the rubber wear.
ASSEMBLING THE SPLASHGUARDS
The two slash guards are already preassembled on the two metal covers.
To assemble the covers, it is necessary to proceed as follows:
1.
Take off the clips (1) present on the pins (2) fixed to the brushes
base.
2.
Assemble the cover onto the brushes base.
3.
Reposition the clips (1) to block.
For the disassembly it is necessary to proceed inversely with above-
mentioned operation
(version 100)
(Version 130)
BRUSHES ASSEMBLY
To assemble the brushes it is necessary that the brushes base is in the
lifted position. If it is not lifted, proceed as follows:
Without the operator seated, turning the key switch clockwise, the
display comes on and after 3 seconds all working groups come off
automatically and are lifted from the floor.
With the brushes base group in lifted position, insert the brushes into
their plate seat underneath the brushes base turning them until the
three metal buttons are properly seated in their slots; rotate energically
the brushes to push the button towards the coupling spring until they
get blocked.
The figure shows the rotating sense for brushes coupling.
For a longer life of the brushes we suggest to invert daily their position.
Whenever brushes result to be deformed we suggest to reassemble
them in the same position, in order to avoid that the different
inclination of the bristles causes excessive motor overload or
troublesome vibrations.
FLOOR CLEANING
RECOVERY TANK
Verify that the squeegee hose couplings (1/2) are correctly inserted into
their seats and that the exhaust hose plug (4) placed in the rear part of
the machine is well closed.


