background image


16                  

7- Instructions for Use 


Combustion Control:


Open (+), slide to the right 

Close (-), slide to the left 


Ignition 


1.


It is extremely important, when first using or lighting for the first time for the season, to thoroughly 

examine the chimney and to make sure it is clean and unobstructed.  Ensure the Chimney is swept 

regularly, If necessary, contact your local chimney sweep. 

2.


Do not overload the appliance, the appliance is designed to display a beautiful flame pattern. 

3.


Completely open both combustion air controls, on each door, pushing it to the right. On the base of 

the fire use a small amount of easily flammable material such as scrunched up paper, firelighters, 

pinecones.  Then lay fine kindling around and on this base in such a way that they are interlocking 

and  self-supported, thus allowing air to flow around them and without the pile collapsing and 

suffocating. 

4.


Once the kindling is well alight, add some small split logs to the kindling stack, resting against each 

other to allow maximum air flow around the wood and so the kindling doesn’t collapse.  Use about 

1kg of split small logs of dry wood. 

5.


Keep the door slightly open, allowing the amount of air needed for a quick and efficient ignition, 

keeping the combustion air control fully open.  Never leave the fire unattended whilst the door is left 

ajar. 

6.


After 5 minutes close the door and reduce both  the door combustion air controls to reduce the 

combustion air intake.  Don’t over fire the heater by leaving controls open continuously. 

7.


Ensure there is a good amount of coal bed and each additional log is well lit before shutting down the 

fire. 


After Firing 


1.


Slowly open the door, spread the embers evenly across the furnace base. 

2.


Place the wood logs (approximately 1 - 2kg each) horizontally left to right, keeping the log away from 

the door glass.  Do not overload the appliance – check your model in the specifications table for the 

maximum permissible load. 

3.


Choose a position in the combustion air control to produce a gentle, long-lasting burn, avoid 

uncontrolled burning with the air control left open. 

Note:- single sided unit shown 

Summary of Contents for ADH100DL

Page 1: ...d by Castworks Pty Ltd 12 Fiveways Boulevard Keysborough VIC 3173 TESTED IN ACCORDANCE WITH AS NZS 4012 2014 AS NZS 4013 2014 Please read this manual thoroughly before installing and starting your fre...

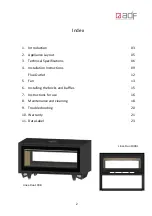
Page 2: ...cal Specifications 06 4 Installation Instructions 09 Flue Outlet 12 5 Fan 13 6 Installing the bricks and baffles 15 7 Instructions for use 16 8 Maintenance and cleaning 18 9 Troubleshooting 20 10 Warr...

Page 3: ...om the sun and transform it into chemical energy The trapped energy e g in the form of wood pellets coal are called biomass fuels and can be converted into various forms electricity fuel or heat Bioma...

Page 4: ...entilated Generally green wood should be left to season for two years Wood to Avoid Softwoods and low density wood This kind of firewood release a lot of heat but burn too quickly and projects embers...

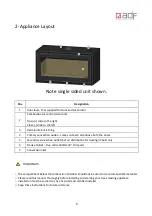
Page 5: ...e both the doors 5 Secondary convection outlet hot air distribution for ducting Inbuilt only 6 Smoke Outlet Flue collar 200mm 8 Crimped 7 Convection inlet Important o The compartment below the combust...

Page 6: ...Factor g kg 1 1 Maximum firewood load kg 10 Minimum clearance distances from combustible materials mm See page 10 Flue Diameter mm 200 Recommended Fuel Burn only Harwood Moisture 20 Electrical Specifi...

Page 7: ...air must be supplied to the room with the heater a minimum equivalent to half the cross sectional area of the flue ie 160cm2 free air o Follow the clearances to combustible materials as shown on page...

Page 8: ...DO NOT USE FLAMMABLE LIQUIDS OR AEROSOLS IN THE VICINITY OF THIS APPLIANCE WHEN IT IS OPERATING o WARNING DO NOT STORE FUEL WITHIN THE HEATER INSTALLATION CLEARANCES o WARNING WHEN OPERATING THIS APPL...

Page 9: ...flue The active flue must be 8 for the entire length of the flue and always less than 45 degrees from the vertical The Flue terminal must meet the minimum height and external clearances for the flue...

Page 10: ...r glass is 350mm The side clearance to the side of the heater is 150mm to combustibles ie island bench or log storage or similar The clearances to combustibles in front of either glass door is 1200mm...

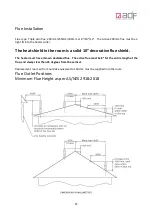
Page 11: ...d in the room is a solid 10 decorative flue shield The heater must have its own dedicated flue The active flue must be 8 for the entire length of the flue and always less than 45 degrees from the vert...

Page 12: ...so be as high as any nearby structure within a 6m Radius AS 2918 2018 External Requirements Refer to AS NZS 2918 2018 Note All external air vents ceiling penetrations must be bird rodent proofed with...

Page 13: ...the base will need a custom designed fan cut out in the bench with air supply to each fan below the heater base A cable will need to run from the heater to a wall mount controller the 240V power supp...

Page 14: ...ystem is well dimensioned ensuring proper drainage and that it complies with the Australian standards in force so that there is no undue smoke escape into the surrounding space Keep combustible and fl...

Page 15: ...he central one across the middle on the side bricks and the outer C channel support bars 6 front and back Begin with the side baffle bricks resting on the side bricks then insert the middle brick and...

Page 16: ...resting against each other to allow maximum air flow around the wood and so the kindling doesn t collapse Use about 1kg of split small logs of dry wood 5 Keep the door slightly open allowing the amoun...

Page 17: ...ng smoke or even flame out into the room Excessive combustion does not necessarily translate into more heating power nor into an increase of efficiency Furnacing may also cause irreparable damage to t...

Page 18: ...a small fire initially and keep windows open for ventilation o Clean the chimney and the flame baffle at least once a year using a qualified technician if necessary o Periodically check and replace th...

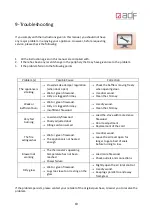
Page 19: ...burn Wet or green firewood Dirty or clogged chimney Insufficient firewood Use dry wood Clean the chimney Very fast burning Low density firewood Poorly adjusted door Filling cord consumed Load the sto...

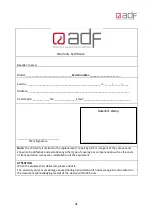
Page 20: ...od 2 The complaint must be presented and validated by one of our agents and endorsed by ADF 3 The installation use and maintenance conditions described in this manual have been strictly respected and...

Page 21: ..._____________________________ Client Signature Note The Warranty is limited to the replacement repair by ADF or its agent of the components known to be defective and excludes any other type of coverag...

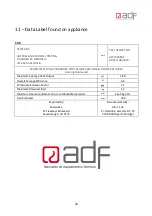
Page 22: ...2014 AS NZS 4013 2014 Burning Hardwood Maximum Avearge Heat Output kW 18 9 Overall Average Efficiency 60 Particulate Emission Factor g kg 1 1 Maximum firewood load kg 12 Minimum clearance distances f...

Reviews: