background image

7

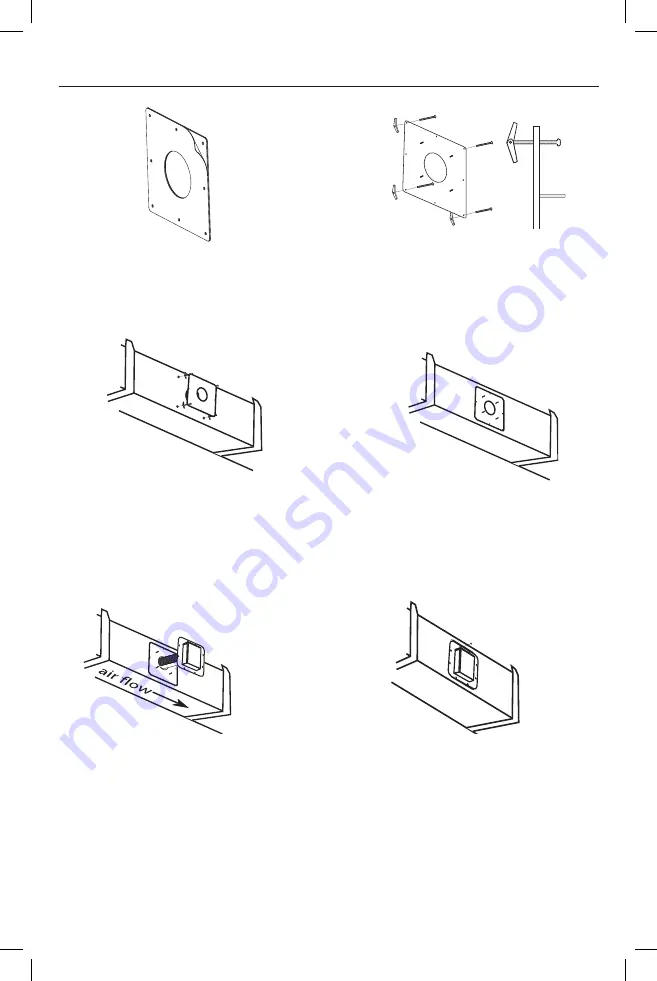
Stud

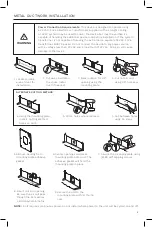
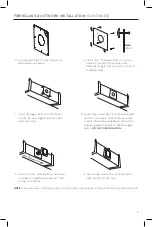
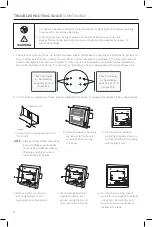
5. Remove backing from the mounting 

plate adhesive gasket.

6.  Insert (4) 2” Threaded bolts into screw 

holes at corners of mounting plate. 
Attach (4) toggle bolt anchors to ends of 
threaded bolts.

7. Insert (4) toggle bolts into 3/8” holes 

in duct. Be sure toggle anchors open 
after inserting.

8. Center large opening in the mounting plate 

over 3.5” opening in duct and press plate 
to duct. The adhesive gasket will hold the 
mounting plate into place. Tighten toggle 
bolts 

- DO NOT OVERTIGHTEN.

9. Insert unit into opening. Be sure the air 

will pass through the ActivePure

®

 Cell 

honeycomb matrix.

10. Secure the unit to the mounting plate 

with four (4) thumb nuts.

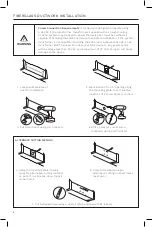
FIBERGLASS DUCTWORK INSTALLATION 

(CONTINUED)

NOTE:

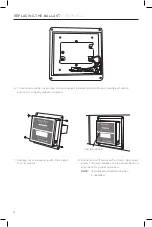
   Unit requires continuous power. Do not install where power to the unit will be cycled on and off.

Summary of Contents for B1013U

Page 1: ...READ MANUAL CAREFULLY FOR PROPER USE AND OPTIMAL OPERATION ...

Page 2: ...placement Parts 3 Recommended Installation Tools 4 Installation Requirements 4 Metal Ductwork Installation 5 Fiberglass Ductwork Installation 6 7 Maintenance UV Lamp Indicator 8 Changing the ActivePure Cell 8 Replacing the Ballast 9 10 Troubleshooting Guide 11 13 Warranty Information 14 FCC Declaration of Conformity 15 Responsible Party 15 PRODUCT OVERVIEW Congratulations on your purchase of the A...

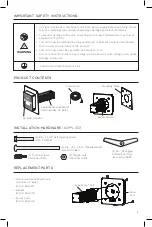
Page 3: ...ctrician failure to do so will void warranty of the product This unit must never be used with an extension cord Do not connect this unit to any voltage source above 32 volts doing so will cause damage to the unit Power Cord Mounting Plate UV bulb indicator Replaceable ActivePure Cell includes UV Bulb Safety Switch IMPORTANT SAFETY INSTRUCTIONS PRODUCT CONTENTS INSTALLATION HARDWARE SUPPLIED REPLAC...

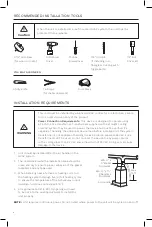
Page 4: ... 4 Nut Driver Bit Min 9 x 9 Metal Ductwork Min 10 x 10 Fiberglass Ductwork Air Handle Max 15 ft RECOMMENDED INSTALLATION TOOLS INSTALLATION REQUIREMENTS When the unit is installed in a roof mounted HVAC system the unit must be protected from elements This unit must be installed by a licensed HVAC contractor or electrician Failure to do so will void warranty of the product Power Connection Requirem...

Page 5: ...tal duct if needed 1 4 a Using the mounting plate mark 4 Cutting Method holes on duct b Drill 4 holes where marked c Cut between holes using tin snips ALTERNATE CUTTING METHOD METAL DUCTWORK INSTALLATION 5 Remove backing from mounting plate adhesive gasket Power Connection Requirements This device is designed to operate using a 24 VAC 40Va transformer Transformers supplied with a straight cooling ...

Page 6: ...g 3 5 hole saw 4 Drill 4 holes at corner screw locations using a 3 8 drill bit FIBERGLASS DUCTWORK INSTALLATION Power Connection Requirements This device is designed to operate using a 24 VAC 40Va transformer Transformers supplied with a straight cooling or HVAC system may be used to power the device but must be verified it s capable of handling the additional device load before installation If th...

Page 7: ...r large opening in the mounting plate over 3 5 opening in duct and press plate to duct The adhesive gasket will hold the mounting plate into place Tighten toggle bolts DO NOT OVERTIGHTEN 9 Insert unit into opening Be sure the air will pass through the ActivePure Cell honeycomb matrix 10 Secure the unit to the mounting plate with four 4 thumb nuts FIBERGLASS DUCTWORK INSTALLATION CONTINUED NOTE Uni...

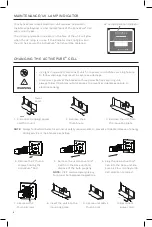
Page 8: ... into the base unit Be sure Air Flow Honeycomb Cell direction is correct 7 Secure with 2 thumb screws 8 Insert the unit into the mounting plate 9 Secure unit with 4 thumb nuts 10 Reconnect power cord MAINTENANCE UV LAMP INDICATOR CHANGING THE ACTIVEPURE CELL 1 Disconnect unplug power cord from unit NOTE Always follow OHSA electrical lockout safety requirements to prevent accidental release of ener...

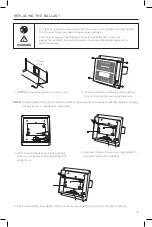
Page 9: ...ire straight out 1 Disconnect unplug power cord from unit REPLACING THE BALLAST Power Cord NOTE Always follow OHSA electrical lockout safety requirements to prevent accidental release of energy during service or maintenance activities UV Light in operation disconnect unit from power cord before servicing failure to follow warnings may result in severe eye damage Disconnect power at the breaker or ...

Page 10: ... power cord turn breaker or fuse power back on and check for proper operation NOTE LED indicator should be lit when in operation LED INDICATOR 6 To reconnect wiring insert wire into wire pocket in ballast until bottomed Gently pull wire to ensure it is properly locked into place REPLACING THE BALLAST CONTINUED ...

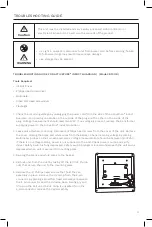
Page 11: ...power is not supplied to the unit Check power source and verify Induct Safety Switch is fully depressed Safety switch plunger is located underneath the unit and is depressed when unit is secured to mounting plate 3 Re plug the black and white wires to the ballast 4 Remove unit from the duct by taking off the 4 11 32 thumb nuts that secure the unit to the mounting plate 5 Remove the 2 Phillips head...

Page 12: ...or tabs and pulling wire straight out 6 To reconnect wiring insert wire into wire pocket in ballast until bottomed Gently pull wire to ensure it is properly locked into place 1 Disconnect unplug power cord from unit NOTE Always follow OHSA electrical lockout safety requirements to prevent accidental release of energy during service or maintenance activities TROUBLESHOOTING GUIDE CONTINUED 2 If con...

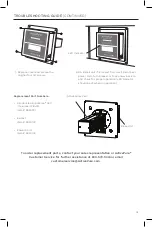
Page 13: ... cover and secure the original four 4 screws Replacement Part Numbers Ozone Free ActivePure Cell Includes UV Bulb Item 9950231 Ballast Item 9950102 Power Cord Item 9950103 Base Unit ActivePure Cell To order replacement parts contact your sales representative or ActivePure Customer Service for further assistance at 800 572 1446 or email customerservice ActivePure com TROUBLESHOOTING GUIDE CONTINUED...

Page 14: ...epresentatives only Warranties are voided if a product is purchased through unauthorized channels this includes company sponsored or independent websites that are not authorized to use ActivePure Induct Guardian I trademarked names images and logos as well as Internet auction sites e g eBay and craigslist To confirm warranty coverage prior to purchasing a product contact ActivePure Customer Servic...

Page 15: ... be determined by turning the equipment off and on the user is encouraged to try to correct the interference by one or more of the following measures Reorient or relocate the receiving antenna Increase the separation between the equipment and receiver Connect the equipment into an outlet on a circuit different from that to which the receiver is connected Consult the Independent Owner for help FCC ...

Page 16: ...n regarding the use of this product please call Customer Service 1 800 572 1446 or email at customerservice ActivePure com www activepure com ActivePure Manufacturing LLC Bristol VA 24201 800 572 1446 ActivePure Manufacturing All Rights Reserved ...

Reviews: