background image

TRAMPOLINE FRAME ASSEMBLY

Refer to Parts List for identification of parts.

WARNING: 2 adults in good physical condition are required for the following assembly. Wear proper shoes

and maintain balance to prevent a fall. Failure to follow all instructions and warnings exactly may 

result in serious injury.

1. Lay out all trampoline parts in groups

(just like picture)

3. Attach the top rail as picture.

6. Now the frame assembly is complete.

7. With stitching portion facing down, lay jumping

mat inside frame and attach a spring into one

of the triangle rings on the mat. Then attach spring

with ring to frame.

WARNING: Trampoline is under heavy tension,

more effort may be required to attach springs to

frame. Be careful not to pinch fingers or slip.

Serious injury may occur!

Continue until you form a large

circle. Joining the last link may

require two or more adults in

good physical condition. With a

second person holding the opposite

end, bring both sides of the circle 

firmly together and make them 

secured.

2. Begin by attaching two leg extensions

to assemble one “W” shape leg with

rail screws (part H).

4. 

Attach the leg assemblies making

all secured.

5. 

Summary of Contents for 9401056089024

Page 1: ... lawn ATTENTION This trampoline is supplied with a safety net and must be installed This safety net is designed to significantly reduce the trampoline user from falling off This net is NOT designed for rebounding climbing or hanging off Failure to install the safety net or misuse of the net will increase the risk of injury The safety net does not replace the need for supervision and to ensure that...

Page 2: ...lease have the following information ready 1 Owner s Manual 2 Model Number 3 Description of Parts 4 Part Number 5 Date of Purchase Customer service number 0800 422 274 MON FRI 8AM 5PM SAT SUN 9AM 4PM Warning ITEM 6FT 3W 75KG 100KG 120KG 150KG 150KG 150KG 150KG 150KG 8FT 3W 10FT 3W 12FT 4W 13FT 6 4W 14FT 6 4W 15FT 6 5W 15FT 6W Max Weight Limited Marketed By The Warehouse LTD 26 The Warehouse Way No...

Page 3: ... the product safety tips warnings and proper techniques for jumping on your trampoline are included in this manual for your safety and an extended product lifespan All users and supervisors should therefore familiarize themselves with these instructions Anybody who chooses to use the trampoline must be aware of their own limitations with regards to performing skills on this trampoline Ÿ Trampoline...

Page 4: ...ng or any kind of deterioration of the mat Bent or broken frame parts such as the legs Broken missing or damaged springs Damaged missing or insecurely attached frame pad Protrusions of any types especially sharp types on the frame springs or mat IF YOU FIND ANY OF THE PREVIOUS CONDITIONS OR ANYTHING ELSE THAT YOU FEEL COULD CAUSE HARM TO ANY USER THE TRAMPOLINE SHOULD BE DISASSEMBLED OR SECURED FR...

Page 5: ... 1 1 1 1 1 1 1 1 6 36 0 0 0 6 3 3 3 3 4 6 1 1 1 1 1 1 1 1 1 6 6 6 8 12 8 12 8 12 10 12 6 4 6 4 6 5 6 8 12 8 12 8 12 12 10 42 48 60 72 84 80 96 90 108 100 108 6 6 6 8 12 8 12 10 12 8 12 1 1 1 1 1 3W 3W 3W 4W 6 4W 6 5W 6W 6W 7FT 8FT 10FT 12FT 13FT 14FT 15FT 16FT ...

Page 6: ...ST PARTS ITEM A Frame Cover Jumping Mat Top Rail Springs Leg Extention W Shaped Leg Screw Tool Optional B C E F G H I A Frame Cover B C F G H I E Jumping Mat Top Rail F W Shaped Leg Piece Leg Extension Spring Screw Tools ...

Page 7: ... lay jumping mat inside frame and attach a spring into one of the triangle rings on the mat Then attach spring with ring to frame WARNING Trampoline is under heavy tension more effort may be required to attach springs to frame Be careful not to pinch fingers or slip Serious injury may occur Continue until you form a large circle Joining the last link may require two or more adults in good physical...

Page 8: ...between the first two directly across from each other 8 10 13 14 11 12 9 Springs under heavy tension may require adjacent springs to be attached every four or five holes making the springs tension averagely distributed Attach remaining springs until all springs are placed on frame securely Tie all black straps to top rail of frame Do not tie to springs Your trampoline is now ready for the enclosur...

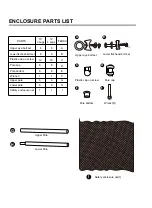
Page 9: ...RTS Upper eye bolt set B 6 8 Lower flat head bolt set Wrench Plastic cap on screw Pole cap Pole bottom Upper pole Lower pole Safety enclosure net Safety enclosure net 1 G H I Upper Pole Wrench 1 Pole cap Pole bottom Plastic cap on screw Lower Pole A C B D E F Upper eye bolt set Lower flat head bolt set ...

Page 10: ...ining poles 1 2 Place the safety enclosure net on trampoline tidily as shown ready for next step After succeeding in the first pole repeat to all poles 4 After firmly clamping all the poles to the trampoline legs put the cup hat on each of the upper poles tightly 3 Note Firmly fix the lower pole and the leg extension with Upper eye bolt set A and Then fasten the bolt by wrenching on Lower flat hea...

Page 11: ...ns your trampolines safety enclosure is now complete 6 Repeat with remaining until all the cup hats are fastened to the net 8 Ending at the entrance slide fastener and hooks Responsible adult supervisor must re zip the slide fastener and re hook all the hooks securely before jumping begins ...

Reviews: