background image

www.acti.com

  Hardware Manual 


22 

Other Connections 

This section describes the procedures in preparing the external devices that you can connect to 

the camera. The camera supports DC12V power input, Digital Input and Output (DI/DO) and 

Audio Input and Output devices using the bundled terminal blocks. The use of these devices, 

however, is optional.   


Connecting a Power Adapter (Optional) 

In case of using a non-PoE switch or your PoE switch has limited power supply, you can 

purchase a power adapter and directly connect the camera to a power outlet. The power adapter 

must be connected to the supplied terminal block before use. 


To do this, follow the procedures below: 


1.


Loosen the screws of the 

12V

 and 

GND

 pins of the power terminal block. 


2.


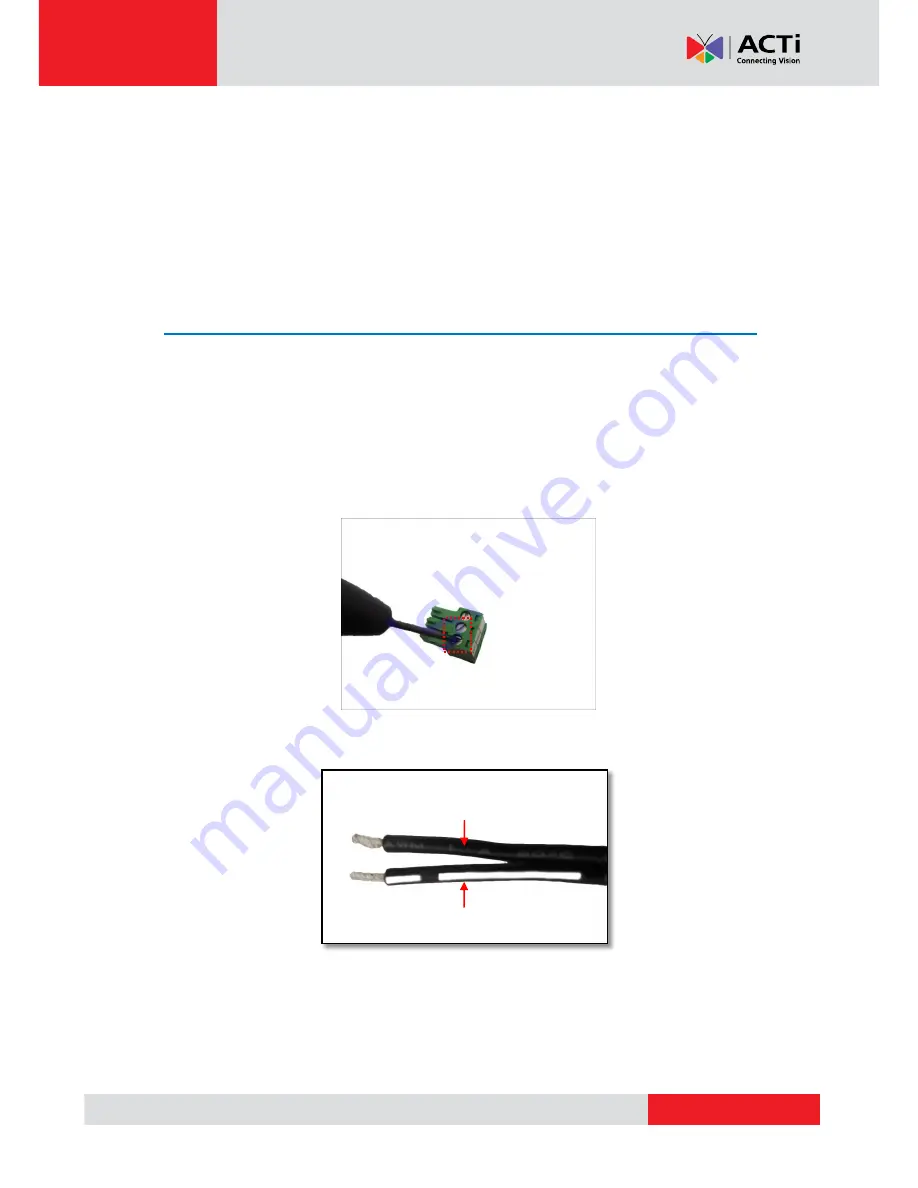
Take note that a standard power adapter cable has two (2) different wires: 


White stripe: Connects to 12V Pin 

Connects to GND Pin 

Summary of Contents for KCM-7111

Page 1: ...Encoder Firmware V4 06 09 User s Manual Outdoor Dome KCM Series Hardware Manual KCM 7311 KCM 7211 KCM 7111 2013 12 11...

Page 2: ...11 Step 3 Prepare for Waterproof Installation 12 Waterproof Solution with Naked Cable 13 Waterproof Solution with Conduit 15 Step 4 Install the Camera to the Surface 19 Step 5 Connect the Cable s 20 S...

Page 3: ...Hardware Manual 3 Other Adjustments 28 How to Adjust Focus and Viewing Angle 28 KCM 7311 KCM 7211 28 KCM 7111 30 Accessing the Camera 31 Connect the Equipment 31 Configure the IP Addresses 31 Access t...

Page 4: ...iting of this manual Please inform your local office if you find any inaccuracies or omissions We cannot be held responsible for any typographical or technical errors and reserve the right to make cha...

Page 5: ...ice personnel under the following conditions 1 When the power supply cord or plug is damaged 2 If liquid has been spilled or objects have fallen into the video product 3 If the inner parts of video pr...

Page 6: ...a package comes with the following items Camera Conduit Gland Cable Gland Hexagon Wrench Pan Bracket Wrench Mounting Screw Kit Terminal Block for Power Terminal Block for DIO DO Terminal Block for Aud...

Page 7: ...www acti com Hardware Manual 7 Physical Description KCM 7111 KCM 7311 KCM 7211...

Page 8: ...hen release the Reset Button 5 Digital Input Output This connector connects to digital input or output devices such as an alarm trigger panic button etc Digital Input DI and Digital Output DO devices...

Page 9: ...ount Use the mounting screw kit included in the camera package no additional accessories are required See Installing the Camera on a Surface on page 10 for installation instructions Flush Mount PMAX 1...

Page 10: ...will be routed pass through the surface or along the surface If the cables will pass through the surface a Mark and drill the conduit hole location on the surface as shown on the drill template b Remo...

Page 11: ...Remove the plastic covering the camera 2 Loosen the three 3 screws securing the dome cover 3 Carefully lift to open the dome cover and place it on the side of the camera NOTE Do not abruptly lift the...

Page 12: ...t devices or external power adapter will be connected to the camera See Waterproof Solution with Conduit on page 15 Determine the type of waterproof solution that is applicable to your installation re...

Page 13: ...describes the procedures in using the bundled cable gland and an exterior grade Ethernet cable 1 Disassemble the cable gland as shown below 2 Insert the clamping nut into the Ethernet cable 3 Insert t...

Page 14: ...will pass through the surface do the following a Pull the network cable through the bottom conduit hole b Insert the sealing insert with claw into the cable gland body and then attach the clamping nut...

Page 15: ...ncluded in the camera package For use with 3 8 flexible conduit For use with 1 2 flexible conduit Flexible Conduit 3 8 or 1 2 Trade size not included in the package Network Cable CAT 5 or CAT 6 not in...

Page 16: ...ut devices or an external power adapter pull the cables through the flex conduit without connectors The terminal blocks will be attached once the cables pass through the camera hole later 4 Insert the...

Page 17: ...Conduit Hole 7 If the cable will be routed along the surface skip this step If the cable will pass through the surface do the following a Pull the network cable and other cables if any through the bo...

Page 18: ...ww acti com Hardware Manual 18 8 If connecting other cables attach the terminal blocks to the cables See Other Connections on page 22 9 Proceed with Step 4 Install the Camera to the Surface on page 19...

Page 19: ...surface and attach the three 3 supplied screws to secure the camera CAUTION When using electric screwdrivers be careful not to touch the internal camera components while attaching the screws Since el...

Page 20: ...ling insert and the clamping nut to the gland body Using Flex Conduit Using Naked Cable 2 Connect the network cable to the Ethernet port and the other cables if any to their corresponding connectors o...

Page 21: ...r model for detailed information please refer to the following sections For KCM 7111 camera models see KCM 7111 on page 30 For KCM 7311 and KCM 7211 camera models see KCM 7311 KCM 7211 on page 28 Step...

Page 22: ...r is optional Connecting a Power Adapter Optional In case of using a non PoE switch or your PoE switch has limited power supply you can purchase a power adapter and directly connect the camera to a po...

Page 23: ...nd the other to the GND pin 4 Tighten the screws of the 12V pin and the GND pins to secure the wire connection 5 Set the prepared power adapter for connection later Below is an example of a power adap...

Page 24: ...activated by the camera upon an event inside the camera For example you can connect an alarm horn to the camera as such when an event occurs inside the camera e g detected intruder the alarm horn wil...

Page 25: ...TTL compatible logic levels Voltage To trigger low Logic level 0 0V 0 4V Normal high Logic level 1 3 1V 30V Current 10mA 100mA DO Connection design Transistor Open Collector Voltage Current 24V DC 100...

Page 26: ...ate relay please refer to its specifications and make sure they match the above design The triggering circuit voltage has to be around 12V DC and the switch controlled circuit voltage has to match the...

Page 27: ...e Pin Mapping Instructions Audio Output 1 GND Connect the wires of the audio output device to GND Pin 1 and AUDIO OUT Pin 2 2 DI1 Audio Input 3 GND Connect the wires of the audio input device to GND P...

Page 28: ...le KCM 7311 KCM 7211 Camera Parts Overview Adjustment Procedures 1 Loosen the tilt adjustment screws adjust the tilt and then tighten back the screws to fix the tilt position 2 Move the rotation adjus...

Page 29: ...e Manual 29 NOTE If you need to tighten or loosen the pan adjustment knob and adjustment by hand is not enough insert the bundled pan bracket wrench into the hole on the knob and then push it to the l...

Page 30: ...t and then tighten back the screws to fix the tilt position 2 Move the rotation adjustment to rotate the viewing orientation 3 Loosen the pan adjustment screw and move the pan direction 4 Loosen the f...

Page 31: ...PC both the camera and the PC have to be within the same network segment In most cases it means that they both should have very similar IP addresses where only the last number of the IP address is di...

Page 32: ...lly found When the left mouse is clicked on the camera model name the default browser of the PC is automatically launched and the IP address of the target camera is already filled in the address bar o...

Page 33: ...amera already filled in the address bar of the browser Use the default IP address of the camera If there is no DHCP server in the given network the user may have to manually assign the IP addresses to...

Page 34: ...are Manual 34 Manually adjust the IP address of the PC In the following example based on Windows 7 we will configure the IP address to 192 168 0 99 and set Subnet Mask to 255 255 255 0 by using the st...

Page 35: ...IP Utility With the procedure shown above all the cameras will have unique IP addresses starting from 192 168 0 101 In case there are 20 cameras selected the last one of the cameras would have the IP...

Page 36: ...Functionality Internet Explorer Live Video Yes Live Video Area Resizable Yes PTZ Control Yes Capture the snapshot Yes Video overlay based configuration Motion Detection regions Privacy Mask regions Y...

Page 37: ...in page The HTTP port number was not added behind the IP address since the default HTTP port of the camera is 80 which can be omitted from the address for convenience Before logging in you need to kno...

Reviews: