background image

6     

Quick Installation Guide


MOUNT THE ENR

4

Before you start, plan the installation. Determine how many cables will be 

connected to the mainboard and where the cables will be routed.

There are three (3) alloted cable holes on the bottom of the ENR, and one on the 

top.

After installing the hard disk drive, prepare to mount the ENR to the wall.

NOTE:

 Make sure the wall is strong enough to withstand the weight of the ENR and other connected 

cables.

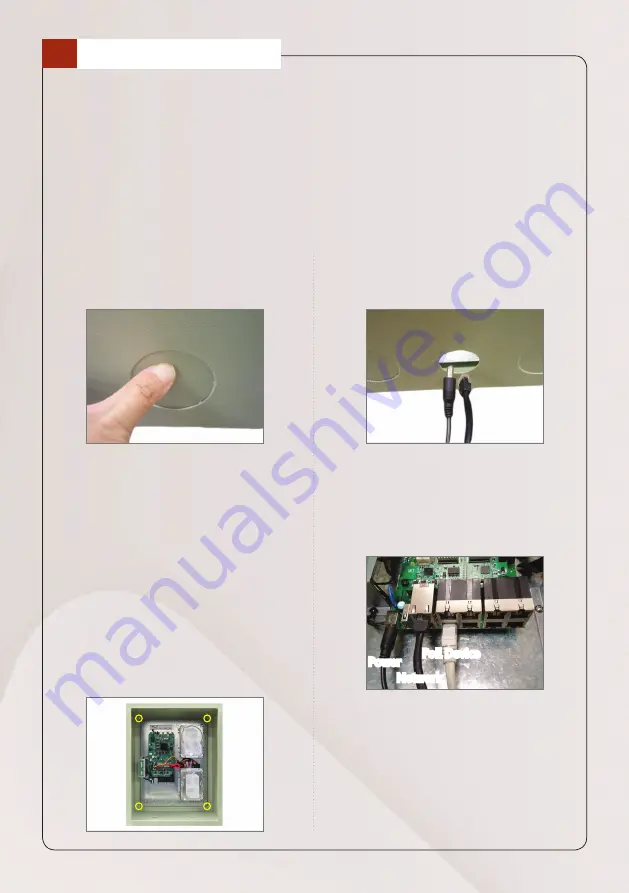
Step 1

Push to remove the temporary covers 

of the cable holes, as needed.

Step 2

Align the ENR to the wall and mark 

the position of the four (4) screw 

holes.

Step 3

Install the ENR to the wall using four 

(4) screws. 

NOTE:

 The wall screws are not included in the 

package. Use appropriate screws according 

to the wall material where the ENR will be 

installed.

Step 4

Route the cables through the cable 

holes of the ENR.

Step 5

Connect the cables to the connectors 

on the mainboard accordingly  

(see “

CONNECTIONS

” on the next 

page for more details).

Power

Network

PoE Device

Summary of Contents for ENR-620P

Page 1: ...Quick Installation Guide ENR 620P 9 Channel 2 Bay Lockbox Standalone NVR with 8 port PoE connectors V190124 ENR 621P 32 Channel 2 Bay Lockbox Standalone NVR with 16 port PoE connectors ...

Page 2: ...r installation Network cameras Monitor with HDMI input and the cable Network cables Network switch At least one ACTI certified 3 5 inch SATA hard disk Check the list of certified models in http www acti com hddselector If you have any problems during installation please contact us via https www acti com CHD or US Canada toll free number 1 866 410 2284 ACTI This package includes the following items...

Page 3: ...Power Button Digital Input Output Audio Input Output DC 48V Power Input USB 3 0 Port LED Indicators Power Blue System Red HDD Activity Green USB 2 0 Ports 2 HDMI Port Ethernet Ports LAN WAN PoE Ports ENR 620P x 8 Hard Disk Bay 2 HDDs are not included in the package 1 2 3 4 5 6 7 8 9 10 11 12 ENR 620P ...

Page 4: ...1 3 10 AC Power Input Power Button Audio Input Output Digital Input Output Reset Button USB 3 0 Port Ethernet Ports LAN WAN PoE Ports 16 HDMI Port Hard Disk Bay 2 HDDs are not included in the package USB 2 0 Ports 2 1 2 3 4 5 6 7 8 9 10 11 ENR 621P 2 5 1 7 ...

Page 5: ... or HDD2 on the ENR user interface Step 5 Connect the data cable and the power cable to the hard disk Power Cable Data Cable NOTE Take note of the connectors direction Step 7 Tie the data and power cables using the black velcro strip to organize the cables NOTE Take note of the cable direction when installing the hard disk drives Step 6 Attach the four 4 screws to secure the hdd brackets to the lo...

Page 6: ...ight of the ENR and other connected cables Step 1 Push to remove the temporary covers of the cable holes as needed Step 2 Align the ENR to the wall and mark the position of the four 4 screw holes Step 3 Install the ENR to the wall using four 4 screws NOTE The wall screws are not included in the package Use appropriate screws according to the wall material where the ENR will be installed Step 4 Rou...

Page 7: ... Source Network WAN LAN ENR automatically assigns IP addresses to cameras 192 168 0 104 192 168 0 101 192 168 0 102 192 168 0 103 Network Cameras 1 3 5 7 2 4 6 8 ENR 621P USB Devices HDMI Monitor Default IP Address 192 168 0 10 DHCP assigned Optional Connect to another network via WAN for remote client connection Power Source Network WAN LAN ENR automatically assigns IP addresses to cameras 192 16...

Page 8: ...remember to change it 1 Inside the lockbox press the POWER BUTTON to turn on the ENR 2 On the Login screen using the on screen keyboard type the Account and Password The User Interface System Setup Full Screen Capture Screenshot Logout Power Off Device List Events List Live View User System Date Time Playback HDD LAN WAN Status Indicators Enter Numeric Keypad ...

Page 9: ...w screen click Add 2 Click Add Camera from the pop up menu Or click other network devices to add them in the ENR You may also group devices by creating a group However for this quick installation guide we will only cover adding cameras in general 3 Click a model to select the camera The text of the selected camera will turn orange 4 Repeat the above step to add more cameras 5 Click Add to complete...

Page 10: ... Drag a model to the Live View screen Add Camera Manually If you are adding cameras located in another network click Add Camera Manually Fill in the IP address HTTP Port Account and Password Then click Add Or use the RTSP page for RTP protocol Double click the page tab to rename it Right click on a channel to access the pop up menu NOTE Menu options vary depending on camera model ...

Page 11: ...o configure video settings set up motion detection event and schedule recordings To modify the camera settings click Get Camera Settings Modify as needed then click Apply To configure motion setup click Setup To resize the detection area drag the box on the lower right corner of the area To set the event trigger double click the Edit icon To configure the recording schedule select a recording or e...

Page 12: ...CHECK RECORDINGS 11 On the Live View screen click the Playback icon on the bottom right corner to enter the Playback screen On the time bar drag the current time indicator to your desired position and then click the Playback icon ...

Page 13: ... storage settings of the ENR Maintenance Includes firmware upgrade and station management system Permission Includes users persmission setup Log Lists the system log of the ENR Joystick Includes joystick configuration For PoE models Configure the PoE ports individually in Network PoE Due to continuous product improvements some contents may have changed from the time time this documentation was pri...

Reviews: