background image

Hisense Refrigerator

6

Description of the appliance

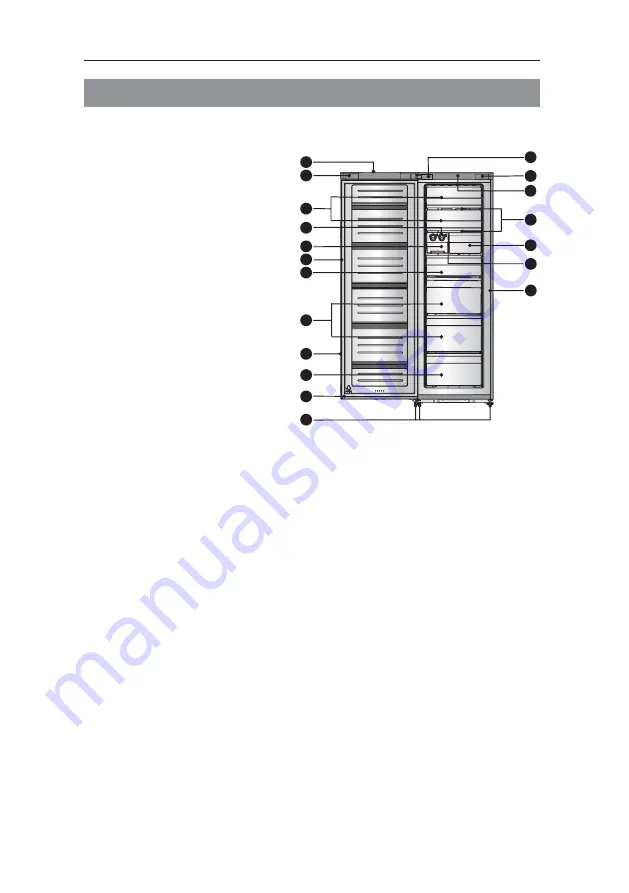
View of the appliance(HR6VFF280SD,HR6VFF280D)

Upper cover of door
Corner cover

3

6.

10.

Block cover
Upper cover

19. Cabinet

1.
2.

. Flap cover

4. Twist ice maker
5.

Handle(back)

7. Upper freezer drawer
8. Middle freezer drawer(huge box)
9. Freezer door

Lower freezer drawer

11. Freezer door seal
12. Adjustable bottom feet
13. Hinge cover
14.
15.
16. Glass shelf
17. Narrow freezer drawer
18. Shelf bracket(inside)

Ice storage box

Note: Due to constant improvement of our products, your refrigerator may be
slightly different from this instruction manual, but its functions and using methods
remain the same. To get more space in the freezer, you can remove drawer(except
lower freezer drawer), installation bracket and integrative ice maker/twistable ice
tray.

Note: To get the best energy efficiency of this product, please place all shelves,
drawers and baskets on their original position as the illustration above.

3

4

5

6

7

8

9

10

11

12

13

14

15

16

2

17

18

19

1

freezer may be

Summary of Contents for GY-NE31FRS

Page 1: ...UPRIGHT FREEZER USER MANUAL GY NE31FRS GY NE31FRS ...

Page 2: ...luding children with reduced physical sensory or mental capabilities or lack of experience and knowledge unless they have been given supervision or instruction concerning use of the appliance by a personal responsible for their safety Children should be supervised to ensure that they do not play with the appliance ...

Page 3: ...ufacturer Don t try to repair the appliance yourself It is dangerous to alter the specifications or modify this product in any way Any damage to the cord may cause short circuit fire or electric shock Don t place too much food directly against the air outlet on the rear wall of both the refrigerator and freezer compartment as it affects sufficient air circulation Don t place hot items near the pla...

Page 4: ......

Page 5: ...t 100mm from its side to the wall and a clear space in front to allow the doors to open 135 As shown in following diagrams Note This appliance performs well within the climate class from showed in the table below N to T Leveling of appliance For sufficient leveling and air circulating in the lower rear section of the appliance the bottom feet may need to be adjusted You can adjust them manually by...

Page 6: ...arrow freezer drawer 18 Shelf bracket inside Ice storage box Note Due to constant improvement of our products your refrigerator may be slightly different from this instruction manual but its functions and using methods remain the same To get more space in the freezer you can remove drawer except lower freezer drawer installation bracket and integrative ice maker twistable ice tray Note To get the ...

Page 7: ...ently located on the door of the refrigerator A keypad of touch buttons and a digital display allow easy configuration of features and settings in a simple and intuitive manner Touch buttons require only a short press on a button to operate The operation occurs when releasing your finger from the button not while the button is pressed There is no need for applying pressure on the keypad Eco Energy...

Page 8: ... the temperature of the freezer is automatically switched to 15 to minimize the energy consumption The function makes the freezer work in a power saving mode which is useful 3 Eco Energy 4 Alarm In case of alarm Alarm icon will light up and a buzzing sound will start Press Alarm button to stop alarm and buzzing then Alarm icon will turn off When the refrigerator is turned on after a period of inac...

Page 9: ...ich needs to be frozen including meat fish ice cream etc Twistable ice tray Note If the ice tray is used for the first time or has not been used for a long time please clean it before using The twist ice tray is used to make and deposit ice cubes You should use it as follows 1 Pull out the twistable ice tray from the installation bracket 2 Pour water into the ice trays and the water level shall no...

Page 10: ...plug from the mains socket Caution the freezer the internal before putting food in the compartment Do not exceed the storage period indicated by the food manufacturer Hisense Refrigerator 10 Switching off your appliance If the appliance needs to be switched off for an extended period the following steps should be taken prevent mould on the appliance 1 Remove all food 2 Remove the power plug from t...

Page 11: ...e from the mains power and appliance from the mains power and leave the doors open Ventilate the room thoroughly to accelerate the Take care to keep door seals clean Sticky food and drinks can cause seals to stick to the cabinet and tear when you open the door Wash seal with a mild detergent and warm water Rinse and dry it thoroughly after cleaning Only after the door seals are completely dry shou...

Page 12: ...r other compartments Gurgling sound similar to water boiling Popping noise during automatic defrosting Clicking noise before the compressor starts Other unusual noises are due to the reasons below and may need you to check and take action The cabinet is not level The back of appliance touches the wall Bottles or containers fallen or rolling It is normal to frequently hear the sound of the motor it...

Page 13: ...your local council your household waste disposal service or the shop where you purchased the product Hisense Refrigerator 13 Increase the temperature by following the Display controls chapter Check whether the top of the refrigerator is tilted back by 10 15mm to allow the doors to self close or if something inside is preventing the doors from closing The water pan located at the rear bottom of the...

Reviews: