©2017 ACP, Inc.
Cedar Rapids, IA 52404
Page 19 of 24
Part No. 20206401
Revised 01/11/2017
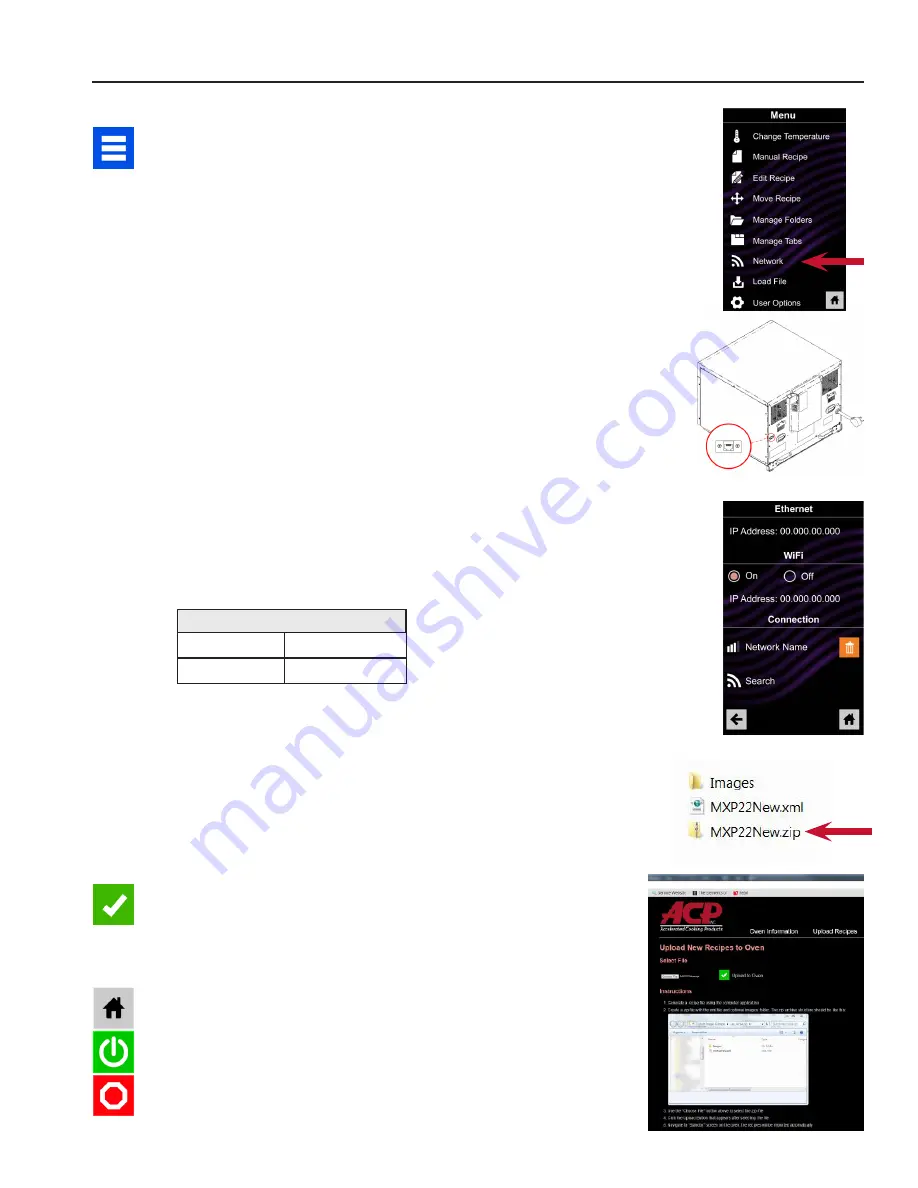
Connect Oven to Network:
1 Touch the blue menu icon at the bottom of the screen
2
Touch the “Network” option.
3
Connect to network using your choice of Ethernet or Wifi:
To connect via Wi-Fi:
•
Enable Wi-Fi capability by touching the “On” option.
• Select the desired Wi-Fi network and enter the
network’s password If the network does not
immediately appear, touch “Search” to locate the Wi-Fi
network from the oven
To connect via Ethernet:
• Make sure the Ethernet cord is plugged into the back of
the oven and wall jack If necessary, use pliers to gently
remove plastic plug from Ethernet port on right rear of
oven Insert Ethernet cable
Connect Computer to Oven via Wi-Fi/Ethernet:
1 Connect computer to same Wi-Fi/LAN network and enter
password
2 An IP address will appear on oven control once it has connected
to the network Open an internet browser window on computer
and type in the IP address exactly as it appears on oven screen
3 Enter your log-in information:
4 The oven and computer are now connected
Transfer Recipe Information via Wi-Fi/Ethernet:
1 After connecting the computer to the oven and logging in, click
on the “Upload Recipes” tab in browser window.
Caution:
Uploading a new file will overwrite existing items on
oven.To ensure items are not lost, first backup files by exporting
to USB drive�
2
Upload zipped XML file (created by the ACP Remote
Programming Interface) by following the instructions on web
page, then touch the green check mark
3
Once the file has been fully uploaded, a message will appear
that says
“Upload Successful!”
The recipes will be imported
when the oven enters standby mode”
4 To cycle the oven through standby mode, touch the home icon
then the green power icon Oven will begin cooling down Touch
the red stop icon to return to home screen Menu items and
settings will be uploaded and ready to use
Log-in Information
Username
ACP_MXP
Password
Express
Oven Programming: Wi-Fi and Ethernet
2


