background image


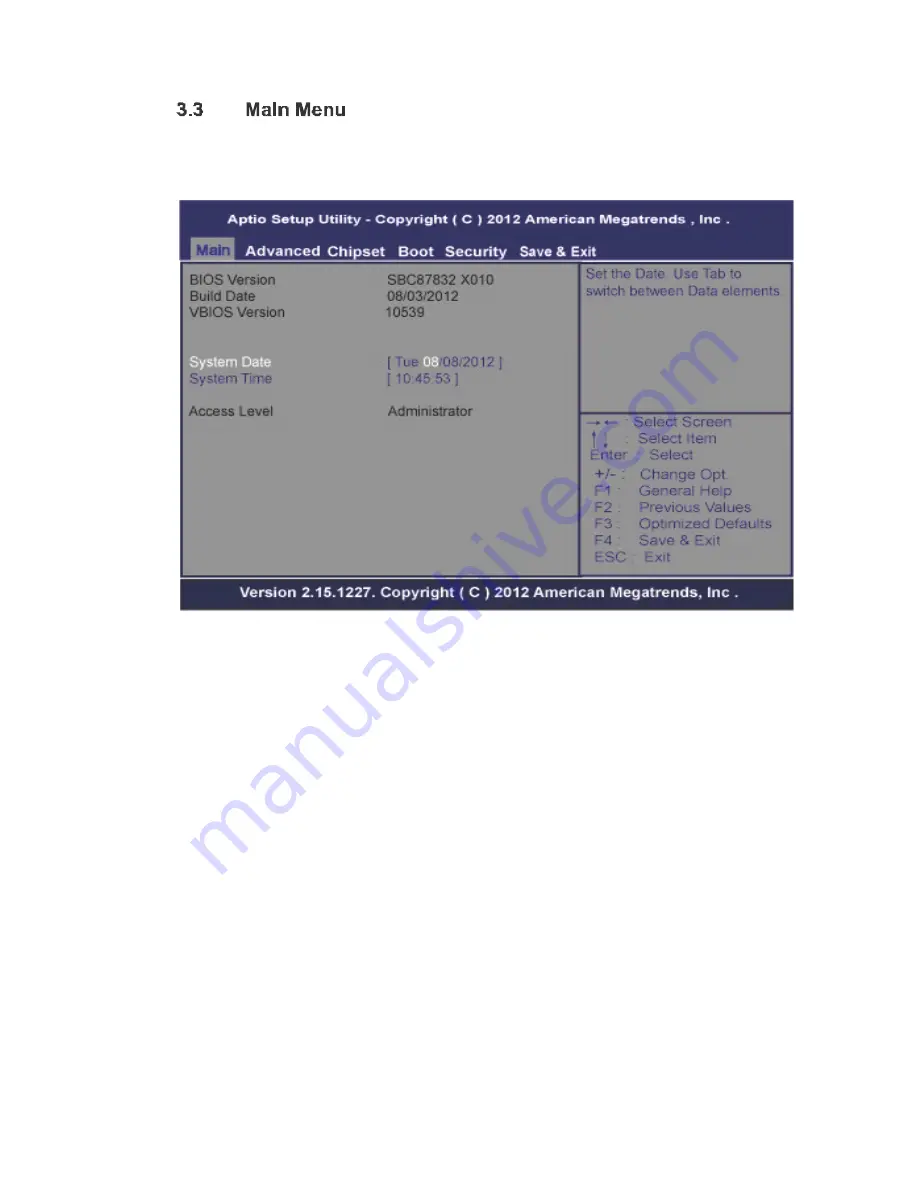
W hen  yo u  first  enter  the  Setup  Utility,  you  will  ente r the  M ain  setu p  screen.  You  can  a lways


return to  the  Main setup  screen by select ing  the M ain  tab. There a re  two  Main Se tup o ptio ns. 
They a re  describ ed in th is sectio n. The M ain BIOS Se tup screen  is shown  be low


z


Use  th is  o ption  to  change  the  system  time  and  da te.  Highlig ht  System  Time  or  System 
Date  using  th e  <Arrow>  keys.  Enter  new  values  through    the  keyboard.  Press  the  <Ta b> 
ke y o r the <Arrow> keys  to mo ve b etween  fields. The  date m ust  be e ntered in M M/DD/YY 
format.  The time is e ntered in  HH:MM:SS  format.


Summary of Contents for FPC 7161

Page 1: ...nd product specifications are subject to change without notice For latest product information please visit Acnodes web site at www acnodes com 14628 Central Ave Chino CA 91710 tel 909 597 7588 fax 909...

Page 2: ...rodu ct at any tim e without notice No pa rt o f this do cum ent ma y be re pro duced stored in a retrie val syste m or transmitted in any form or by any mea ns electronic mechanical pho toco pying re...

Page 3: ...ct th e power cords f ro m FPC7161 be fore makin g a ny insta llatio n Be sure b oth the system an d t he external d evice s are turned OFF Su dden surge of power could ruin sensitive components Make...

Page 4: ...M1 COM2 Connector 11 2 4 Ethernet 12 2 5 Mounting Panel Wall Desktop VESA 13 2 5 1 VESA ARM Wall Mount 13 2 5 2 Panel mount Kit Assembly 13 2 6 HDD Installation 14 2 7 DRAM Installation 16 2 8 Wireles...

Page 5: ...abilities makes FPC716 1 surely a most robust and cost e ffective solutio n FPC71 61 f eatures a technology o f wid e operating temp erature ran ge which allows it to work betwe en 10 C to 5 0 C It i...

Page 6: ...5 USB 2 0 aud io line o ut and Gigabit Ethernet Ad ditiona lly th is slim unit supports panel mou nt wall moun t optional VESA mo unt op tion al and desktop stand opti onal Main CPU Board z CPU AtomT...

Page 7: ...One 2 5 SATA Drive z Net Weight 5 0 Kgs 11 02 lb z Dimension 396 8x 53 9x 247 1mm z Operation Temperature 10C to 50C z Relative Humidi ty 10 to 95 40C Non Cond ensing z Power Input 10 30VDC with phoe...

Page 8: ...The following diagrams sho w the dimension s and outlines of FPC 7161...

Page 9: ...the follo wing illustra tion for I O locations of the FPC7 161 1 POWER SWITCH ATX 2 Termin al Block for DC Power Input 3 2 x USB2 0 4 COM 1 RS 232 422 485 5 COM 2 RS 232 6 2 x ETHERNET 7 2 x USB2 0 8...

Page 10: ...d package should contain the following items FPC7161 unit x 1 Driver CD x 1 Phoenix connector x 1 Screws for HDD x 4 Panel mount kit x 6 If you cannot find the package or any items are missing please...

Page 11: ...nd flexible expa nsions for you to mee t different dema nd for example CF card The chapter will show you how to install the hardware It include s CompactFlash Card Serial Port Ethernet Mouthing Method...

Page 12: ...s one CF slot for users to install CompactFla sh card Please refer to the followin g instru ctions for installation Step 1 Open the cover unscrew 2 screws on the chassis Step 2 Stick the mylar on the...

Page 13: ...d to the CF card slot the finding the CF cover from the system package and screw it This section tells users how to open back cover Please follow the steps below Step 1 Unscrews on the back cover Plea...

Page 14: ...Step 2 Remove the back cover...

Page 15: ...onnector RS 232 Default RS 422 COM 1 RS 485 The COM1 and COM2 is a standard DB 9 conn ector This connector is equippe d with 5V level power capab ility on DCD and 12V level on RI by setting JP10 and J...

Page 16: ...8 CTS No use No use 9 RI No use No use The FPC71 61 is equippe d with a high performance Plug and Play Ethernet interface full compliant with IEEE 802 3 standa rd and can be connected with a RJ 45 LAN...

Page 17: ...op VESA mou ntings The FPC716 1 provides VESA moun t 100x100 mm Screw four screws to fix the kit in the back chassis The FPC7161 is designed for panel mount application To mount the FPC716 1 the stand...

Page 18: ...1 provide s a convenient Hard Disk Drive HDD bracket for users to in sta ll 2 5 SATA HDD Please follow th e ste ps Step 1 Refer section 2 2 to open the back cover Step 2 Fix the HDD on the HDD tray by...

Page 19: ...Step 3 Plug the cables to connectors and screw the HDD tray on the bracket installation completes...

Page 20: ...mem ory up to 4GB Please follow steps below to install the mem ory modules Ste p 1 Refer to section 2 2 to open the back cover Step 2 Find the DIMM heatsink on the back cover Stick the thermal pad on...

Page 21: ...Step 3 Insert the DRAM to the DIMM socket and then push it down firmly until it is clipped by the socket Installation completed...

Page 22: ...hen installing the wire less LAN card refer to the following instruction s and illustration Step 1 Refer to section 2 2 to open the back cover and find out mini card slot on mainboard Step 2 Insert th...

Page 23: ...Step 3 Find the Antenna cab le and connect it on wireless LAN card Step 4 Lift the rubber stopper from the top of back cover and screw the antenna cable...

Page 24: ...nna on the antenna connector FPC 7161 equips with a phoen ix type powe r connector It adopts 10VDC to 30VDC Please follow the signs on power connector to connect DC power source Power positive G Safty...

Page 25: ...Right Arrow keys allow you to select a setup screen Up Down The Up and Down Arrow keys allow you to select a setup screen or sub screen Plus Minus The Plus and Minus Arrow keys allow you to change th...

Page 26: ...They are describ ed in this sectio n The Main BIOS Setup screen is shown below z Use th is o ption to change the system time and da te Highlig ht System Time or System Date using th e Arrow keys Ente...

Page 27: ...to set configuratio n of the CPU and other system devices You can select any of the items in the left frame of the screen to go to the sub menus ACPI Settings CPU Conf iguration IDE Configuration USB...

Page 28: ...tions f or th e ACPI Con fig ura tion an d cha nge the value of the selecte d o ptio n A descript ion of th e select ed item ap pears on th e right side of th e screen Use this item to select the high...

Page 29: ...r disable Hyper Thre ading Technology which makes a single physical processor perform multi taskin g function as two logical ones XD can prevent certa in classes of malicious buffer overflow attacks w...

Page 30: ...z The optional settings are Disa bled Ena bled The optiona l settings are IDE AHCI...

Page 31: ...reen to select options for the USB Configuratio n and change the value of the selected option A description of the selected item appears on the righ t side of the scre en The optiona l settings are Au...

Page 32: ...select optio ns fo r the Supe r IO Conf igu ration and cha nge the value of t he selected op tio n A descriptio n of the selected ite m appe ars on the righ t side of the screen Use this item to set...

Page 33: ...z This screen shows the Hardware Health Configuratio n and a description of the selected item appears on the right side of the screen...

Page 34: ...chipset settings You can select any of the items in the left frame of the screen to go to the sub menus Host Bridg e For items marke d with f please press Ente r for more options South Bridge For ite...

Page 35: ...z This item is for memo ry freque ncy and timin g settings Press Enter to go to the sub menu...

Page 36: ...st is selected GA20 can be disab led usin g BIOS services If Always is selected disabling G20 is not allowe d this option is usefu l when any RT code is execute d above 1MB Set display mode for option...

Page 37: ...ndica tes whether an adm inistra tor passwo rd has been set If the passw ord has been installed Insta lled displays If not Not Insta lled displays This item indica tes wheth er an user password has be...

Page 38: ...e r Se lect Ok to disca rd change s and exit When you have completed t he system configuration change s select this option to leave Set up and rebo ot the compute r so th e new system co nfig uration...

Page 39: ...ct this option Select Restore Defau lts from the Save Exit menu and press En ter Select this option to save syste m configuration changes done so far as User Defaults Select Save as User Defaults fro...

Page 40: ...drive the touch panel to get two fingers touch function that based on the Windows 7 support z Touch Screen projected capacitive multi touch Touch Screen Controller Mastouch USB Touch Screen Controlle...

Reviews: