


9A
blink on the display. Use the
DOWN
and
UP
button to select the
Yes
(yes blackout),
No
(no blackout) or
Freeze
mode. Once the mode has been selected, press the
ENTER
button to setup, to go back to the functions without any change press the
MENU
button again. Hold and press the
MENU
button about one second or wait
for one minute to exit the menu mode.
Sound Mode
Select
Sound Mode
, press the
ENTER
button to confirm, present mode will
blink on the display. Use the
DOWN
and
UP
button to select the
On
(sound on) or
Off
(sound off) mode. Once the mode has been selected, press the
ENTER
button
to setup, to go back to the functions without any change press the
MENU
button
again. Hold and press the
MENU
button about one second or wait for one minute
to exit the menu mode.
Sound Sense
Select
Sound Sense
, press the
ENTER
button to confirm, present mode will
blink on the display. Use the
DOWN
and
UP
button to select the
0
…
100
mode.
Once the mode has been selected, press the
ENTER
button to setup, to go back to
the functions without any change press the
MENU
button again. Hold and press
the
MENU
button about one second or wait for one minute to exit the menu mode.
Pan Inverse
Select
Pan Inverse
, press the
ENTER
button to confirm, present mode will
blink on the display. Use the
DOWN
and
UP
button to select the
Yes
(pan inversion)
or
No
(normal) mode. Once the mode has been selected, press the
ENTER
button
to setup, to go back to the functions without any change press the
MENU
button
again. Hold and press the
MENU
button about one second or wait for one minute
to exit the menu mode.
Tilt Inverse
Select
Pan Inverse
, press the
ENTER
button to confirm, present mode will
blink on the display. Use the
DOWN
and
UP
button to select the
Yes
(tilt inversion)
or
No
(normal) mode. Once the mode has been selected, press the
ENTER
button
to setup, to go back to the functions without any change press the
MENU
button
14A
function is good when you want an instant show. You have to set the first unit in
master mode
Show Mode
and select
show1
or
show2
or
show3
or
show4
mode.
Its DMX input jack will have nothing plugged into it, and its master LED will be
constantly on and sound LED will flash to the music. The other units will have to set
in
slave mode
and select
Slave 1
(normal) or
Slave 2
(2 light show) mode, Their
DMX cables plugged into the DMX input jacks (daisy chain) and the slave led lights
will constantly on.
2-light show
In
slave mode
,
Slave 1
means the unit works normally and
Slave 2
means
2-light show. In order to create a great light show, you can set
Slave 2
on the
second unit to get contrast movement to each other, even if you have two units
only.
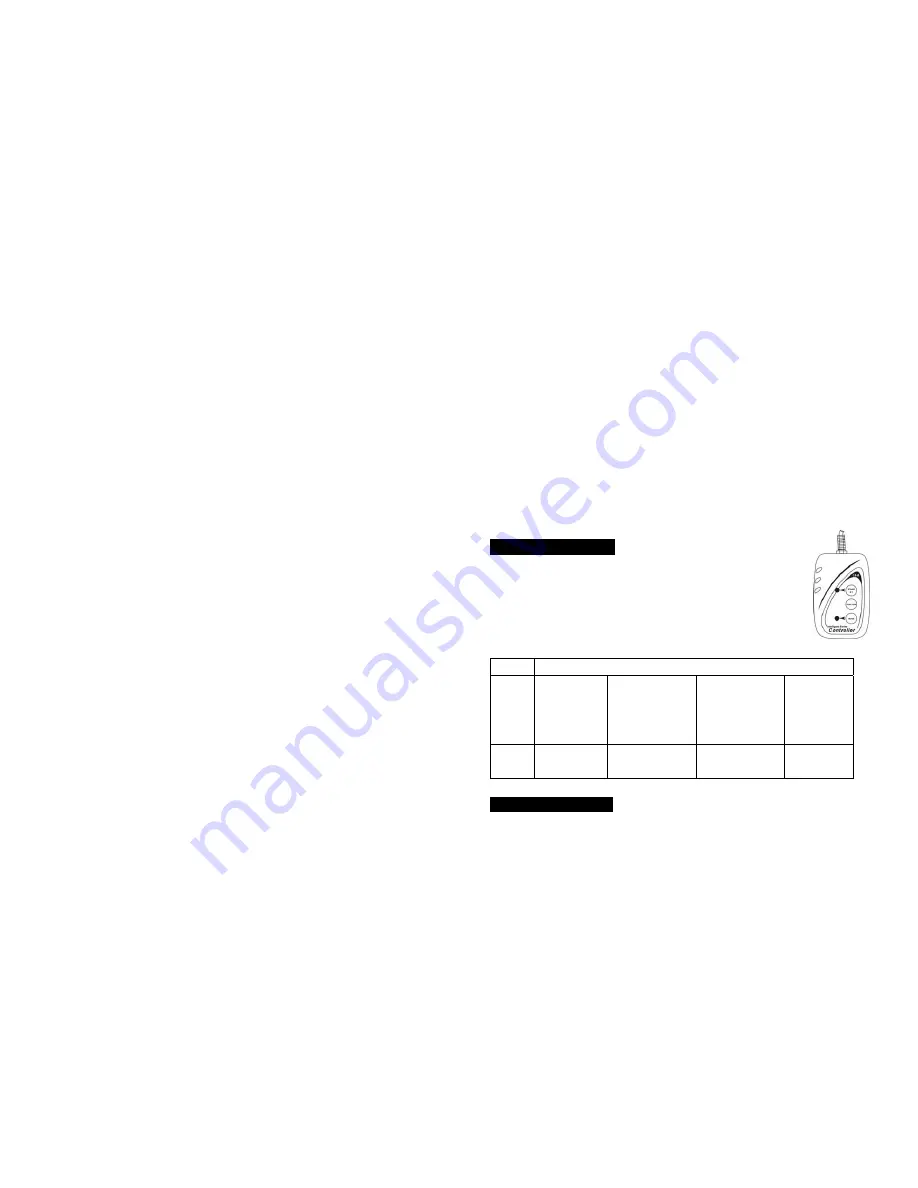
4.2 Easy Controller
The easy remote control is used only in master/slave mode.
By connecting to the 1/4” microphone jack of the first unit, you will
find that the remote controller on the first unit will control all the
other units in Stand by, and Mode selection.
Stand By
Blackout the unit
Function
1. Sync. Strobe
2. Async. strobe
3. Sound Strobe
Show
1-4
1. Pan index
2. Tilt index
3. Dimmer
Fade Speed
1. Fast
2. Middle
3. Slow
Mode Sound
(LED OFF)
Show
(LED Slow Blinking)
Show
(LED Fast Blinking)
LED ON
4.3 DMX Controller
By using a universal DMX controller to control the units, you will need to set
DMX address from 1 to 512 so that the units can receive DMX signal.
Press the
MENU
button up to when the
DMX Address
is showing on the display.
Pressing
ENTER
button and the display will blink. Use
DOWN
and
UP
button to


