background image

22

1

1

2

3

4

4

3

2

L04B

L04A

L04B

L04A

L04B

L04B

L04B

Y2

Y2

Y1

Y4

Y5

Summary of Contents for SOLAR HARVEST SH7

Page 1: ...AD INSTRUCTIONS CAREFULLY BEFORE ASSEMBLY Item No Model No Packing List SH7 SH7 ext 2534100 2534110 AL No 1 PC No 1 PC No 2 1CTN 1CTN 1CTN 1CTN Customer Support Support ACFgreenhouses com 1 888 888 9050 AL No 2 GREENHOUSE SIZE 6 10 3 4 L x 6 10 3 4 x 6 10 3 4 H EXTENSION SIZE 4 6 1 8 L x 6 10 3 4 W x 6 10 3 4 H ...

Page 2: ...ONTENTS 1 Assembly Advice Page 1 2 Product Features Page 1 2 3 Parts List Page 3 6 7 Framework Panel Assembly Page 14 28 6 Roof Vent Assembly Page 13 4 Base Assembly Page 7 10 5 Door Assembly Page 11 12 ...

Page 3: ...e greenhouse 5 Keep the roof and gutter clear of snow dirt leaves Allowing snow to build up on the roof may damage the product 6 Unlike steel if the paint finish is scratched this will not harm the aluminium underneath 7 When your product needs cleaning use a mild detergent solution and rinse with cold clean water Do not use acetone abrasive cleaners or strong detergents to clean the panels 1 Comp...

Page 4: ...vents If required automatic roof vent openers are available as an inexpensive optional extra 8 Each Polycarbonate Panel comes with UV protected properties Therefore please ensure the white film is facing outward towards the sun remove the film before installing into aluminium channel 7 Please ensure the roof vents are not installed into the end roof bays of the greenhouse as this is where you need...

Page 5: ...X60 L04B 3 L05A 2 L01A L03C 1 2 L03D 1 L08A 1 L01B 1 L01C 1 L02A 4 L06A 1 L07A 2 L02B 4 L08A 2 W06 2 W08 2 L02B L05C 4 L05D 4 L09A 2 L15A 2 L19 4 L20 2 L21 2 W04 4 76 76 40 4 L04B 2 M01 M6 S01 M6X10 Z01 Ø4X14D Z03 Ø4X8 L01D 1 PART NO QTY ALU Box No 1 PART NO QTY ALU Box No 1 3 Front Assembly PART NO QTY Back Assembly PART NO QTY Door Assembly 3 Sections PART NO QTY Parts W05 11 8 Z02 Ø5X15 SH7 ...

Page 6: ...2 Y9 Y1 2 Y2 5 Y3 1 Y4 2 Y5 1 4 Y6 6 Y7 Y11 2 Y10 2 Y7 Y9 Y7 Y9 PC No 1 4 Y6 Y6 Y6 Y6 Y2 Y4 Y5 Y1 Y2 Y11 Y11 Y2 Y4 Y3 Y1 Y2 Y2 Y7 Y7 Y6 Y6 PC No 1 SH7 ...

Page 7: ...2 L04B 2 L10A 2 L08D 2 W02 2 L10B 2 L10C 2 C G H K 2 2 1 2 J04 J05 J06 2 2 1 PART NO QTY PART NO QTY Y7 Y9 2 Y9 2 Y6 4 Y7 Y10 2 PC N0 2 5 Y6 Y6 Y7 Y9 Y6 Y6 EXT 2 Sections AU Box No 2 ALU Box No 2 EXT 2 Sections PC No 2 6 S03 M8X60 30 30 16 4 M01 M6 S01 M6X10 Z01 Ø4X16D Z03 Ø4X8 6 Z02 Ø5X15 2 Section Part ...

Page 8: ...ont wall back wall and the 3 section assembly Extensions are added by placing them inbetween one of the end walls and the 3 section assembly as shown in the diagram above The 2 section assembly of the greenhouse extension is connected to the 3 section assembly of the greenhouse with the middle section which acts as an interior support wall SH7 Ext 1 Greenhouse SH7 Ext 1 Greenhouse SH7 Greenhouse S...

Page 9: ...a b Expansion bolt in concrete a b a b Steel bar Lawn land a b 7 It is essential the dimensions a b are the same to ensure the base is square Support at the corners only is inadequate ...

Page 10: ...W05 s positions where it is placed in the middle of PC panel for each section SH7 Extension SH7 Extension SH7 Extension SH7 Extension optional If you do not have any extensions the Front wall will be placed where the middle section support wall is shown above ...

Page 11: ...196 9 6481 7862 1 9191 5 4046 6 3917 7 9 Dim Model 1 2 3 2092 2 2092 2 2092 2 2092 2 2092 2 Front Rear 3 Sections Assembly SH7 W Outer Width of Base Profiles L Outer Length of Base Profiles a b Outer Diagonal of Base Profiles a1 b1 Inner Diagonal of Base Profiles SH7 SH7 EXT 1 SH7 EXT 2 SH7 EXT 3 SH7 EXT 4 SH7 EXT 5 ...

Page 12: ...Front Assemby Back Assembly SH7 EXT 1 SH7 EXT Middle Section 3 Section Assembly 2 Section Assembly SH7 The basic model SH7 can be easily extended by adding a 2 Section Assembly each time for a longer size ...

Page 13: ...G 2 QTY L18A L16A 1 2 NO PART L18B 2 L17 1 L16B 1 J 8 4 4 L16C 1 Y11 2 L16B J Z01 L16B J Z01 L18A J Z01 L18B L17 L17 L18A J Z01 L18B 2 1 L17 3 L18A Y11 L05G L16B 5 L18B 4 6 16 Z01 Ø4X14D M01 M6 S01 M6X10 Door 1 Assembly ...

Page 14: ...12 7 8 9 10 11 12 7 L18B 8 L18A Y11 L05G L16A 10 9 11 L16C 12 L16A J Z01 L18B L18A J Z01 L18B L16A J Z01 L16C L18A J Z01 L16C Door 2 Assembly ...

Page 15: ...L15A 1 L19 2 L20 1 L21 1 L15A L20 L19 L21 Z01 Y10 L19 Z01 Z01 Z01 QTY NO PART 13 22 Z01 Ø4X16D Roof Vent Assembly Roof Vent Assembly ...

Page 16: ...08A L08 J03R L A B L08 L08A A B J03R L 2 2 3 3 4 4 3 4 K L08D L08 L08D L08A C J04 14 make sure you pay close attention to the direction of the pins make sure you pay close attention to the direction of the pins must connect all plastic parts J04 and J03 R L before completing this step ...

Page 17: ...L01A L01A L03C L03D 15 1 1 2 2 3 4 3 4 L01A L08A L08A L03C L08A L03D L08A L01A L08A L08A ...

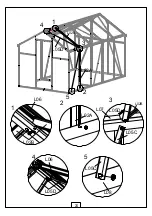
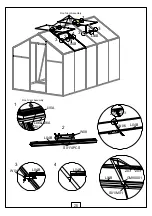
Page 18: ...Y1 Y3 Y4 Y2 Y2 Y2 L04B L04B L04B 1 2 3 4 1 2 3 4 L01A L01A L03C L03D L04B L04B L04B L04B L04B L04B 16 ...

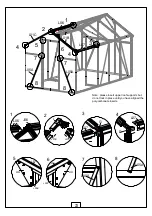
Page 19: ...01A E 5 L01B L03C W01 L01C L03D 2 4 W01 1 2 3 4 5 6 6 7 7 6 7 Note please insert upper roof supports but do not lock in place until you have aligned the poly carbonate inserts make sure you pay close attention to the direction of the pins ...

Page 20: ...L10B 1 H L10A C 1 1 2 2 L10A L10A L10C L10B L10B L10B 3 3 4 4 5 2 G 3 3 L10B G L10A 4 K L08D L10C 5 L10C L10B W02 18 ...

Page 21: ...S01 L02B L02B L07A L07A L06A L02A L02A L02A 2 S01 J06 L06A L06A 19 1 2 5 6 7 7 7 7 7 4 2 5 5 1 3 6 4 6 L06A L02B L02A L02A L07A L02B H E L07A 3 4 L07A G Slide 2 S01 into L02A and tighten L02A at each end with S01 ...

Page 22: ...L05C L05C L05C L05D L05D L05D L05C L05D L06A L05C L08A 1 2 3 3 3 3 3 1 1 2 2 2 2 20 ...

Page 23: ...21 L01D L01A L03E L03F 1 2 3 4 L01D L08A L08 L03E L08A L03F L08A L01A L08 L08A 1 2 3 4 ...

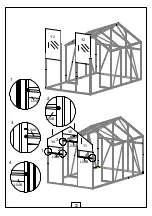
Page 24: ...22 1 1 2 3 4 4 3 2 L04B L04A L04B L04A L04B L04B L04B Y2 Y2 Y1 Y4 Y5 ...

Page 25: ...L01B L03F W01 L01C L03E W01 5 6 7 8 4 2 1 5 6 7 7 4 3 8 8 L06 L07 D L05A L05A L05A L05A L07 G F L01C L01B L06 L07 Note please insert upper roof supports but do not lock in place until you have aligned the poly carbonate inserts ...

Page 26: ...24 L05D L05C L05D L06 L05C L08 4 5 1 2 3 L06 L02B L02A L07 1 2 3 4 5 L02A L05D L02B L02B ...

Page 27: ...比例 25 Y6 Y6 Y6 Y6 Y6 Y6 Y6 Y6 Y6 Y6 Y7 Y7 Y7 Y9 Y9 Y7 ...

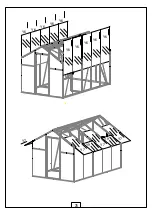
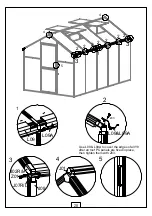
Page 28: ...26 Roof Vent Assembly 3 L06 L06A Roof Vent Assembly Z01 1 S01 4PCS W08 L04B 2 L04B W04 3 Z03 Z03 W06 GM80001 Z03 Z03 L04B L04B S01 M01 L15A 3 2 2 3 4 L04B L04B 1 1 1 1 L04B 4 ...

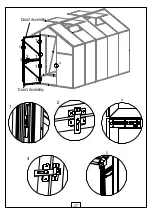
Page 29: ...27 Door1 Assembly Door2 Assembly 1 2 3 1 2 4 1 1 1 5 4 3 5 ...

Page 30: ...Z03 L09 L09A 3 J02R L J07R L J08 Z01 1 L09 L09A 5 28 1 3 3 5 4 J01 4 4 2 2 2 2 2 2 2 2 Use L09 L09A to cover the edges of all Y9 after all roof PC panels are fixed in place then tighten them with Z03 ...

Reviews: