Note: A system can be connected with
one
each time.
B
se rching for a new device, please cancel the existing connection.
only
BLUETOOTH device
efore
a
23
Page 1: ...S MIC TREBLE VIDEO AUDIO L R IPod Dock 5 1 SURROUND SOUND UPCONVERSION DVD KARAOKE RECEIVER DKR 510 FRONT AUX BLUETOOTH BLUETOOTH CD G CD G with HDMI switching Bluetooth IPod Dock DKR 510 640 WATTS 5...
Page 2: ...tion 7 2 DVD Functions 7 3 Setting of the disc player 7 3 1 Language setting 7 3 2 Video 7 3 3 Audio 7 3 4 Rating 7 3 5 Misc 7 Disc player function 6 Amplifier function 8 Operation of Mp3 function 9 J...
Page 3: ...r speaker or on the same stand with speaker keep it away from shocking to protect its normal work Don t play discs that are scratched cracked or warped to prevent the unit from damage The power supply...
Page 4: ...back forward Not IPhone compatible 9 MASTER VOLUME Controls the music volume Trun clockwise to raise the music volume and counter clockwise to lower the music volume 8 MIC VOL MULTI In Karaoke mode u...
Page 5: ...eft the impedance equal or more than 8 16 OHM Using speaker cable with exposed wires or banana plugs to connect 6 WOOFER SPEAKER TERMINAL 20 OPTICAL and COAXIAL INPUT Using speaker cable with exposed...
Page 6: ...de To switch languages in DVD mode or Memorize the channel in Radio mode To switch amount Disc Card and USB port Zoom in out function in DVD mode To switch subtitle in DVD mode information in DVD mode...
Page 7: ...re all connection with power off 2 Audio Video cables are connected according to the different color identification and they should be fitted firmly AUDIO VIDEO HDMI SIGN COAXIAL OPTICAL YPbPr S VIDEO...
Page 8: ...l Rear surround speakers which behind your listening position should be nearly 2 meters up the floor SPEAKER CHOICE Speaker should be powerful enough Main speaker Centre and surround speaker impedance...
Page 9: ...nt Right Surround Left Surround Right Sub Woofer Center 7 Please check and connect to the LEFT RIGHT channel and positive red and negative black of DKR 510 Make sure the connection of channel and the...
Page 10: ...ERS 8 5 1 HDMI connection 5 Audio Video Connection 5 2 External DVD VCR HDP AUX connection TV MONITOR TV MONITOR INPUT INPUT OUTPUT OUTPUT OUTPUT HDMI HDMI HDMI HDMI HDMI HD DVD Satellite Tuner PS3 DV...
Page 11: ...S SUB WOOFER SURROUND SOUND SPEAKERS TV MONITOR INPUT YPbPr S VIDEO VIDEO 5 3 Connect to a DVD Recorder 5 4 Connect to a TV monitor DVD RECORDER S VIDEO S VIDEO VIDEO VIDEO INPUT INPUT INPUT OUTPUT OU...
Page 12: ...r 5 6 Connecting AM FM Antennas FM wire antenna supplied AM loop antenna supplied AMPLIFIER AUDIO INPUT FRONT CENTRE SURROUND SUBWOOFER FL FR CEN SW SL SR 10 SUB WOOFER SURROUND SOUND SPEAKERS SUB WOO...
Page 13: ...woofer volume remote control to to change surround speakers centre speaker and volume Press the key MUSIC MENU on the display SL VOL SR VOL CTR VOL SUB VOL then press the keys subwoofer 7 Press the ke...
Page 14: ...g Once it s read the disc this machine will start playing automatically lf it is a DVD the machine will show the DVD menu or title menu lf it is a CD this machine will start playing in the sequence PL...
Page 15: ...ey During playing discs the four direction keys enable you to select at your option in title menu or setup 7 2 4 Number key Press relevant number key for direct access according to picture titles When...
Page 16: ...r stereo vocal 7 2 8 Repeat In DVD mode press REPEAT key The following will be displayed REPEAT Chapter repeat on Repeat Chapter REPEAT REPEAT Title repeat on Repeat off Repeat Title Repeat Off REPEAT...
Page 17: ...ropean TV System PAL DVD menu English Video out HD Audio Audio Rating Rating Misc Misc HD Jpeg Mode On Aspect Ratio Follow the operation instructions stated in Video in combination with desired option...
Page 18: ...ameras in 2006 Shipments of HDMI are expected to exceed that of Digital Visual Interface DVI in 2008 driven primarily by the Consumer Electronics CE Market 7 3 3 Audio This setting is suitable for fil...
Page 19: ...1m 1 4m 1 7m Center Delay Follow the operation instructions stated in Audio in combination with desired option in the following figure The user can select the surround delay mode No delay 1m 2m 3m 4m...
Page 20: ...y by menu 1 2 Press direction key to select picture then press Play key 3 ln condition of stop press direction key to select other pictures 4 ln condition of stop Select the first line file item on th...
Page 21: ...VOL then press the keys to change microphone 1 or microphone 2 volume dividually 3 Press the key MIC DELAY REPEAT ECHO on the front panel to display ECHO DELAY ECHO REPEAT ECHO VOLUME then adjust the...
Page 22: ...14 BLUETOOTH function c Press BLUETOOTH key on the DKR 510 front panel or remote control to display ON ACE DKR 510 ACE DKR 510 ACE DKR 510 Amplifier ACE DKR 510 Amplifier 20...
Page 23: ...H Press BLUETOOTH key on the DKR 510 front panel or remote control to display ON 21 ACE DKR 510...
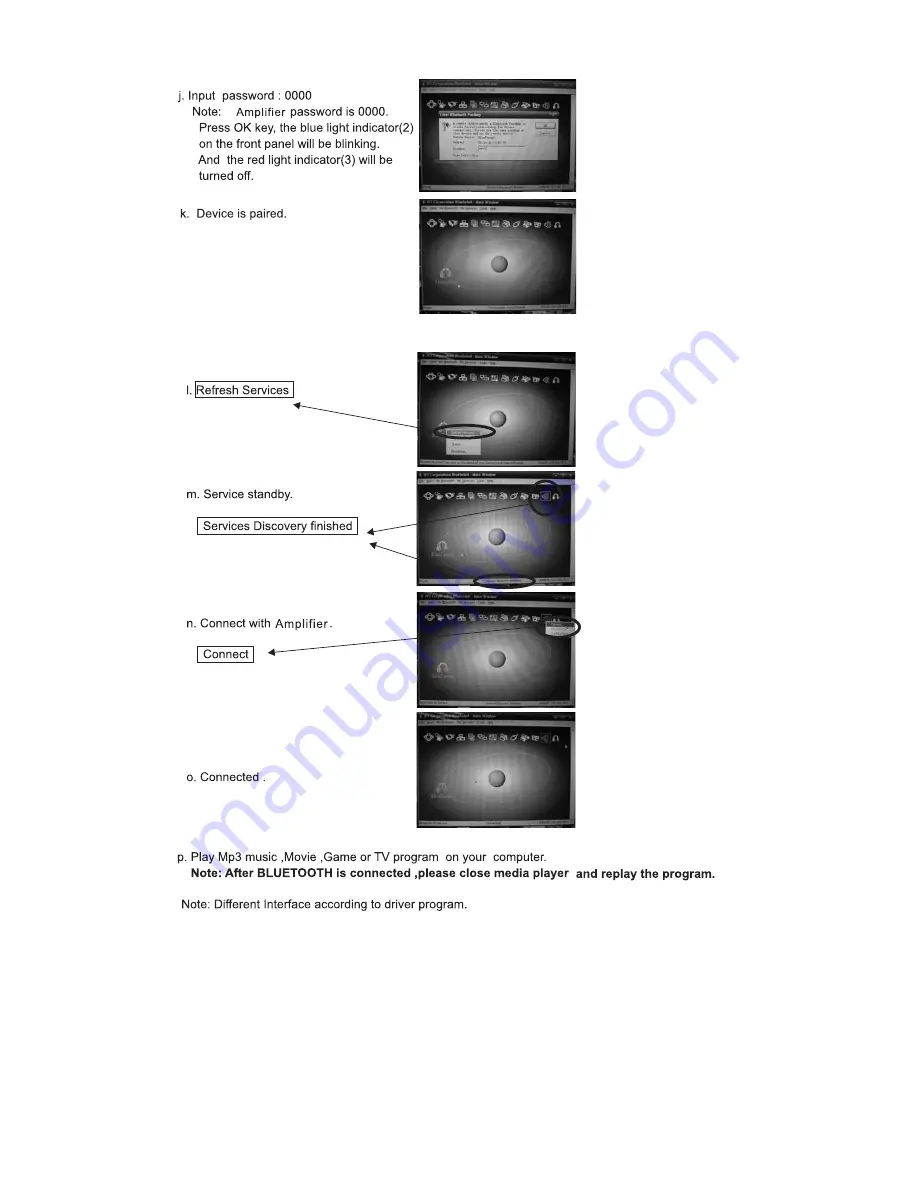
Page 24: ...Note A system can be connected with one each time B se rching for a new device please cancel the existing connection only BLUETOOTH device efore a 23...
Page 25: ...Distance up to 10m Press the key BLUETOOTH with A2DP Profile Connect the playing device Pairing the correct password Media player is on Media player playing with sound card Media player is off Media p...
Page 26: ...odel DKR 510 16 Technical Specification Amplifier DVD Weight 12kg Sub woofer output power 150W Front speakers output power 150WX2 Centre speaker output power 70W Surround speakers output power 60WX2 C...