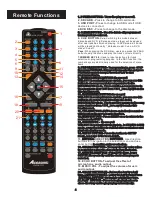
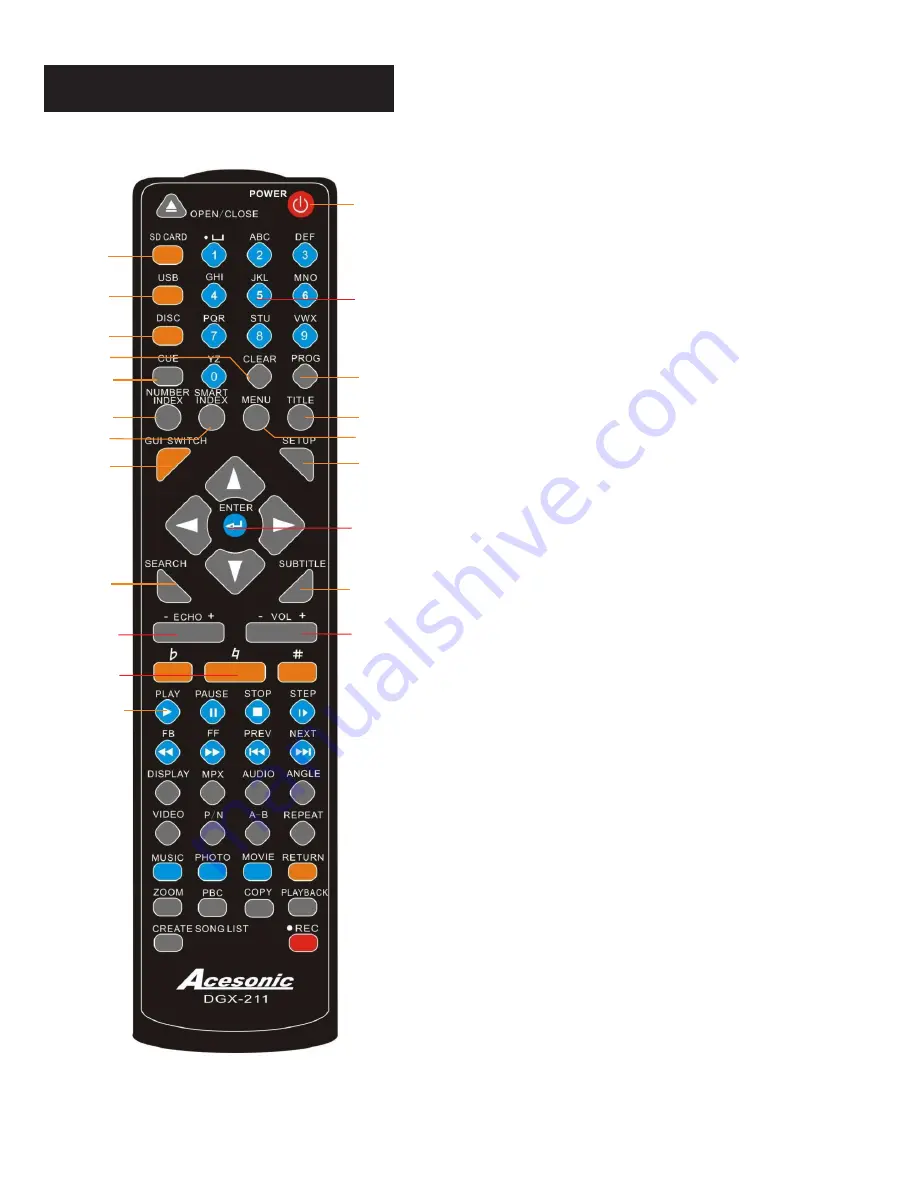
Acesonic DGX-211 User Manual Download Page 7

Remote Functions

4

1. POWER BUTTON - 

Turns the player on or off.

4. DVD DISC - 

Press to change to the disc mode.

3. USB PORT - 

Press to change to USB mode if USB 

devices is connected.

2. SD CARD - 

Press to change to SD card mode. 

5. CLEAR BUTTON - 

Used to delete all programmed 

tracks you have entered. 

1

2

3

4

5

6. CUE  BUTTON- 

Cue:


Switching the mode between 

Karaoke and DVD. In Karaoke mode, player will be paused 
after one track has finished playing. In DVD mode, all tracks 
will be played continually. * Karaoke mode= Cue on, DVD 
mode= Cue off.

Pass:

 When playing the DVD disc, users can press the PASS 

button to skip the menu and play the track or movie directly.

6

7

8. PROGRAM BUTTON - 

To program tracks

,

 press  STOP  

then press PROGRAM. Enter your tracks selection and press 
PROGRAM again to accept. Press the PLAY to start 
programmed tracks.

9. NUMBER INDEX BUTTON-

No use yet!

With 2011 incoming firmware update, you can use this 
button to do song search by song-number in the 
DISC/USB/SD mode. There must be a song number in 
the song name (ex: 1001 from 1001_love.mp3) to make 
this function work.

10. NAME INDEX BUTTON-

No use yet!

With 2011 incoming firmware update, you can use this 
button to do song search by song name in the 
DISC/USB/SD mode. There must be a name in the song 
name (ex: love from 1001_love.mp3) to make this 
function work.

11. TITLE BUTTON -

DVD’s have an indication number 

which makes it easy to locate chapters.

12.MENU BUTTON - 

Press MENU once to return to the 

root menu for DVD’s. 

13. GUI SWITCH - 


In USB/SD CARD 

mode, press the button to switch between windows and 
playback display mode. 

14. SETUP BUTTON- 

Press the button to SETUP 

menu, see page 10 for more detail . 

ENTER & 

BUTTONS 

to confirm entry or selection.

16. SEARCH BUTTON -

 You may directly enter a time 

to search for a disc; the disc plays from that point.

17. SUBTITLE BUTTON


From DVD discs, press 

SUBTITLE repeatedly until the desired language is 
selected.

20. SHARP BUTTON (#) - 

Raises the key by a half 

tone

. LOW BUTTON (b) - 

Lower the key by a half tone

 NATURAL BUTTON - 

go back to original key tone.

21.

PLAY  BUTTON


Press to begin playback or to 

close disc tray and begin playing automatically.

No use yet!

With 2011 incoming firmware update, 

15. 

DIRECTION 

-

 Use direction 

buttons for navigation in the selection menu and use 
enter button 

18. ECHO BUTTON- To adjust the effect of 
microphone  audio output.
19. MUSIC VOL - To adjust the volume of music 
audio output.

8

7.NUMBER KEY 0-9-

 Used to input selections for track 

selection or programming purpose. In the PBC function, the 
number keys are additionally used for the selection of menu 
items.

9

10

11

12

13

14

15

16

17

18

19

20

21

Summary of Contents for DGX-211

Page 1: ...V 1 CAUTION To assure this player will work at its best please read this user s manual carefully before operation and keep for future reference DGX 211 Multi Function HDMI Karaoke Player With Digital...

Page 2: ...L PLACED INSIDE THE UNIT IMPORTANT FOR LASER PODUCTS The exclamation point within an equilateral triangle is intended to alert the user to the presence of important operating and maintenance servicing...

Page 3: ...manufacturer 23 Wet location marking Apparatus shall not be exposed to dripping or splashing and no objects filled with liquids such as vases shall be placed on the apparatus 1 Read These Instructions...

Page 4: ...nlight or near any heating device Notes on Installation Select a place where the unit will be level dry and not too cold or hot Do not use unit on its side or where subject to vibrations e g speakers...

Page 5: ...NTROL is on or off The image may be poor noisy or grainy due to actual defects on the disc itself Some functions may not be possible on all discs as described in this manual NOTE NOTE Handling At anyt...

Page 6: ...Please change in the SETUP menu before using it Karaoke vocal output does not work while using COAXIAL output SETUP AUDIO SETUP SPDIF OUTPUT SPDIF RAM OR SPDIF PCM BACK PANEL FUNCTIONS AND OPERATION F...

Page 7: ...DISC USB SD mode There must be a name in the song name ex love from 1001_love mp3 to make this function work 11 TITLE BUTTON DVD s have an indication number which makes it easy to locate chapters 12 M...

Page 8: ...rom A to B 3 Press A B again till A B disappears 37 MUSIC BUTTON In USB SD Card mode use this button to call out all the music files and display on the screen 38 PHOTO BUTTON In USB SD Card mode use t...

Page 9: ...to use this player in karaoke mode you must have your player connected as the picture below Note We recommend using USB version 2 0 class 4 or higher SD cards for smooth recording and playback VIDEO I...

Page 10: ...ons MAKING THE CONNECTION BETWEEN PLAYER WITH 5 1 CHANNEL AMPLIFIERS You can connect this player with 5 1 channel amplifiers as shown below NO Microphone audio will be outputted in 5 1 Channel mode PO...

Page 11: ...vice containing more than 2 000 files For example 2 000 MP3s files or 2 000 MP3G songs each MP3G contains 2 files adding up to 4 000 files cdg mp3 MP3G The DGX 210 may support 2 5 external hard drives...

Page 12: ...G MP3G or VCD song from disc or USB or SD card 2 Insert SD card or USB as a file saving device if you play from disc 3 Select the song you want to record and play the song first Then press RECORD butt...

Page 13: ...TYPE 4 3PS 4 3LB or 16 9 Some discs can not be played as your selection because that disc was not recording in the same format to show Sub MENU to select TV TYPE TV TYPE 1 Press Direction KEY to choos...

Page 14: ...EY to select the SPEAKER SETUP The MENU Sub OP MODE LINE OUT RF REMO DYNAMIC RANGE FULL 6 8 4 8 2 8 and OFF DUAL MONO STEREO MONO L R MIX MONO AUDIO LANGUAGE 1 Press Direction KEY to choose AUDIO LANG...

Page 15: ...t to hear it With your memory card inserted press the PLAYBACK button on the remote A window will open displaying all files that are on the memory card and machine will automatically select the last f...

Page 16: ...all tracks 5 Go to START section you will see the ripping information To start the ripping process press ENTER t 6 After ripping finish select QUIT section to leave the window and go back machine pla...

Page 17: ...time information and the time search function may not work This function does not work when there are programed tracks Repeating Playback 1 press PLAY to start playback Each time you press REPEAT the...

Page 18: ...SD card or USB drive 3 In the song list system will automatically assign a song number for each song If the file has been delete or add into the disc USB SD card the previous song number might not wor...

Page 19: ...with analog copy protect there is disturbance in the technology copy guard Some discs include a copy playback picture prevention signal and the copy guard system will prevent proper playback 5 When ST...

Page 20: ...t works Need to play the song first then press the REC button on the remote or front panel 16 No voice after playback Didn t turn on the volume of microphone while recording 17 No graphic 18 Cannot re...

Page 21: ...Note 18...

Page 22: ...75 humidity Multimedia Source MP3 G CD G AVI CD VCD MPEG JPG Interface USB 2 0 Port for MP3 JPEG AVI playbacks and JPEG viewing Weight 2 5 Kg Dimensions 430 W X 125 D X 80 H mm Output level 0Vrms 1 5...

Reviews: