background image

EN-9

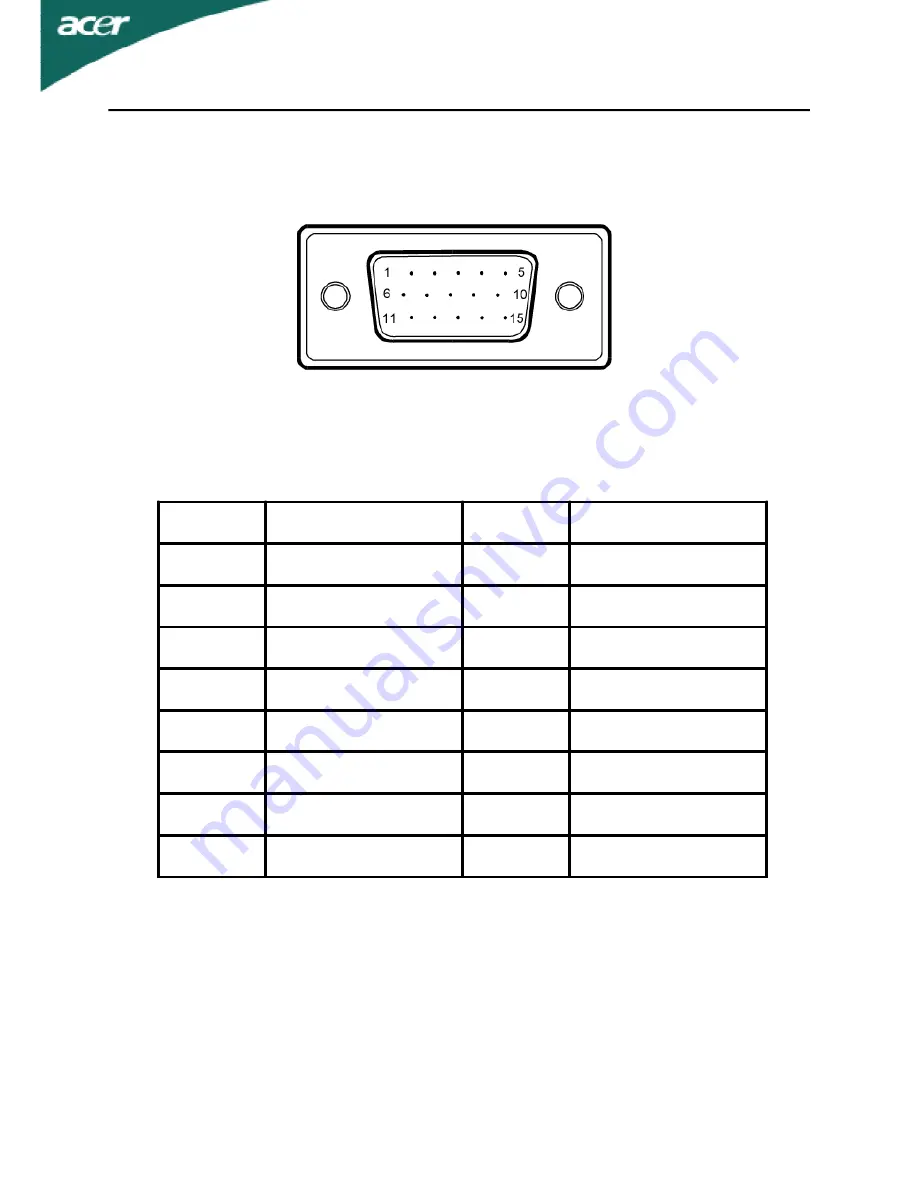
PIN NO.

DESCRIPTION

PIN NO.

DESCRIPTION

1.

Red

9.

+5V

2.

Green

10.

Logic Ground

3.

Blue

11.

Monitor Ground

4.

Monitor Ground

12.

DDC-Serial Data

5.

DDC-return

13.

H-Sync

6.

R-Ground

14.

V-Sync

7.

G-Ground

15.

DDC-Serial Clock

8.

B-Ground

CONNECTOR  PIN  ASSIGNMENT

15-Pin Color Display Signal Cable

Summary of Contents for X163WL

Page 1: ...npacking 5 Attaching Removing the base 6 Screen position adjustment 6 Connecting the power cord 7 Safety precaution 7 Cleaning your monitor 7 Power saving 8 DDC 8 Connector Pin Assingment 9 Standard T...

Page 2: ...ay find slightly uneven brightness on the screen depending on the desktop pattern you use The LCD screen has effective pixels of 99 99 or more It may include blemishes of 0 01 or less such as a missin...

Page 3: ...be placed near or over a radiator or heat register or in a built in installation unless proper ventilation is provided Never push objects of any kind into this product through cabinet slots as they m...

Page 4: ...ips and information for comfortable use Computer users may complain of eyestrain and headaches after prolonged use Users are also at risk of physical injury after long hours of working in front of a c...

Page 5: ...Blink frequently to keep your eyes from drying out Display Keep your display clean Keep your head at a higher level than the top edge of the display so your eyes point downward when looking at the mi...

Page 6: ...Cable Quick Start Guide AC Power Cord Please check the following items are present when you unpack the box and save the packing materials in case you will need to ship or transport the monitor in futu...

Page 7: ...as indicated first before removing the base and follow the arrow direction to remove it SCREEN POSITION ADJUSTMENT In oder to optimize the best viewing position you can adjust the tilt of the monitor...

Page 8: ...in which the equipment will be installed SAFETY PRECAUTION Avoid placing the monitor or any other heavy object on the power cord to avoid damage to the cable Do not expose the monitor to rain excessiv...

Page 9: ...ry time from Active OFF state back to ON state is around 3 seconds DDC To make your installation easier the monitor is able to Plug and Play with your system if your system also supports DDC protocol...

Page 10: ...1 Red 9 5V 2 Green 10 Logic Ground 3 Blue 11 Monitor Ground 4 Monitor Ground 12 DDC Serial Data 5 DDC return 13 H Sync 6 R Ground 14 V Sync 7 G Ground 15 DDC Serial Clock 8 B Ground CONNECTOR PIN ASS...

Page 11: ...80 x 960 1280 x 720 1366 x 768 VESA VESA 60Hz 60Hz 60Hz 1 2 3 4 5 6 7 8 9 10 11 640 x 480 640 x 480 720 x 400 800 x 600 800 x 600 1024 x768 1024 x768 1280 x 800 VESA MAC SVGA SVGA XGA XGA 60Hz 66 66Hz...

Page 12: ...OFF b Connect the VGA video cable to the computer 2 Connect power cord Connect the power cord to the monitor then to a properly grounded AC outlet 3 Power ON Monitor and Computer Power ON the monitor...

Page 13: ...n Exit 1 When OSD menu is in active status this button will act as EXIT KEY EXIT OSD menu 2 When OSD menu is in off status press this button for 2 seconds to activate the AutoAdjustment function The A...

Page 14: ...red function 3 Press the MENU button to select the function that you want to adjust 4 Press or to change the settings of the current function 5 To exit and save select the exit function If you want to...

Page 15: ...eColor Management OSD and access the scenario modes Step 2 Press or to select the mode Step 3 Press Key to confirm the mode and run Auto Adjust Automatic Adjustment Step 1 Press Auto Key to initial s...

Page 16: ...EN 15 I Only Analog Input Model 2 USER If selected to USER item will appear the Standard OSD Features and Benefits...

Page 17: ...iption Contrast Adjusts the contrast between the foreground andbackground of the screen image Brightness Adjusts the background brightness of the screenimage ACM ACM Adaptive Contrast Management ACM O...

Page 18: ...al position available in Analog mode only N A Warm Set the color temperature to warm white N A Cool Set the color temperature to cool white User Red Adjusts Red Green Blue intensity User Green User Bl...

Page 19: ...EN 18...

Page 20: ...ected at the back of monitor Check if the power of computer system is ON Abnormal Picture Unstable Picture Check if the specification of graphics adapter and monitor is in compliance which may be caus...

Page 21: ...ny interference received including interference that may cause undesired operation The following local Manufacturer Importer is responsible for this declaration Model Number X163WL SKU Number X163WL x...

Page 22: ...t will continue comply with the requirements EMC Directive 2004 108 EC as attested by conformity with the following harmonized standards EN55022 AS NZS CISPR22 Class B EN55024 EN61000 3 2 Class D EN61...

Reviews: