background image

22

Eng

lish

English

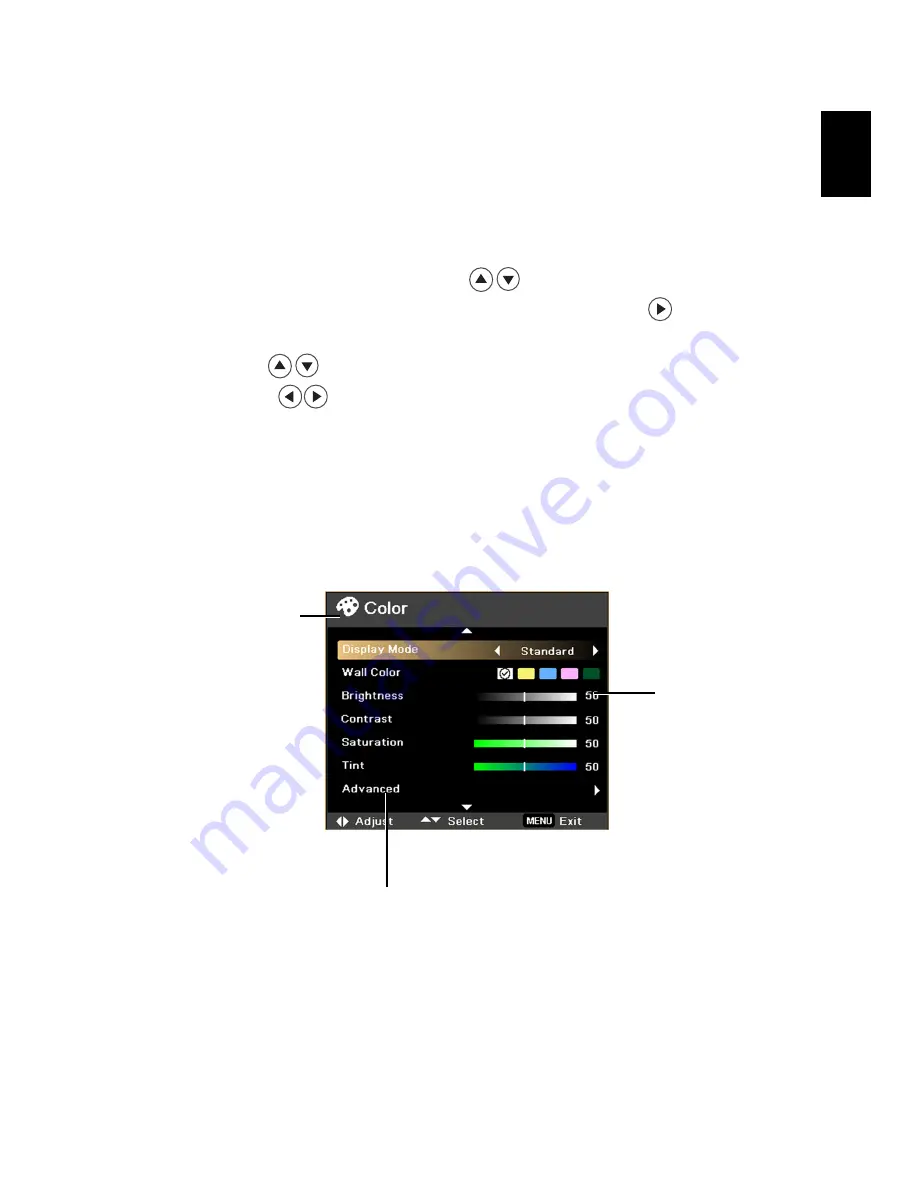
Onscreen Display Menus

The projector has a multilingual OSD that allows you to make image adjustments 
and change a variety of settings.

Using the OSD menus

To open the OSD menu, press 

MENU

 on the remote control.

When the OSD is displayed, use the 

 keys to select any item in the 

main menu. After selecting the desired main menu item, press 

 to enter the 

feature settings submenu.

Use the 

 keys to select the desired item and adjust the settings by 

using the 

 keys.

Select the next item to be adjusted in the submenu and adjust as described 
above.

Press 

MENU

 on the remote control to return to the main menu.

To exit the OSD, press 

MENU

 on the remote control again. The OSD menu will 

close and the projector will automatically save the new settings.

Setting

Main menu

Submenu

Summary of Contents for X1220

Page 1: ...Acer Projector X1120H X1220H X1320WH P1120 P1220 P1320W Series User s Manual ...

Page 2: ... number ___________________________________ Date of purchase ________________________________ Place of purchase ________________________________ 2011 All Rights Reserved Original Issue 07 2011 Acer Projector X1120H X1220H X1320WH P1120 P1220 P1320W Series ...

Page 3: ... placing the product on a bed sofa rug or other similar surface This product should never be placed near or over a radiator or heat register or in a built in installation unless proper ventilation is provided Never push objects of any kind into this product through cabinet slots as they may touch dangerous voltage points or short out parts that could result in a fire or electric shock Never spill ...

Page 4: ...tlet is properly grounded before inserting the AC adapter plug Do not insert the plug into a non grounded power outlet Contact your electrician for details Warning The grounding pin is a safety feature Using a power outlet that is not properly grounded may result in electric shock and or injury Note The grounding pin also provides good protection from unexpected noise produced by other nearby elec...

Page 5: ...ustment of other controls may result in damage and will often require extensive work by a qualified technician to restore the product to normal condition Warning For safety reasons do not use non compliant parts when adding or changing components Consult your reseller for purchase options Warning This device and its enhancements may contain small parts Keep them out of the reach of small children ...

Page 6: ...projector is under operation as this could cause the object to become heated and deformed or even cause a fire The lamp becomes extremely hot during operation Allow the projector to cool for approximately 45 minutes prior to removing the lamp assembly for replacement Do not operate lamps beyond the rated lamp life Never replace the lamp assembly or any electronic components unless the projector is...

Page 7: ...n of the global environment please recycle For more information on the Waste from Electrical and Electronics Equipment WEEE regulations visit www acer group com public Sustainability sustainability01 htm Mercury advisory For projectors or electronic products containing an LCD CRT monitor or display Lamp s inside this product contain mercury and must be recycled or disposed of according to local st...

Page 8: ...e projector on 9 Turning the projector off 10 Adjusting the projected image 10 Adjusting the height of the projected image 10 Optimizing image size and distance 12 Adjusting distance and zoom to optimize image size 16 User controls 19 Installation menu 19 Acer Empowering Technology 20 Onscreen Display Menus 22 Color 23 Image 24 Setting 27 Management 31 Audio 31 3D 32 Language 33 3D projection 34 U...

Page 9: ...37 Watching 3D DVD content 37 Appendices 39 Troubleshooting 39 LED and alarm definitions 42 Replacing and cleaning the dust filter 43 Replacing the lamp 44 Ceiling mount installation 45 Specifications 48 Compatibility modes 50 Regulations and safety notices 54 ...

Page 10: ... User for optimum performance in any situation NTSC PAL SECAM compatible and HDTV 720p 1080i 1080p supported Lower power consumption and economy ECO mode extends lamp life Acer EcoProjeciton Technology delivers Intelligent power management approach and physical efficiency improvement Empowering Key reveals Acer Empowering Technology utilities Acer eView eTimer ePower Management e3D Management for ...

Page 11: ...below Check to make sure your unit is complete Contact your dealer immediately if anything is missing Projector Power cord VGA cable Remote control Batteries User s Manual CD Quick Start Guide Carrying case optional Screw pack Dust filter optional 1 acer Projector Quick Start Guide ...

Page 12: ...o input connector 7 Kensington lock port 2 HDMI input connector 8 Monitor loop through output connector VGA OUT 3 S Video input connector 9 Composite video input connector 4 PC analog signal HDTV component video input connector VGA 1 IN or VGA 2 IN 10 Power socket 5 RS 232 connector 11 Audio output connector 6 Mini USB connector 6 2 3 4 5 1 1 7 8 9 RS 232 VGA OUT VIDEO HDMI MINI USB AUDIO IN AUDIO...

Page 13: ...tor to the input source 4 POWER Power indicator LED 5 LAMP TEMP Lamp Temp Indicator LED 6 MENU Press MENU to launch the onscreen display OSD menu back to the previous step for the OSD menu operation or exit the OSD menu Confirm your selection of items 7 Four directional select keys Use up down left right buttons to select items or make adjustments to your selection 8 POWER Refer to Turning the pro...

Page 14: ...es the screen image 3 POWER Refer to Turning the projector on off on page 9 4 ASPECT RATIO To choose the desired aspect ratio 5 ZOOM Zooms the projector display in or out 6 Four directional select keys Use up down left right buttons to select items or make adjustments to your selection 1 2 3 4 5 6 8 9 11 12 13 14 15 16 17 17 18 19 20 7 10 ...

Page 15: ...1 HDMI DVI Press HDMI DVI to change source to HDMI DVI 12 HIDE Momentarily turns off the video Press HIDE to hide the image press again to display the image 13 SOURCE Changes the active source 14 RESYNC Automatically synchronizes the projector to the input source 15 Empowering Key Launches Acer functions eView eTimer ePower e3D Management 16 MUTE Turns the sound on off 17 KEYSTONE Adjusts the imag...

Page 16: ...s button to select the next or previous page This function is only available when connected to a computer via a USB cable 20 S VIDEO Press S VIDEO to change source to S Video This function is only available when a USB cable is not connected to a computer Icon Function Description X1120H X1220H P1120 P1220 X1320WH P1320W ...

Page 17: ...B cable 2 HDMI cable 6 S Video cable 3 VGA cable 7 Composite video cable 4 RS 232 cable 8 Power cord RS 232 VGA OUT VIDEO HDMI MINI USB AUDIO IN AUDIO OUT VGA1 IN VGA2 IN VGA D Sub D Sub D Sub D Sub 3 3 1 USB USB 5 D Sub 4 RS232 R W 8 Y Y 7 6 1 HDMI 2 2 1 HDMI HDMI HDMI HDMI S Video output Video output ...

Page 18: ...ssing the POWER button on the control panel The power indicator LED will flash and then turn blue 3 Turn on your source computer notebook video player etc The projector will detect your source automatically If the screen displays the Lock and Source icons it means the projector is locked onto a specific source type and that input signal type is not detected If the screen displays No Signal please ...

Page 19: ...s that the projector has overheated The lamp with automatically turn off the projector will automatically shut down and the LED temp indicator will blink Contact your local dealer or service center Fan Fail Lamp will automatically turn off soon This onscreen message indicates that the fan has failed The lamp will automatically turn off the projector will automatically shut down and the LED temp in...

Page 20: ...11 English English To raise lower the image 1 Use the elevator foot raise lower the image to the desired height Elevator foot 1 ...

Page 21: ...positioned at a desired distance from the screen Example If the projector is 3 m from the screen good image quality is possible for image sizes between 68 and 75 Note The image will be 148 cm high when the projector is 3 m from the screen Max screen size 75 Min screen size 68 Min screen size 68 8 A C B 3 m Desired distance Height 148 cm From base to top of image Height 135 cm ...

Page 22: ...113 62 127 x 95 124 3 68 139 x 104 135 75 152 x 114 148 3 5 80 162 x 122 158 87 178 x 133 173 4 91 185 x 139 181 100 203 x 152 198 4 5 103 208 x 156 203 112 228 x 171 223 5 114 231 x 174 226 125 254 x 190 247 6 137 278 x 208 271 150 305 x 228 297 7 159 324 x 243 316 175 355 x 266 346 8 182 370 x 278 361 200 406 x 305 396 9 205 417 x 313 406 225 457 x 343 445 10 228 463 x 347 451 250 508 x 381 495 ...

Page 23: ...14 English English X1320WH P1320W Series Max screen size 93 Min screen size 77 Min screen size 77 7 A C B 3 m Desired distance Height 163 cm From base to top of image Height 135 cm ...

Page 24: ...113 77 167 x 104 135 3 77 167 x 104 135 93 200 x 125 163 3 5 90 194 x 122 158 108 233 x 146 190 4 103 222 x 139 181 124 267 x 167 217 4 5 116 250 x 156 203 139 300 x 188 244 5 129 278 x 174 226 155 333 x 208 271 6 155 333 x 208 271 186 400 x 250 325 7 181 389 x 243 316 217 467 x 292 379 8 206 444 x 278 361 248 533 x 333 433 9 232 500 x 313 406 279 600 x 375 488 10 258 556 x 347 451 310 667 x 417 5...

Page 25: ...16 English English Adjusting distance and zoom to optimize image size X1120H X1220H P1120 P1220 Series Desired distance Height From base to top of image 2 m 2 2 m 50 Desired image size A C D B ...

Page 26: ...sired image size Distance m Top cm Diagonal inches A W cm x H cm Max zoom B Min zoom C From base to top of image D 30 61 x 46 1 2 1 3 59 40 81 x 61 1 6 1 8 79 50 102 x 76 2 0 2 2 99 60 122 x 91 2 4 2 6 119 70 142 x 107 2 8 3 1 139 80 163 x 122 3 2 3 5 158 90 183 x 137 3 6 4 0 178 100 203 x 152 4 0 4 4 198 120 244 x 183 4 8 5 3 238 150 305 x 229 6 0 6 6 297 180 366 x 274 7 2 7 9 357 200 406 x 305 8...

Page 27: ...50 108 x 67 1 6 1 9 88 60 129 x 81 1 9 2 3 105 70 151 x 94 2 3 2 7 123 80 172 x 108 2 6 3 1 140 90 194 x 121 2 9 3 5 158 100 215 x 135 3 2 3 9 175 120 258 x 162 3 9 4 7 210 150 323 x 202 4 8 5 8 263 180 388 x 242 5 8 7 0 315 200 431 x 269 6 5 7 8 350 250 538 x 337 8 1 9 7 438 300 646 x 404 9 7 525 Zoom Ratio 1 2x Desired distance Height From base to top of image 1 6 m 1 9 m 50 Desired image size A...

Page 28: ...he OSD for projector installation and maintenance 3 The background pattern acts as a guide for adjusting the calibration and alignment settings such as screen size and distance focus and more 4 The Installation menu includes the following options Projection method Menu location Keystone settings Language settings Reset to factory defaults Use the up and down arrow keys to select an option the left...

Page 29: ...eView Management submenu Acer eView Management is for display mode selection Please refer to Onscreen Display Menus on page 22 for more details Acer eTimer Management Press to launch Acer eTimer Management submenu Acer eTimer Management offers a reminder function for presentation time control Please refer to Onscreen Display Menus on page 22 for more details Acer ePower Management Press to launch ...

Page 30: ...21 English English Acer e3D Management Press to launch Acer e3D Management Acer e3D Management offers quick access to 3D functions Please refer to Onscreen Display Menus on page 22 for more details ...

Page 31: ...n the main menu After selecting the desired main menu item press to enter the feature settings submenu Use the keys to select the desired item and adjust the settings by using the keys Select the next item to be adjusted in the submenu and adjust as described above Press MENU on the remote control to return to the main menu To exit the OSD press MENU on the remote control again The OSD menu will c...

Page 32: ...There are several choices including white light yellow light blue pink dark green The projector will compensate for color deviation due to the wall color to show the correct image tone Brightness Adjust the brightness of the image Press to darken image Press to lighten the image Contrast Contrast controls the difference between the lightest and darkest parts of the picture Adjusting the contrast c...

Page 33: ... higher color temperatures the screen looks colder at lower color temperatures the screen looks warmer Degamma Effects the representation of dark scenery With greater gamma value dark scenery will look brighter Color R Adjusts the red color Color G Adjusts the green color Color B Adjusts the blue color Color C Adjusts the cyan color Color Y Adjusts the yellow color Color M Adjusts the magenta colo...

Page 34: ...fit the width of the screen and the height adjusted to display the image using a 16 9 ratio L Box Keep original signal aspect ratio and zoom in by 1 333 times Keystone Adjust image distortion caused by tilting the projector 40 degrees Sharpeness Adjusts the sharpness of the image Press to decrease the sharpness Press to increase the sharpness H Position horizontal position Press to move the image ...

Page 35: ...will be grayed out HDMI Color Range Adjust the color range of the HDMI image data to correct color display errors Auto Automatically adjust using information from the player Limited Range Process the input image as limited color range data Full Range Process the input image as full color range data HDMI Scan Info Adjust the overscan ratio of the HDMI image on screen Auto Automatically adjust using...

Page 36: ...t signal one cycle When source lock is turned On it will lock the current source channel unless you press the SOURCE button on the remote control or control panel to change the source and it will only search the next source Startup Screen Use this function to select your desired startup screen If you change the setting the changes will take effect when you exit the OSD menu Acer The default Acer p...

Page 37: ...re function is limited to the 4 3 aspect ratio only Note For XGA models to get best quality for your desired image set the PC resolution to 1024 x 768 before you use this function Note For SVGA models to get best quality for your desired image set the PC resolution to 800 x 600 before you use this function Note For WXGA models to get best quality for your desired image set the PC resolution to 128...

Page 38: ...used Timeout Min Once Security is activated the administrator can set the timeout function Press or to select the timeout interval The range is from 10 minutes to 990 minutes When the time is up the projector will prompt the user to enter the password again The factory default setting of Timeout Min is Off User Password Press to set up or change the User Password Use the number keys to set your pa...

Page 39: ...owing to retrieve the administrator password Press MENU for more than four seconds when the Enter Password or Enter Administrator Password dialog box is currently displayed Write down the Unlock ID and contact with Acer service center They will give you a new Administrator Password according to the Unlock ID Lock User Startup Screen By default Lock User Startup Screen is Off If Lock User Startup S...

Page 40: ... cooling process by pressing the power button twice Instant Resume Enables you to restart the projector immediately without a two minute cool down period Auto Shutdown The projector will automatically shutdown when there is no signal input after the allocated time in minutes Lamp Hour Elapse Displays the lamp s elapsed operating time in hours Lamp Reminding Activate this function to display a remi...

Page 41: ...bled when the projector is turned on Please adjust the setting depending on your purpose Mute Choose On to mute the volume Choose Off to restore the volume 3D Choose On to enable the 3D functions supported by TI DLP 3D technology Choose this item when using DLP 3D glasses a quad buffer NVIDIA or ATI graphics card and HQFS format file or DVD with corresponding SW player Choose Off to turn off 3D mo...

Page 42: ...33 English English Language Language Choose the language for your OSD menu Use the or key to select your preferred language Press to confirm the selection ...

Page 43: ...rd supports 3D playback Note Please refer to your graphics card s documentation 2 Download and install the latest drivers for your graphics card Note Please refer to your graphics card vendor s website for the latest driver version 3 You should also download a suitable 3D player such as the one available from www 3dtv at Note You may need to purchase additional software 4 Ensure you have the corre...

Page 44: ...natively press on your projector s remote control to open Acer e3D Management From the 3D options select On 5 If you find that the 3D content is not displaying properly try selecting 3D Sync Invert from the projector OSD or Acer e3D Management ...

Page 45: ...reoscopic player in order to view 3D content The instructions below explain how to view 3D content using the stereoscopic player that is available at www 3dtv at Other players may have different procedures 1 Open the stereoscopic player and set the viewing method by going to View Viewing Method Software pageflipping 2 Open the 3D content in the player Note You need to view content at fullscreen re...

Page 46: ...n or not Note Refer to the documentation that came with your glasses for instructions how to turn them on and how to change the battery Watching 3D DVD content If you have a DVD player that supports 3D playback you can watch 3D DVD contant using your Acer 3D enabled projector Connect your DVD player to the projector using any of the available input formats 1 Press the MENU button on the projector ...

Page 47: ...38 English English 4 If you find that the 3D content is not displaying properly try selecting 3D Sync Invert from the projector OSD or Acer e3D Management ...

Page 48: ...ab Verify that your display resolution setting is lower than or equal to UXGA 1600 x 1200 If the problem still appears change the monitor display you are using and follow the steps below Verify that the resolution setting is lower than or equal to UXGA 1600 x 1200 Click the Change button under the Monitor tab Click Show all devices Next select Standard monitor types under the SP box and choose the...

Page 49: ...adjust the following settings If you play a 4 3 format DVD title please change the format to 4 3 in the projector OSD If the image is still stretched you will also need to adjust the aspect ratio Set up the display format to 16 9 wide aspect ratio on your DVD player 8 Image is too small or too large Adjust the zoom ring on the front of the projector Move the projector closer to or further from the...

Page 50: ... turn on until the lamp module has been replaced To replace the lamp please refer to Replacing the lamp on page 44 Condition Message 1 Message Fan Fail the system fan is not working Projector Overheated the projector has exceeded its recommended operating temperature and must be allowed to cool down before it may be used Replace the lamp the lamp is about to reach its maximum lifetime Prepare to r...

Page 51: ... mode V Flashing Flashing Normal turn off mode V Solid on for 1 second Solid on for 1 second Turn on mode with cooling Flashing for 15 seconds then steady blue After 15 seconds then solid on for 45 seconds After 15 seconds then solid on for 45 seconds Lamp events Lamp ignition fail V Flashing End of lamp lifetime V V Thermal events Temperature error V Flashing Fan error V V Color wheel or DMD erro...

Page 52: ...gged with dust preventing proper ventilation This can cause overheating and damage the projector Normally 1000 hours is recommended however the period will vary depending on actual environment Please follow these steps for cleaning procdure 1 To clean the dust filter use a small vacuum cleaner designed for computers and other office equipment It also can be cleaned using water Illustration 2 2 If ...

Page 53: ...ent is hot Allow it to cool down before changing the lamp To change the lamp 1 Turn off the projector by pressing the Power button 2 Allow the projector at least 45 mins to cool down 3 Disconnect the power cord 4 Use a screwdriver to remove the screws on the two sides of the cover Illustration 1 5 Push up and remove the cover 6 Remove the two screws that secure the lamp module Illustration 2 and p...

Page 54: ...ure the mount base Note Screws are not included Please obtain the appropriate screws for your type of ceiling 2 Secure the ceiling rod using the appropriate type of four cylinder screws 2 0 m m 1 3 m m 8 4 mm 130 mm 4 9 9 m m Ceiling Mount Base Attach to ceiling Screw Type A 50 mm length 8 mm diameter Long Rod Extension Rod Long Cylinder Cap Allen Key For tightening loosening Tightening Screw Medi...

Page 55: ...cket and the projector to allow for proper heat distribution Use two washers for extra support if deemed necessary 4 Attach the ceiling bracket to the ceiling rod Screw Type B Smaller Washer Large Washer Projector Bracket Supports projector and allows for adjustments Spacer For heat dissipation Large cylinder cap Tightening Screw Allen Key For tightening loosening Screw Type A 50 mm length 08 mm d...

Page 56: ...for each model is listed in the table below 3 mm diameter screws are enclosed in the screw pack Models Screw Type B Washer Type Diameter mm Length mm Large Small X1120H X1220H X1320WH P1120 P1220 P1320W 4 8 V V 30 Tightening Screw Allen Key Allen Key Tightening Screw SCREW SPEC M4 x 8 mm 210 6 mm 193 6 mm 139 0 mm ...

Page 57: ...20 P1220 Native 4 3 X1320WH P1320W Native 16 10 Displayable colors 16 7 million colors Projection lens X1120H X1220H P1120 P1220 F 1 97 2 17 1 1X manual zoom lens X1320WH P1320W F 1 47 1 83 1 2X manual zoom lens Projection screen size diagonal X1120H X1220H P1120 P1220 27 250 X1320WH P1320W 30 315 Projection distance X1120H X1220H P1120 P1220 1 2 m 10 m X1320WH P1320W 1 2 m 10 m Throw ratio X1120H...

Page 58: ...ocket VGA input x2 Mini B USB RS 232 Composite video S Video VGA output 3 5 mm audio jack input 3 5 mm audio jack output HDMI Standard package contents Power cord VGA cable Remote control Batteries for remote control User s Manual CD Quick Start Guide Carrying case optional Screw pack Dust filter optional ...

Page 59: ...20 XGA 1024 x 768 60 48 36 1024 x 768 70 56 48 1024 x 768 75 60 02 1024 x 768 85 68 67 1024 x 768 119 804 98 80 SXGA 1152 x 864 70 63 80 1152 x 864 75 67 50 1152 x 864 85 77 10 1280 x 1024 60 63 98 1280 x 1024 72 77 90 1280 x 1024 75 79 98 1280 x 1024 85 91 15 QuadVGA 1280 x 960 60 60 00 1280 x 960 75 75 00 SXGA 1400 x 1050 60 65 32 1400 x 1050 75 82 00 UXGA 1600 x 1200 60 75 00 PowerBook G4 640 x...

Page 60: ...0 66 60 1024 x 600 60 37 30 Modes Resolution V Frequency Hz H Frequency kHz 480i 720 x 480 59 94 29 97 27 00 480p 720 x 480 59 94 31 47 576i 720 x 576 50 25 27 00 576p 720 x 576 50 31 25 720p 1280 x 720 60 45 00 720p 1280 x 720 50 37 50 1080i 1920 x 1080 60 30 33 75 1080i 1920 x 1080 50 25 33 75 1080p 1920 x 1080 60 67 50 1080p 1920 x 1080 50 56 26 Horizontal scan rate 30k 100 kHz Vertical scan ra...

Page 61: ...24 72 77 90 1280 x 1024 75 79 98 1280 x 1024 85 91 15 QuadVGA 1280 x 960 60 60 00 1280 x 960 75 75 00 1280 x 960 85 86 00 SXGA 1400 x 1050 50 54 00 1400 x 1050 60 65 32 1400 x 1050 75 82 00 UXGA 1600 x 1200 60 75 00 Modes Resolution V Frequency Hz H Frequency kHz WXGA 1280 x 768 60 47 78 1280 x 768 75 60 29 1280 x 768 85 68 63 1280 x 720 60 44 80 1280 x 720 75 56 00 1280 x 720 85 64 00 1280 x 800 ...

Page 62: ...97 27 00 480p 720 x 480 59 94 31 47 576i 720 x 576 50 25 27 00 576p 720 x 576 50 31 25 720p 1280 x 720 60 45 00 720p 1280 x 720 50 37 50 1080i 1920 x 1080 60 30 33 75 1080i 1920 x 1080 50 25 33 75 1080p 1920 x 1080 60 67 50 1080p 1920 x 1080 50 56 26 Horizontal scan rate 30k 100 kHz Vertical scan rate 50 120 Hz ...

Page 63: ...evice into an outlet on a circuit different from that to which the receiver is connected Consult the dealer or an experienced radio television technician for help Notice Shielded cables All connections to other computing devices must be made using shielded cables to maintain compliance with FCC regulations Notice Peripheral devices Only peripherals input output devices terminals printers etc certi...

Page 64: ...ions this product may or may not contain wireless radio devices such as wireless LAN and or Bluetooth modules Canada Low power license exempt radio communication devices RSS 210 a Common information Operation is subject to the following two conditions 1 This device may not cause interference and 2 This device must accept any interference including interference that may cause undesired operation of...

Page 65: ...sary steps have been taken and are in force to assure that production units of the same product will continue comply with the requirements EMC Directive 2004 108 EC as attested by conformity with the following harmonized standards EN55022 AS NZS CISPR22 Class B EN55024 EN61000 3 2 Class A EN61000 3 3 Low Voltage Directive 2006 95 EC as attested by conformity with the following harmonized standard ...

Page 66: ...ctive 1999 5 EC as attested by conformity with the following harmonized standard z Article 3 1 a Health and Safety EN60950 1 EN62311 z Article 3 1 b EMC EN301 489 1 EN301 489 17 z Article 3 2 Spectrum Usages EN300 328 EN301 893 Applicable to 5GHz high performance RLAN Year to begin affixing CE marking 2011 _______________________________ Jun 30 2011 Easy Lai Manager Date Regulation Center Acer Inc...

Page 67: ...evice must accept any interference received including interference that may cause undesired operation The following local Manufacturer Importer is responsible for this declaration Product DLP Projector Model Number FSV1101 FNX1102 FWX1103 Machine Type X1120H X1220H X1320WH P1120 P1220 P1320W D401D D411D D421D EV S32H EV X32H EV W32H series Name of Responsible Party Acer America Corporation Address...

Reviews: