background image

ACER  EI242QR


10


3. Assembly and Disassembly SOP


EI242QR


4.1 Disassembly Procedures


Preparation before disassemble 

1.Clean the room for 

disassemble 

2.Identify the area for monitor 
3.Check the position that the monitors be placed and the quantity of the monitor ;prepare the area for material flow; 

according to the actual condition plan the 

disassemble 

layout 

4.Prepare the implement, equipment, materials as bellow: 

1) working table 
2) Screw-driver 
3) knife 
4) glove 
5) cleaning cloth 
6) ESD protection


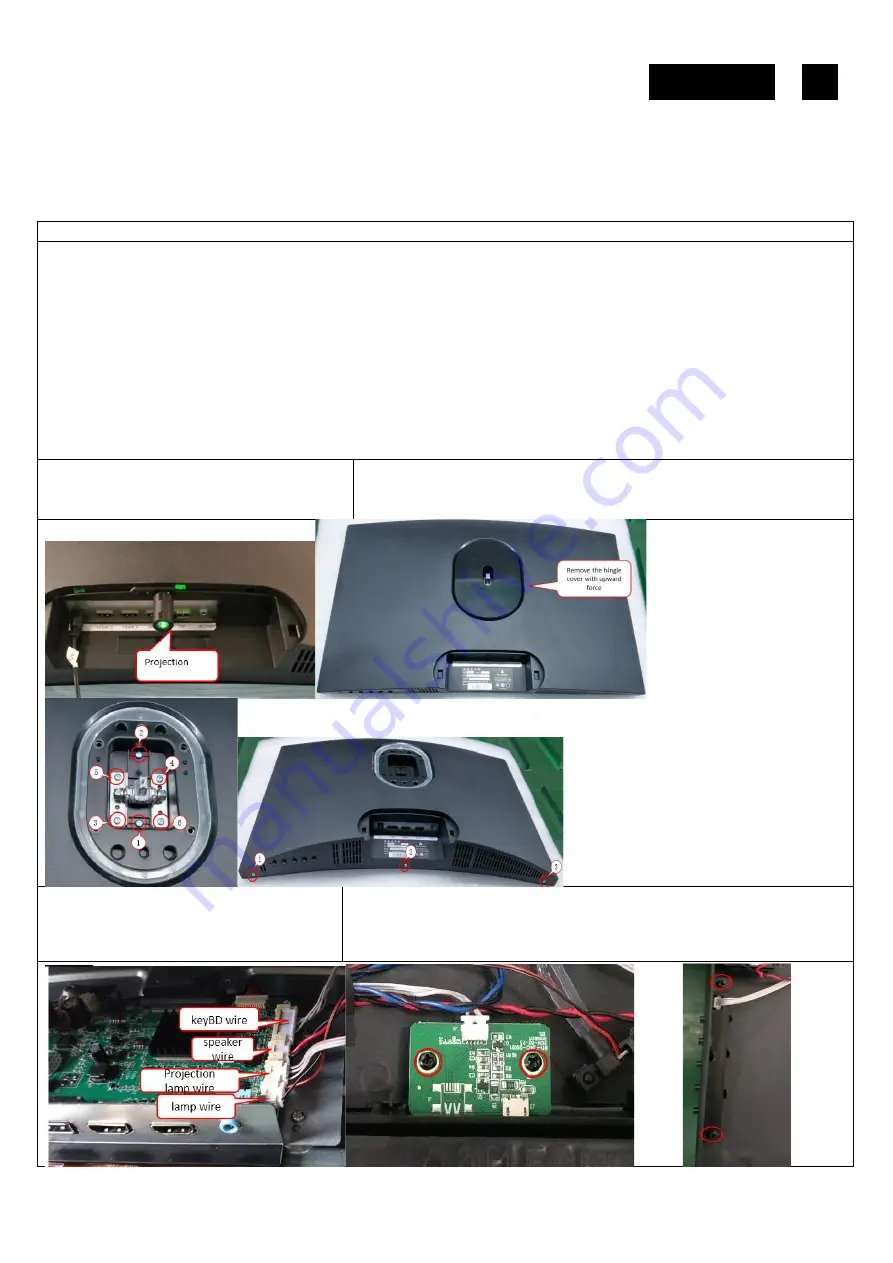
S1


Disassemble the RC, stand  

Disassemble base and hinge cover from the 
RC. Take off the projection lamp, Unlock RC 
screws. Disassemble RC from onitor. 


S2


Disassemble the cable from the connector , 
also disassemble the Key BD & projection 
lamp power BD from the RC.


Disassemble the keyBD wire, lamp wire, speaker cable & Projection lamp 
wire from the BD connector. 
Unlock the screw and disassemble the key BD & projection lamp power BD 


Summary of Contents for EI242QR

Page 1: ...ACER_EI242QR_SM20211215V1 Acer Monitor EI242QR LIFECYCLE EXTENSION GUIDE...

Page 2: ......

Page 3: ...vity diagram 6 3 Mechanical Instruction 7 4 Assembly and Disassembly SOP 8 5 Troubleshooting 14 6 FRU List 16 Safety Notice Any person attempting to service this chassis must familiarize with the chas...

Page 4: ...iring method may damage equipment or products It is recommended that service engineers should have repairing knowledge experience as well as appropriate product training per new model before performin...

Page 5: ...ACER EI242QR 5 Exploded Diagram 1 1 Product Exploded Diagram...

Page 6: ...ACER EI242QR 6 1 Wiring connectivity diagram...

Page 7: ...he type and size of the tools that would typically can be used to disassemble the product to apoint where components and materials requiring selective treatment can be removed Tool Description working...

Page 8: ...t 4 Prepare the implement equipment materials as bellow 1 working table 2 Screw driver 3 knife 4 glove 5 cleaning cloth 6 ESD protection S1 Disassemble the RC stand Disassemble base and hinge cover fr...

Page 9: ...n the cable Disassemble the LVDS cable LED power cable lamp power cable etc from the MB S4 Disassemble the MB lamp power BD and MB bracket Unlock the screw and remove the MB lamp power BD from the cha...

Page 10: ...S5 Disassemble the light bar from the RC Remove the tape from the cable then disassemble the light bar cover take the light bar from the groove of the RC finally unlock the screw and disassemble the...

Page 11: ...ove 5 cleaning cloth ESD protection S1 Assemble the lower trim part Take a lower trim and stick the conductive cloth and PE foam Then fix the lower trim part with screw S2 LVDS cable panel power cable...

Page 12: ...mbly Assemble the light bar with bracket then insert it into the groove of the RC fix the light bar cover and mylar cover the naked light bar area S5 Key BD projection lamp power BD and RC assembly As...

Page 13: ...ACER EI242QR 13 S5 Assemble the hinge bracket and the cover and the projection lamp Assemble the hinge bracket and the cover insert the projection lamp into the RC...

Page 14: ...ACER EI242QR 14...

Page 15: ...ACER EI242QR 15 4 Troubleshooting...

Page 16: ...to return it Category ACER DESCRIPTION Description PART NO ADAPTER ADAPTER 48W 12V 4 0A BLACK 25 TLTMC 001 BOARD MAIN BOARD 2H 1DP AUDIO OUT 55 TK0MC 001 BOARD FUNCTION KEY BOARD 55 THJMC 002 CABLE C...

Reviews: