background image

English

Acer LCD Monitor Quick Start Guide (QSG)

Important safety instructions

Please read the following instructions carefully.

1.  To clean the LCD monitor screen: 

• 

Turn off the LCD monitor and unplug the power cord.

• 

Spray a non-solvent cleaning solution onto a rag and clean the screen gently.

2.  Do not place the LCD monitor near a window. Exposing the monitor to rain, moisture or sunlight can severely damage 

it. 

3.  Do not apply pressure to the LCD screen. Excessive pressure may cause permanent damage to the display. 

4.  Do not remove the cover or attempt to service this unit yourself. An authorized technician should perform servicing of 

any nature. 

5.  Store the LCD monitor in a room with a temperature of -20° to 60° C (-4° to140° F). Storing the LCD monitor outside 

this range may result in permanent damage.

6.  Immediately unplug your monitor and call an authorized technician if any of the following circumstances occur:

• 

Monitor-to-PC signal cable is frayed or damaged. 

• 

Liquid spills onto the LCD monitor or the monitor is exposed to rain. 

• 

The LCD monitor or case is damaged. 

7.  In order to prevent damage to the LCD pannel, do not place the monitor face down on a surface. 

Package contents


LCD 

monitor

Power 

Adapter

MHL  cable  

(optional)

HDMI 

cable  

(optional)

Mini DP 

cable  

(optional)

DP  cable  

(optional)

USB  cable  

(optional)

Quick start 

guide

Wall 

mount 

BKT

CZ340CK

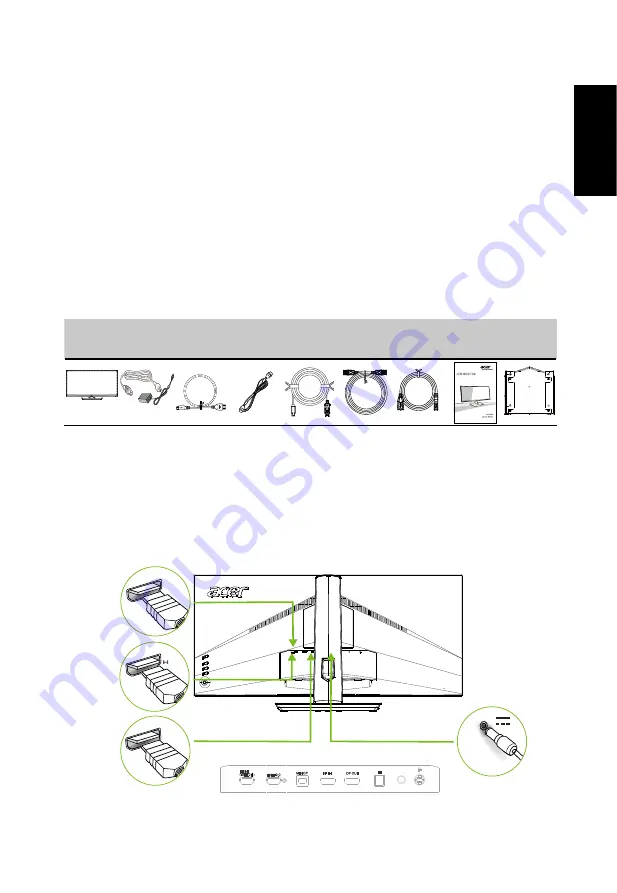
Connecting your monitor to a computer

1.  Turn off your computer and unplug your computer's power cord.

2.  Connect the signal cable to the HDMI (optional) and /or DP/Mini DP (optional) and /or MHL (optional) input socket of 

the monitor, and the HDMI (optional) and /or DP (optional) and /or MHL (optional) output socket of the graphics card 

on the computer. Then tighten the thumbscrews on the signal cable connector.

3.  Connect the USB Cable(Optional)  

Connect the USB 3.0 cable to port for fast charge. 

Connect the USB 3.0 cable to port.

4.  Insert the monitor power cable into the power port at the back of the monitor.

5.  Connect the power adapter and power cord to the monitor, then to a properly grounded AC outlet. 


DP

MHL

Summary of Contents for CZ340CKA

Page 1: ... PC signal cable is frayed or damaged Liquid spills onto the LCD monitor or the monitor is exposed to rain The LCD monitor or case is damaged 7 In order to prevent damage to the LCD pannel do not place the monitor face down on a surface Package contents LCD monitor Power Adapter MHL cable optional HDMI cable optional Mini DP cable optional DP cable optional USB cable optional Quick start guide Wal...

Page 2: ...en the Function Menu is active this button will quit the OSD 5 Function key a Press to view Main page Press again to enter next function in the Function Menu b The single toggle button on the backside of the Display bezel operates like a joystick To move the cursor simply toggle the button in four directions Press the button to select desired option Red indicates operable Grey indicates inoperable...

Page 3: ...put MHL Menu 1 Hot Key1 Modes Brightness Input Volume Gamma Contrast Blue Light Over Drive PIP PBP 2 Hot Key2 Modes Brightness Input Volume Gamma Contrast Blue Light Over Drive PIP PBP 3 Input selection 4 Menu OSD Hot key1 default Game mode To choose game mode G1 G2 G3 which user defined profile to use or scenario mode User Standard ECO Graphics Movie Action Racing Sports User Movie Graphics ECO S...

Page 4: ...wn to select Picture from the OSD Then toggle to the right to navigate to the element you wish to adjust and press the joystick to enter it 3 Toggle to the left or right to adjust the sliding scales 4 The Picture menu can be used to adjust the Brightness Contrast Black Boost Blue Light ACM and Super Sharpness 5 Brightness Adjust the brightness from 0 to 100 Note Adjusts the balance between light a...

Page 5: ...to 1 Press the MENU key to open the OSD 2 Toggle the joystick to the up or down to select Color from the OSD Then toggle to the right to navigate to the element you wish to adjust and press the joystick to enter it 3 Toggle to the left or right to adjust the sliding scales 4 Gamma mode allows you to adjust the luminance tone The default value is 2 2 standard value for Windows 5 Color temperature D...

Page 6: ...he element you wish to adjust and press the joystick to enter it 3 Toggle to the left or right to adjust the sliding scales 4 OD Select Off Normal or Extreme 5 Aim point Show an Aim point on the screen for shooting games OSD Game Mode User 120 English Gaming System OSD Timeout Picture Color Language Audio OSD Off Off Transparency Refresh rate num Save setting to Enter Move X 1 Press the MENU key to ...

Page 7: ...is On can support auto search for signal source in order 6 Daisy Chain Default is extend can select daisy chain function extend or clone Clone Mode is not supported with Adaptive Sync 7 DP Format Default is DP1 2 can selection DP support DP1 1 or DP1 2 format 8 Wide mode You can select which screen aspect you are using The options are Full Aspect and 1 1 9 PIP PBP settings 10 Hotkey Assigment Sele...

Page 8: ...SD 2 Toggle the joystick to the up or down to select Save Setting to from the OSD Then toggle to the right to navigate to the element you wish to adjust and press the joystick to enter it 3 Save Setting to Game mode There are three user defined profiles available When you have decided what settings suit you save them and system will be able to recall the settings in the future when you turn on gam...

Page 9: ...5Hz 9 XGA 1152x870 75Hz 10 XGA 1280x960 60Hz 11 XGA 1280x720 60Hz 12 SXGA 1280x1024 75Hz 13 WXGA 1280x800 60Hz 14 WXGA 1360x768 60Hz 15 WXGA 1440x900 60Hz 16 WSXGA 1680x1050 60Hz 17 WUXGA 1920x1080 60Hz 18 WFHD 2560x1080 60Hz 19 UHD 3440x1440 30Hz 20 UHD 3440x1440 60Hz 21 UHD 3440x1440 75Hz DisplayPort HDMI only HDMI only IBM MODE MODE Resolution 1 DOS 720x400 70Hz MAC MODE MODE Resolution 1 VGA 6...

Page 10: ...comply with the Class B limits may be attached to this equipment Operation with non certified peripherals is likely to result in interference to radio and TV reception Caution Changes or modifications not expressly approved by the manufacturer could void the user authority which is granted by the Federal Communications Commission to operate this product In order to prevent damage to the monitor do...

Page 11: ...nly HDMI Input Model Speakers Typical 7W x 2 Maximum Screen Size Horizontal 799 8mm Vertical 334 8mm Power Source 100 240V 50 60Hz Environmental Considerations Operating Temp 5 to 35 C Storage Temp 20 to 60 C Operating Humidity 10 to 85 Dimensions 816 8 W x 461 77 H x 308 97 D mm Weight N W 9 6 kg Unit net Mechanism spec Tilt 5 to 20 Swivel 30 to 30 Height adjustment 120 mm Pivot No Detachable foo...

Reviews: