background image

ix


Declaration of Conformity 

We,  

Acer Incorporated


8F, 88, Sec. 1, Xintai 5th Rd., Xizhi, New Taipei City 221, Taiwan 


And, 

Acer Italy s.r.l. 

Viale delle Industrie 1/A, 20020 Arese (MI), Italy 

Tel: +39-02-939-921 ,Fax: +39-02 9399-2913 

www.acer.it 


Product:   

LCD Monitor 

Trade Name:  

ACER

CB342CK

CB342CK xxxxxx


Model Number:  


SKU Number: 


(“x” = 0~9, a ~ z, A ~ Z, or blank)  


We, Acer Incorporated, hereby declare under our sole responsibility that the product described above is in 

conformity with the relevant Union harmonization legislations as below Directive and following harmonized 

standards and/or other relevant standards have been applied:


EMC Directive:


2014/30/EU 

 EN55032:2012/AC:2013 Class B 


EN61000-3-2:2014 Class D 

 EN 55024:2010 


EN61000-3-3:2013 


LVD Directive: 

2

014/35/EU 

 EN 60950-1:2006/A11:2009/A1:2010/A12:2011/A2:2013  


RoHS Directive: 2011/65/EU 

 EN 50581:2012 


ErP Directive: 2009/125/EC 

 Regulation (EC) No. 1275/ 2008; EN 50564:2011 


Year to begin affixing CE marking: 2019. 


_______________________________                                                             

Aug. 15, 2019


RU Jan / Sr. Manager                                                                                    Date 

Acer Incorporated (Taipei, Taiwan)


CE Declaration of Conformity

Summary of Contents for CB342CK

Page 1: ...Acer LCD Monitor User s Guide ...

Page 2: ...ided below The serial number and model number are recorded on the label affixed to your computer All correspondence concerning your unit should include the serial number model number and purchase information No part of this publication may be reproduced stored in a retrieval system or transmitted in any form or by any means electronically mechanically by photocopy recording or otherwise without th...

Page 3: ...structions carefully Keep this document for future reference Follow all warnings and instructions marked on the product Cleaning your monitor Please carefully follow these guidelines when cleaning the monitor Always unplug the monitor before cleaning Use a soft cloth to wipe the screen and cabinet front and sides Connecting disconnecting the device Observe the following guidelines when connecting ...

Page 4: ...battery leakage do not place the product on a vibrating surface Never use it under sporting exercising or any vibrating environment which will probably cause unexpected short current or damage internal devices Using electrical power This product should be operated from the type of power indicated on the marking label If you are not sure of the type of power available consult your dealer or local p...

Page 5: ... following the operating instructions Note Adjust only those controls that are covered by the operating instructions since improper adjustment of other controls may result in damage and will often require extensive work by a qualified technician to restore the product to normal condition Potentially explosive environments Switch off your device in any area with a potentially explosive atmosphere a...

Page 6: ... the features and benefits of our other products Disposal instructions Do not throw this electronic device into the trash when discarding To minimize pollution and ensure utmost protection of the global environment please recycle For more information on the Waste from Electrical and Electronics Equipment WEEE regulations visit http www acergroup com public Sustainability LCD pixel statement The LC...

Page 7: ...ing too long in one fixed posture avoid slouching forward and or leaning backward stand up and walk around regularly to remove the strain on your leg muscles Taking care of your vision Long viewing hours wearing incorrect glasses or contact lenses glare excessive room lighting poorly focused screens very small typefaces and low contrast displays could stress your eyes The following sections provid...

Page 8: ...r computer use more relaxing and productive Take short breaks regularly and often Perform some stretching exercises Breathe fresh air as often as possible Exercise regularly and maintain a healthy body In order to prevent damage to the monitor do not lift the monitor by its base ...

Page 9: ...e is in conformity with the relevant Union harmonization legislations as below Directive and following harmonized standards and or other relevant standards have been applied EMC Directive 2014 30 EU EN55032 2012 AC 2013 Class B EN61000 3 2 2014 Class D EN 55024 2010 EN61000 3 3 2013 LVD Directive 2014 35 EU EN 60950 1 2006 A11 2009 A1 2010 A12 2011 A2 2013 RoHS Directive 2011 65 EU EN 50581 2012 E...

Page 10: ...peration The following local Manufacturer Importer is responsible for this declaration Product LCD Monitor Model Number CB342CK SKU Number CB342CK xxxxxx x 0 9 a z A Z or Blank Name of Responsible Party Acer America Corporation Address of Responsible Party 333 West San Carlos St Suite 1500 San Jose CA 95110 U S A Contact Person Acer Representative Phone No 254 298 4000 Fax No 254 298 4147 Acer Ame...

Page 11: ... Conformity ix Federal Communications Commission Declaration of Conformity x Unpacking 1 Attaching removing the base 2 Screen position adjustment 3 Connecting the power cord 5 Power saving 5 Display Data Channel DDC 5 Connector pin assignment 6 Standard timing table 8 Installation 9 User controls 10 How to adjust a setting 11 Mode Management Menu 11 Adjusting the OSD settings 12 Adjusting the pict...

Page 12: ...ent when you unpack the box and save the packing materials in case you need to ship or transport the monitor in the future LCD monitor Quick start guide LCD monitor CB2 series CB342CK USER GUIDE AC power cord DP cable Option HDMI cable Option USB cable Option ...

Page 13: ...emoving the base Installation Align the base with the stand and push the base towards the top of the monitor and then rotate the base clockwise Tighten the screw clockwise Remove Reverse the steps to remove the base ...

Page 14: ...ilt swivel of the monitor Height Adjustment After pressing the top of the monitor then you can adjust the height of the monitor 2 150mm 1 Tilt Please see the illustration below for an example of the tilt range Only at the highest point can 35 degrees of recline be offered for the angle of elevation 5 35 ...

Page 15: ...4 Swivel With the built in pedestal you can swivel the monitor for the most comfortable viewing angle 360 360 ...

Page 16: ...for the country in which the equipment will be installed Power saving The monitor will be switched to power saving mode by the control signal from the display controller as indicated by the orange colored power LED Model LED light On Blue Power saving Orange The power saving mode will be kept until a control signal has been detected or the keyboard or mouse is activated The recovery time from powe...

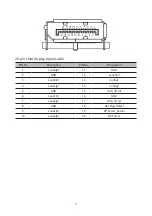
Page 17: ...ription 1 TMDS data 2 11 TMDS clock shield 2 TMDS data 2 shield 12 TMDS clock 3 TMDS data 2 13 CEC 4 TMDS data 1 14 DDC serial data 5 TMDS data 1 shield 15 SCL 6 TMDS data 1 16 SDA 7 TMDS data 0 17 DDC CEC Ground 8 TMDS data 0 shield 18 5V Power 9 TMDS data 0 19 Hot Plug Detect 10 TMDS clock ...

Page 18: ...o Description PIN No Description 1 Lane0 p 11 GND 2 GND 12 Lane3 n 3 Lane0 n 13 Config1 4 Lane1 p 14 Config2 5 GND 15 AUX_CH n 6 Lane1 n 16 GND 7 Lane2 p 17 AUX_CH p 8 GND 18 Hot Plug Detect 9 Lane3 n 19 DP Power_Return 10 Lane3 p 20 DP Power ...

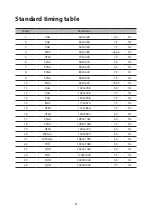
Page 19: ...SVGA 800 600 75 Hz 10 MAC 832 624 74 55 Hz 11 XGA 1024 768 60 Hz 12 XGA 1024 768 70 Hz 13 XGA 1024 768 75 Hz 14 MAC 1152 870 75 Hz 15 VESA 1152 864 75 Hz 16 VESA 1280 960 60 Hz 17 SXGA 1280 1024 60 Hz 18 SXGA 1280 1024 75 Hz 19 VESA 1280 720 60 Hz 20 WXGA 1400 900 60 Hz 21 WSXGA 1680 1050 60 Hz 22 FHD 1920 1080 60 Hz 23 QHD 2560 1440 60 Hz 24 FHD 1720x1440 75 Hz 25 QHD 3440X1440 60 Hz 26 QHD 3440X...

Page 20: ...same time USB 3 0 devices radio frequency interference may impact on 2 4GHz USB wireless devices result in a drop in throughput on the wireless transmission User may feel delayed response to mouse or keyboard inputs missing keyboard characters or mouse commands decreased operating distance between the 2 4 GHz USB wireless device and its receiver Please refer to the following ways which helps to re...

Page 21: ...on to select scenario mode When the OSD menu is active this button will act as the exit key exit OSD menu Volume Key Enter Press this button to adjust volume a Press to enter a selection in the OSD b When OSD Lock push 3 seconds Lock function is disabled Input source switching Up Left a Use the INPUT hotkey to enter Input select function b Press this button to select the desired item when in OSD m...

Page 22: ... and digital cameras N A Rec709 Rec709 mode is the same with sRGB mode but for the Rec 709 color space N A HDR HDR mode provide a High Dynamic Range to helps create lifelike images while replicating accurate details in lighting and shades to create a picture which is truthfully bright or dark without sacrificing detail N A User Mode In User mode the settings can be fine tuned to suit any situation...

Page 23: ...the keys to adjust the sliding scales 4 The Picture menu can be used to adjust the current Brightness Contrast Black Boost BlueLight ACM HDR Super Sharpness qualities 5 Brightness Adjust the brightness from 0 to 100 Note Adjusts the balance between light and dark shades 6 Contrast Adjust the contrast from 0 to 100 Note Sets the degree of difference between light and dark areas 7 Black Boost Adjust...

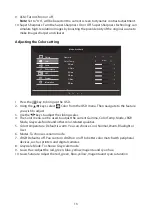
Page 24: ... up the OSD 2 Using the keys select Color from the OSD menu Then navigate to the feature you wish to adjust 3 Use the keys to adjust the sliding scales 4 The Color menu can be used to adjust the current Gamma Color Temp Mode sRGB Mode Grayscale Mode and other color related qualities 5 Color temperature Default is warm You can choose Cool Normal Warm Bluelight or User 6 Modes To choose scenario mod...

Page 25: ...rd off On off Normal off Picture Color Audio Performance OSD System Information Over Drive FreeSync VRB Ultra Low Latency Refresh Rate Num 1 Press the key to bring up the OSD 2 Using the keys select Performance from the OSD menu Then navigate to the feature you wish to adjust 3 Use the keys to adjust the sliding scales 4 The Performance menu can be used to adjust the screen Over Drive FreeSync Ref...

Page 26: ...ing mode The transparency can be 0 OFF 20 40 60 or 80 7 OSD Lock To control OSD Key lock On Off Note OSD Locked Set the OSD Lock to On by the OSD option and press Enter to execute the All Key lock function The OSD Locked message will be displayed in the middle of the screen LED lights will be changed from blue light to orange light Press any Key screen to prompt OSD Locked message OSD Unlocked In ...

Page 27: ...t and other important settings 5 DDC CI Allows the monitor settings to be set through the software on the PC Note DDC CI short for Display Data Channel Command Interface which allows monitor controls to be sent via software Product the Information setting Mode Standard Picture Color Audio Performance OSD System Information Main Source HDMI 1 Resolution 3440x1440 H V Frequency H 89 KHz V 60 Hz Mode...

Page 28: ...Check if the computer system is switched on and in power saving standby mode Unstable picture Check if the specification of graphics adapter and monitor is in compliance which may be causing the input signal frequency mismatch Abnormal picture Image is missing off center too large or too small on the screen Check the display setting on your system In case of a missing image please select another r...

Reviews: