background image

Chapter 1

11

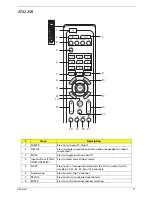
AT4220B

#

Item

Description

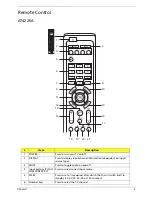
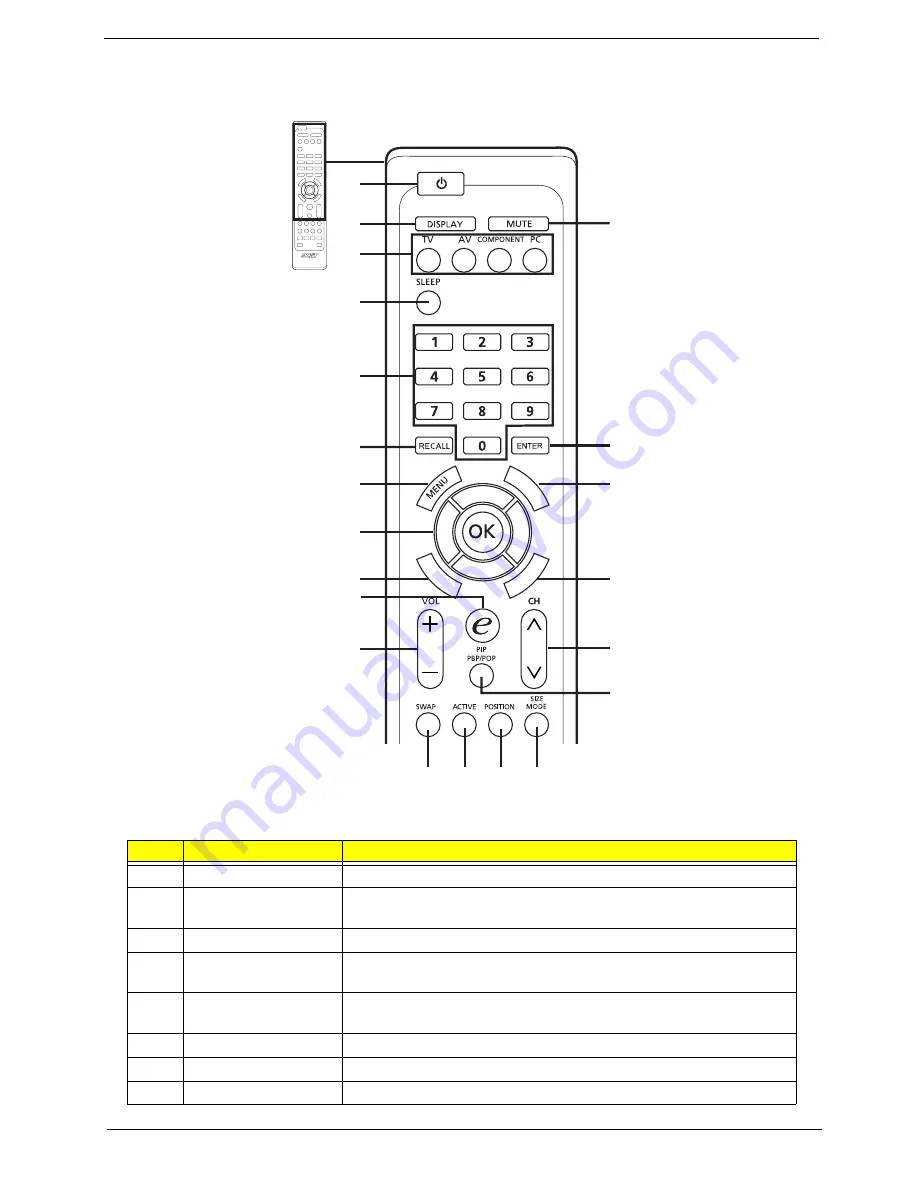
1

POWER

Press to turn your TV on/off.

2

DISPLAY

Press to display input/channel information (dependent on input/
source type).

3

MUTE

Press to toggle audio on and off.

4

Input buttons (TV/AV/
COMPONENT/PC)

Press to select correct input mode.

5

SLEEP

Press to set a time period after which the TV will switch itself to 
standby (15, 30, 45, 60, 90 or 120 minutes).

6

Number keys

Press to select the TV channel.

7

RECALL

Press to return to the previous channel.

8

ENTER

Press to confirm channel number selection.

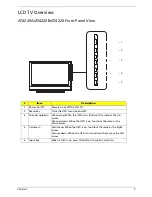
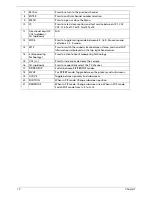
1

7

11

2

10

6

3

9

8

4

5

12

13

15

16

17

14

18

19

20

21

Summary of Contents for AT4220

Page 1: ...Acer AT4220A LCD TV Service Guide PRINTED IN TAIWAN Service guide files and updates are available on the ACER CSD web For more information please refer to http csd acer com tw ...

Page 2: ...II Revision History Please refer to the table below for the updates of LCD TV AT4220A service guide Date Chapter Updates ...

Page 3: ...ublication may be reproduced transmitted transcribed stored in a retrieval system or translated into any language or computer language in any form or by any means electronic mechanical magnetic optical chemical manual or otherwise without the prior written permission of Acer Incorporated ...

Page 4: ...y Acer Incorporated software described in this manual is sold or licensed as is Should the programs prove defective following their purchase the buyer and not Acer Incorporated its distributor or its dealer assumes the entire cost of all necessary servicing repair and any incidental or consequential damages resulting from any defect in the software Acer is a registered trademark of Acer Incorporat...

Page 5: ... bits and pieces of additional information related to the current topic WARNING Alerts you to any damage that might result from doing or not doing specific actions CAUTION Gives precautionary measures to avoid possible hardware or software problems IMPORTANT Reminds you to do specific actions relevant to the accomplishment of procedures ...

Page 6: ...ill NOT be covered in this generic service guide In such cases please contact your regional offices or the responsible personnel channel to provide you with further technical details 2 Please note WHEN ORDERING FRU PARTS you should check the most up to date information available on your regional web or channel For whatever reason if a part number change is made it will not be noted in the printed ...

Page 7: ... HDCP for DVI D optional 19 pin HDMI connector optional DIN45325 IEC169 2 terminal for TV CATV input 3 5 mm earphone jack for audio line input Video Functions PAL NTSC SECAM video format support 480i 576i 480p 576p 1080i and 720p format support Built in dynamic adaptive smoothing filter Built in dynamic temporal frame filter noise reduction Built in dynamic motion and edge adaptive de interlacing ...

Page 8: ... 5W Max Remote Control Multi function remote control Speaker Internal speaker 10W x 2 Amplifier 10W x 2 stereo adjustable volume Others On screen display adjustment function ISP In System Programming function available for revising driver easily ...

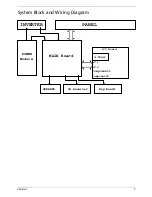
Page 9: ...Chapter 1 3 System Block and Wiring Diagram MAIN Board SPEAKER IR Receiver Key Board Component2 Component1 AV 2 AV 1 I O Board A Tuner INVERTER PANEL Module POWER ...

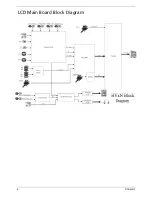
Page 10: ...4 Chapter 1 LCD Main Board Block Diagram ...

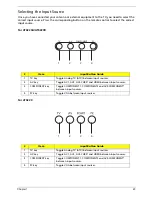
Page 11: ...Channel up down Channel up When the OSD is on functions the same as the Up arrow Channel down When the OSD is on functions the same as the Down arrow 4 Volume Volume up When the OSD is on functions the same as the Right arrow Volume down When the OSD is on functions the same as the Left arrow 5 Input key When is OSD is on press this button to confirm selection 1 2 3 4 5 ...

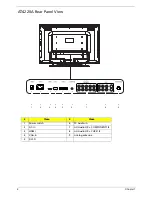
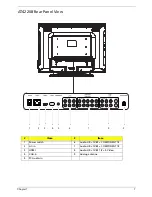
Page 12: ...6 Chapter 1 AT4220A Rear Panel View Item Item 1 Power switch 6 PC Audio in 2 AC in 7 AV Audio L R COMPONENT 1 2 3 HDMI 8 AV Audio L R CVBS 1 2 4 VGA in 9 Analog antenna 5 DVI D 4 3 2 1 8 7 6 5 9 ...

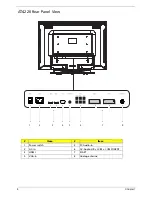
Page 13: ... AT4220B Rear Panel View Item Item 1 Power switch 6 Audio L R CVBS COMPONENT 1 2 2 AC in 7 Audio L R CVBS COMPONENT 1 2 3 HDMI 8 Audio L R CVBS 1 2 S Video 4 VGA in 9 Analog antenna 5 PC Audio in 4 3 2 1 9 8 7 6 5 ...

Page 14: ...8 Chapter 1 AT4220 Rear Panel View Item Item 1 Power switch 5 PC Audio in 2 AC in 6 AV Audio L R CVBS COMPONENT 3 HDMI 7 SCART 4 VGA in 8 Analog antenna 4 3 2 1 8 7 6 5 ...

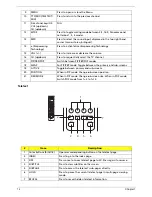
Page 15: ...dent on input source type 3 MUTE Press to toggle audio on and off 4 Input buttons TV AV COMPONENT PC Press to select correct input mode 5 SLEEP Press to set a time period after which the TV will switch itself to standby 15 30 45 60 90 or 120 minutes 6 Number keys Press to select the TV channel 1 7 11 2 10 6 3 9 8 4 5 12 13 15 16 17 14 18 19 20 21 ...

Page 16: ... switch the sound system between stereo main and SAP Information is displayed on the top right hand corner 14 e Empowering Technology Press to activate Acer Empowering Technology 15 VOL Press to increase or decrease the volume 16 CH up down Press to sequentially select the TV channel 17 PIP PBP POP Switch between PIP PBP POP modes 18 SWAP For PIP PBP mode Toggle between the primary and sub screens...

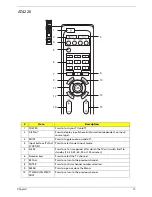
Page 17: ...n and off 4 Input buttons TV AV COMPONENT PC Press to select correct input mode 5 SLEEP Press to set a time period after which the TV will switch itself to standby 15 30 45 60 90 or 120 minutes 6 Number keys Press to select the TV channel 7 RECALL Press to return to the previous channel 8 ENTER Press to confirm channel number selection 1 7 11 2 10 6 3 9 8 4 5 12 13 15 16 17 14 18 19 20 21 ...

Page 18: ... Switch between PIP PBP POP modes 18 SWAP For PIP PBP mode Toggle between the primary and sub screens 18 ACTIVE Toggle between primary and sub screens 20 POSITION When in PIP mode Change sub screen position 21 SIZE MODE When in PIP mode Change sub screen size When in POP mode Switch POP mode from 1 5 to 1 12 Item Description 1 Color buttons R G Y B Operates corresponding button on the teletext pag...

Page 19: ...Press to select correct input mode 5 SLEEP Press to set a time period after which the TV will switch itself to standby 15 30 45 60 90 or 120 minutes 6 Number keys Press to select the TV channel 7 RECALL Press to return to the previous channel 8 ENTER Press to confirm channel number selection 9 MENU Press to open or close the Menu 10 TTX MIX TELETEXT MIX Press to return to the previous channel 1 7 ...

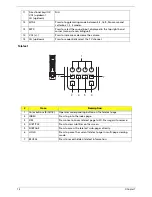
Page 20: ...e 15 CH up down Press to sequentially select the TV channel Item Description 1 Color buttons R G Y B Operates corresponding button on the teletext page 2 INDEX Press to go to the index page 3 SIZE Press once to zoom teletext page to 2X Press again to resume 4 SUBTITLE Press to view subtitles on the screen 5 SUBPAGE Press to access the teletext s sub pages directly 6 HOLD Press to pause the current...

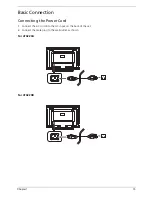
Page 21: ...Chapter 1 15 Basic Connection Connecting the Power Cord 1 Connect the AC cord into the AC input on the back of the set 2 Connect the male plug to the wall outlet as shown For AT4220A For AT4220B ...

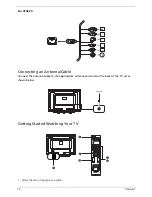
Page 22: ...T4220 Connecting an Antenna Cable Connect the antenna cable to the appropriate antenna terminal on the back of the TV set as shown below Getting Started Watching Your TV 1 Select the setup language you prefer 1 2 4 1 1 3 ...

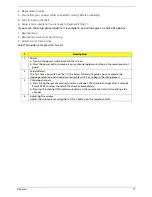
Page 23: ...r switch beneath the screen b Press the power button number keys or channel up down button on the remote control good 2 Setup Wizard The first time you switch on the TV the Setup Wizard will guide you to complete the language selection and channel scanning Press OK key to begin the setup process 3 Changing channels a Press 0 9 on the remote control to select a channel The channel changes after 2 s...

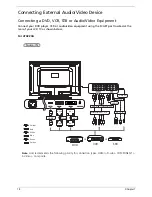
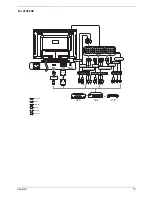
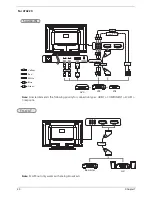
Page 24: ...ment Connect your DVD player VCR or audio video equipment using the SCART port located at the rear of your LCD TV as shown below For AT4220A Note Acer recommends the following priority for connection types HDMI D sub COMPONENT S Video Composite Source IN Y Yellow Red White Blue Green S video R W S ...

Page 25: ...Chapter 1 19 For AT4220B Y Yellow Red White Blue Green R W 6 YLGHR 6 ...

Page 26: ...r 1 For AT4220 Note Acer recommends the following priority for connection types HDMI COMPONENT SCART Composite Note SCART out only works with analog broadcasts Source IN Y Yellow Red White Blue Green R W TV OUT ...

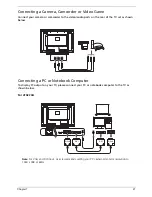
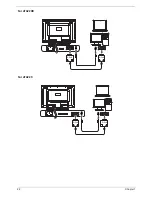
Page 27: ...o ports on the rear of the TV set as shown below Connecting a PC or Notebook Computer To display PC output on your TV please connect your PC or notebook computer to the TV as shown below For AT4220A Note For VGA and DVI input Acer recommends setting your PC s external monitor resolution to 1360 x 768 at 60Hz ...

Page 28: ...22 Chapter 1 For AT4220B For AT4220 ...

Page 29: ...V ATV between input sources 2 AV key Toggle AV1 AV2 AV3 CVBS and HDMI between input sources 3 COMPONENT key Toggle COMPONENT 1 COMPONENT2 and AV3 COMPONENT between input sources 4 PC key Toggle VGA between input sources Item Input Button Guide 1 TV key Toggle Analog TV ATV between input sources 2 AV key Toggle AV1 AV2 AV3 CVBS and HDMI between input sources 3 COMPONENT key Toggle COMPONENT 1 COMPO...

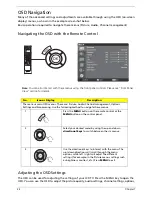
Page 30: ...to open the OSD You can use the OSD to adjust the picture quality audio settings channel settings options No Icon or Display Description There are six main OSD menus These are Picture Audio Channel management Options Settings and Empowering Use the following method to navigate these menus 1 Press the MENU button on the remote control or the MENU button on the control panel 2 Select your desired me...

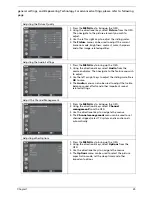
Page 31: ...n navigate to the feature you wish to adjust 3 Use the left or right keys to adjust the sliding scale Press OK to save 4 The Audio menu can also be used to adjust the treble balance sound effects and other important sound related settings Adjust the Channel Management 1 Press the MENU key to bring up the OSD 2 Using the directional keys select Channel management from the OSD 3 Use the directional ...

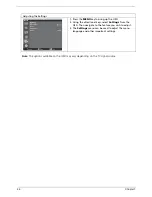
Page 32: ...e TV signal source Adjusting the Settings 1 Press the MENU key to bring up the OSD 2 Using the directional keys select Settings from the OSD Then navigate to the feature you wish to adjust 3 The Settings menu can be used to adjust the menu language and other important settings ...

Page 33: ...odes designed to give you the best picture quality when watching a particular kind of program There are five pre defined audio and video setting for 1 Press and hold the Empowering Key for more than two seconds to open the menu 2 TV mode Empowering Key settings menu will come out 3 Use the directional keys to navigate the menu and select the Empowering Technology icon 4 Press MENU to exit Now when...

Page 34: ...raphics of modern video games providing lifelike entertainment while protecting your eyesight by adjusting brightness and contrast What s more Game mode provides a heightened audio experience Sports Sports mode us suited for outdoor sports program with accurate background depth and clear gradation between the bright outdoor playing field and darker auditoriums Sports mode also brilliantly enhances...

Page 35: ...channel There are a total of five slots in which you can store TV programs Viewing Your Favorite Channels On the remote control if you press the Empowering Key for less than two seconds the TV will toggle between the five stored TV channels sequentially according to your list of favorites ...

Page 36: ...P screens 2 Press the TV AV COMPONENT or PC keys number keys or CH up or down to change the content of the active screen 3 Press the SWAP key to change the content between the primary and the subscreen 4 Press the POSITION key to select the location of the subscreens from upper left upper right lower right lower left as shown in the image 5 Press the SIZE MODE key to select the size of the subscre...

Page 37: ...V AV COMPONENT or PC keys number keys or CH up or down to change the content of the active screen 3 Press the SWAP key to change the content between the primary and the PBP screen POP 1 Press the ACTIVE key to toggle between POP screens 2 Press the number keys or CH up or down to change TV channel on the active screen 3 Press the SIZE MODE key to access the 1 5 or 1 12 picture on picture mode as s...

Page 38: ...ional keys to navigate to the Settings menu Then select Set PIN 3 Enter a four digit password Type it again and press OK to reconfirm 4 Press MENU to exit Note The default PIN for this TV is 0000 Enter 0000 when you want to change the PIN If you forget your PIN please enter 6163 to reset If you want to lock your TV please follow the steps below 1 Press the MENU key on the remote control to bring u...

Page 39: ...ax power consumption 291W Power saving 5W Mechanical Dimensions W x H x D mm 1071 x 794 x 311 Weight Kg 32 3 Weight lbs 71 15 Wall mounting 400 mm x 200 mm Analog TV system TV color system NTSC Sound system M Stereo system BTSC A2 Closed caption Yes V chip US Canada Analog TV tuner quantity 1 Terminal Analog tuner in Yes AV1 CVBS S Video Audio R L AV2 CVBS S Video Audio R L COMPONENT1 YPbPr YCbCr ...

Page 40: ...r can be instantaneous The recovery from off state requires no manual power on Sync on normal operation Sync off Preset mode Pixel Format Hor Freq kHz Hor Polarity Vert Freq Hz Vertical Polarity Standard 1 720 400 31 47 70 VGA 2 640 480 31 47 60 VGA 3 640 480 37 861 72 VESA 4 640 480 37 50 75 VESA 5 640 480 43 4 85 VESA 6 800 600 35 156 56 VESA 7 800 600 37 879 60 VESA 8 800 600 48 077 72 VESA 9 8...

Page 41: ...3 y 273 on x and y value Display Area Phase Center and Tilt Display area 42 inches diagonal H phase A B less than 1 5 mm V center C D less than 1 5mm Tilt E F less than 1 mm Max Brightness The brightness should exceed 350 Cd m2 while set both of contrast and brightness to max and color temperature of Standard is selected Typical value would be at 400 Cd m2 Acoustical Noise With the display operati...

Page 42: ...o for purity white point mis convergence luminance measurements and white uniformity measurement Operating temperature Operating humidity 0o C to 35o C 10 to 90 non condensing Storage and Shipping Storage temperature Shipping temperature Storage humidity Shipping temperature 20o C to 60o C 20o C to 60o C 10 to 90 non condensing 10 to 90 non condensing Altitude Operating altitude Shipping altitude ...

Page 43: ...side x axis Front and rear side y axis Drop Test The packaged display shall be capable of passing drop test as specified in following specification without any measurable degradation in performance or detectable mechanical or cosmetic damage Filter 330 Hz Dropping way 1 corner 3 edges 6 flats Dropping height see the table below Weight kg Corner edge F R Btm cm L R Up side cm 0 9 76 76 9 1 61 61 18...

Page 44: ... X AV2 X X X X X X O X HDMI X X X X X X O X Component 1 X X X X X X O X Component 2 X X X X X X O X VGA O O O O O O X O DVI X X X X X X O X O support X not support POP 1 5 1 12 Main Sub Screen Combination Main Sub TV AV1 AV2 HDMI Component 1 Component 2 VGA DVI TV X X X X X X O X AV1 X X X X X X X X AV2 X X X X X X X X HDMI X X X X X X X X Component 1 X X X X X X X X Component 2 X X X X X X X X VG...

Page 45: ...handle the module during operation or just after powered off you must take proper precautions against electric shock and must not touch the drive circuit portion and metallic part of module within 10 minutes The capacitors in the drive circuit portion remain temporarily charged even after the unit is powered off If the residual voltage is strong enough it could result in electric shock Thus we str...

Page 46: ... arrows indicate 3 Release the two screws holding the TV Stand cover 4 Then remove the TV Stand cover 5 Release the four screws fastening the right speaker 6 Push the latch as the arrow indicates and disconnect the right speaker cable then remove the right speaker 7 Repeat step 5 and step 6 to remove the left speaker ...

Page 47: ...Chapter 2 41 8 Release all the screws marked in red Then lift the TV back cover as shown ...

Page 48: ...42 Chapter 2 9 Release all screws securing the PCB holder 10 Then remove the PCB holder as the arrows indicate ...

Page 49: ...O board as the arrow indicates 13 At first disconnect all the cables that connect to the main board 14 Release the four screws fastening the main board then detach the main board 15 Release the eight screws fastening the power board and the grounded wire 16 Then remove the power board ...

Page 50: ...ard then detach the IR board 18 Release the three screws holding the button board then detach the function board 19 Detach function key 20 Disconnect the LVDS cable and release the four screws holding the PCB tray 21 Then remove the PCB tray with LVDS cable ...

Page 51: ...nverter backlight cables and the inverter board FFC 24 Then detach the right inverter board 25 Repeat these steps to detach the left inverter bracket and the left inverter board 26 Release the screws marked in red then remove the right and the left LCD brackets 27 Release the eight screws holding the LCD then you can remove the LCD ...

Page 52: ...46 Chapter 2 Board Placement Please refer to this section to reconnect all cables when you do the assembly 1 Speaker cable connector The other ends of this cable link to the two speakers ...

Page 53: ... of this cable links to the LVDS board 3 Inverter cable connector This is a three end cable The other two ends link the right inverter and the power board We define this cable as Inverter R to Power Board to Main Board Please refer to the photos below ...

Page 54: ... other end of this cable links to the power board 5 Main board to power board cable 14 pins and 10 pins The other end of this cable links to the power board too 6 Main board to function board to IR board cable The other two ends of this cable link to function board and IR board ...

Page 55: ...Chapter 2 49 7 Power board to left inverter board cable The other end of this cable links to the left inverter board Please refer to the photos below ...

Page 56: ...50 Chapter 2 ...
Page 57: ...e symptoms by attempting to re create the failure by running the diagnostic test or by repeating the same operation 3 Disassemble and assemble the unit without any power sources 4 If any problem occurs you can perform visual inspection before you follow this chapter s instructions You can check the following Power cords are properly connected and secured There are no obvious shorts or opens There ...

Page 58: ... board Or IO board or All cable LED Bright Replacement Panel A Replacement M B END no LED Bright Green color Check Remote control and keypad OK Replacement Remote control or IR board or Keypad board NG Replacement Cable Check M B no no no LCD Panel can Display no Check panel s all cable Replacement M B Check Power code Power code Plug in Replace Power board or Main board Or IO board or All cable L...

Page 59: ...B Replacement LCD Panel Inverter B END LCDPanel Backlight Bright LCDPanel Backlight Bight Replacement Main B Inverter power Cable had Plug in Change Inverter Power Cable LCDPanel Backlight Bright Replacement Power B Replacement LCD Panel Inverter B END LCDPanel Backlight Bright LCDPanel Backlight Bight Replacement Main B B no no no no ...

Page 60: ...Function Remote Control have battery Change Battery IR Board Cable plug in Check IR B cable or Replacement IR B Cable Press Remote Menu Key OSD can Display Replacement IR B C Press Remote Menu Key OSD can Display Replacement M B END ...

Page 61: ... Button Keys No Function Key Board Cable plug in Check K B cable or Replacement K B Cable Press Menu Key check have Function Replacement K B Cable End Press Menu Key check have Function Replacement K B Cable End D ...

Page 62: ...play RFCable plug in CheckRFcable or Replacement RFCable Replacement I Oboard RFCanDisplay END Replacement M B RFCable plug in CheckRFcable or Replacement RFCable Replacement I Oboard RFCanDisplay END Replacement M B E no no ...

Page 63: ...Chapter 3 56 COMPONENT1 and COMPONENT2 No Display Component Cable plug in Check Component cable or Replacement Component Cable Replacement I O Board Component cat display END Replacement M B Board F ...

Page 64: ...57 Chapter 3 AV1 and AV2 No Display CVBS Cable plug in Check CVBS cable or Replacement CVBS Cable Replacement I O Board CVBS cat display END Replacement M B Board H ...

Page 65: ...peaker cable or Replacement Speaker cable END Mute turn off Volume set 50 Audio R L source had plug IN Check Audio R L source cable Replacement IO B or Speaker Video can Display Check Video cable or Replacement Video Cable Speaker R L cable plug IN Check Speaker cable or Replacement Speaker cable END Mute turn off Volume set 50 H Speaker have Sound Output Speaker have Sound Output no Replacement M...

Page 66: ...59 Chapter 3 VGA No Display VGA Cable plug in Check VGA cable or Replacement VGA Cable Read EDID DATA EDID Data Normal END Write EDID data VGA can display Replacement M B P ...

Page 67: ...Chapter 3 60 DVI No Display DVI Cable plug in Check DVI cable or Replacement DVI Cable Read EDID DATA EDID Data Normal END Write EDID data DVI can display Replacement M B Q ...

Page 68: ...61 Chapter 3 HDMI No Display HDMI Cable plug in Check HDMI cable or Replacement HDMI Cable Read EDID DATA EDID Data Normal END Write EDID data HDMI can display Replacement M B R ...

Page 69: ...r Replacement HDMI CABLE Read EDID DATA EDID Data Normal Write EDID data Sound output Replacement Main B END HDMI Cable plug in Check HDMI cable or Replacement HDMI CABLE Read EDID DATA EDID Data Normal Write EDID data Sound output Replacement Main B END no L no no ...

Page 70: ...Replacement Main B Sound Normal Replacement Main B M Mute turn off Volume set to 50 PC DVI can Display Check Video cable or PC or Replacement VGA DVI cable no Audio Line in Cable Plug IN Check Line in cable or Replacement Line in Cable END no no ...

Page 71: ...ug in Check Component cable or Replacement Component Cable Component Sound Normal Replacement IO B END Component Sound Normal Z L1 Mute turn off Volume 30 Earphone remove Component Source can Display Check Component cable or Replacement Component Cable ...

Page 72: ...Check Video and R L cable or Replacement Video or R L Cable AV1 S Video Sound Normal Replacement IO B END AV1 S Video Sound Normal 1 L1 Mute turn off Volume 30 Earphone remove AV1 S Video Source can Display Check Video and R L cable or Replacement Video or R L Cable ...

Page 73: ...is made it will NOT be noted on the service guide For Acer authorized service providers your Acer office may have a different part number code from those given in the FRU list of this printed service guide You MUST use the local FRU list provided by your regional Acer office to order FRU parts for repair and service of customer machines Note To scrap or to return the defective parts you should fol...

Page 74: ...E ASSY HX4E INV PANEL AUO 12P 10P 2A 50 M34V7 002 INVERTER CABLE INVERTER R TO POWER TO MB CABLE ASSY HX4E INV AU 14P 10P 4P 2A 50 M34V7 003 CABLE MB TO POWER BOARD 10P 14P CABLE ASSY HH7 MB POW LG 10P 14P 1A 50 M24V7 005 CABLE MB TO KEY TO IR CABLE ASSY HV4 MB IR BTN 10 9 8 REV1A 50 M34V7 004 SPEAKER CABLE CABLE ASSY HH2 SPEAKER 2P 3P 4P 1A 50 M12V7 005 CABLE AUDIO TO POWER BOARD 8P 7P CABLE ASSY...

Page 75: ... SPEAKER ASSY HX4E FS 0000085AA 23 M34V7 002 Label POWER LABEL LABEL POWER HV4 HCHV4001 REV3A 40 M34V7 001 I O TURNER LABEL PAL EU LABEL I O TUNER EU HV9 HCHV9003 REV3A 40 M25V7 002 I O TURNER LABEL NTSC US LABEL I O TUNER NA HV9 HCHV9004 REV3A 40 M28V7 002 I O TURNER LABEL PAL AUS LABEL I O TUNER AU HV9 HCHV9005 REV3A 40 M38V7 001 Miscellaneous CLAMP AUO R L HX4 FBHX4002 REV3A CLAMP AUO R L HX4 F...

Page 76: ... M4 22 B BNI WASHER SPRING 86 M34V7 002 SCREW T4 12 B BNI SCREW T4 12 B BNI 86 M25V7 003 NUT IO EA1 MBEA1001 REV3D NUT IO EA1 MBEA1001 REV3D 86 M25V7 001 SCREW T3 8 B BNI SCREW T3 8 B BNI 86 M08V7 007 SCREW M3 6 B BNI SCREW M3 6 B BNI 86 M08V7 003 SCREW F3 0 6 B NI SCREW F3 0 6 B NI 86 M25V7 002 ...

Page 77: ... COVER ASSY 60 M34V7 002 1 13 SCREW T4 12 B BNI SCREW T4 12 B BNI 86 M25V7 003 38 14 RATING LABEL HV4 RATING LABEL HV4 N A 1 15 I O TURNER LABEL PAL EU LABEL I O TUNER EU HV9 HCHV9003 REV3A 40 M25V7 002 1 16 POWER LABEL LABEL POWER HV4 HCHV4001 REV3A 40 M34V7 001 1 17 SCREW T3 8 B BNI SCREW T3 8 B BNI 86 M08V7 007 7 18 NUT IO EA1 MBEA1001 REV3D NUT IO EA1 MBEA1001 REV3D 86 M25V7 001 2 19 SCREW M4 ...

Page 78: ... KEY HV7E EBHV7001 REV3A 42 M25V7 001 1 31 WIRE SADDLE CHA 4 WIRE SADDLE CHA 4 VV3 EBVV3006 REV3A 42 M03V7 012 1 32 WIRE SADDLE MWS 7 WIRE SADDLE MWS 7 VV3 EBVV3010 REV3A 42 M03V7 013 6 33 SCREW T3 12 P BNI SCREW T3 12 P BNI 86 M34V7 001 8 ...

Reviews: