background image

English

15

Y

Y

W

W

R

R

Video

Audio

L

R

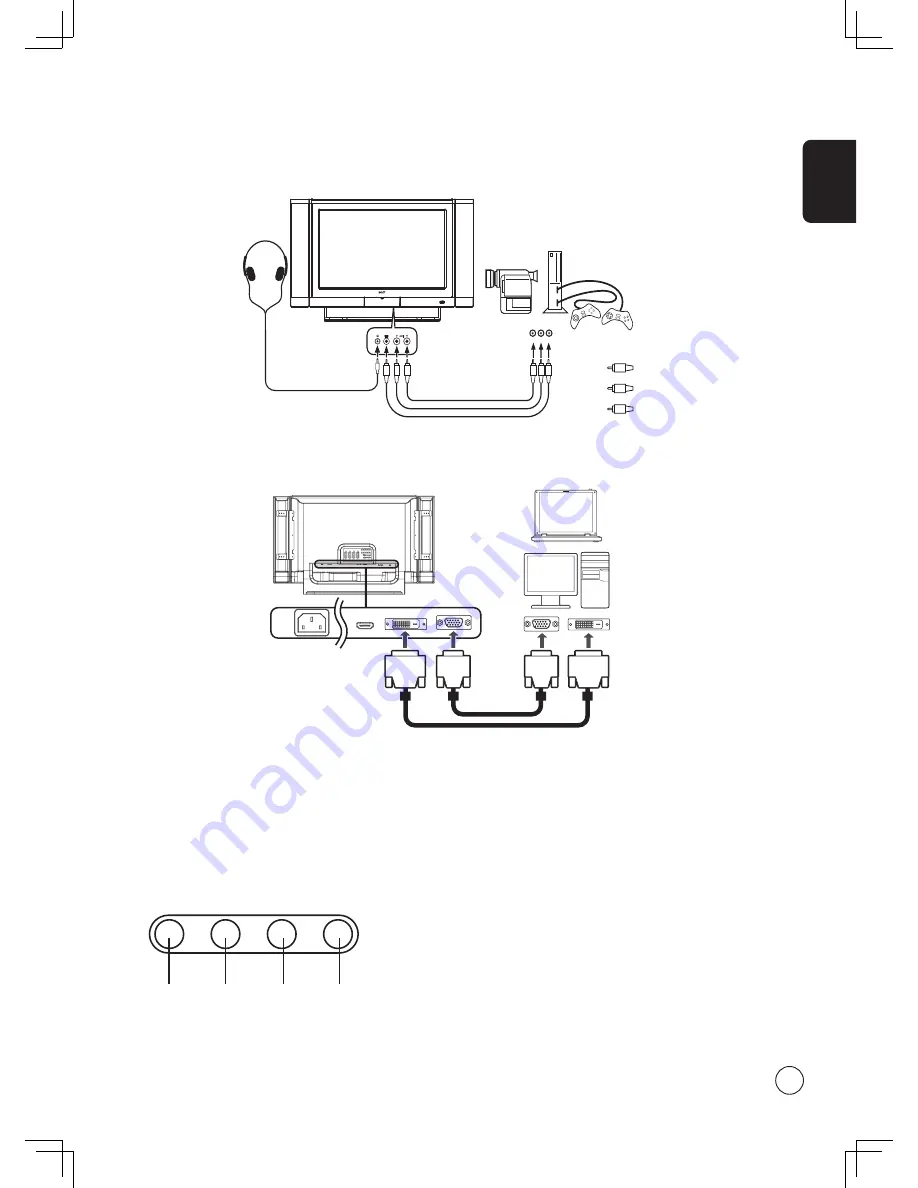
Connecting a camera, camcorder, video game or headphones

Connect your camera or camcorder to the video/audio ports on the bottom of the TV set as shown below.

DVI

D-Sub

D-Sub

DVI

or

Connecting a PC or notebook computer

To display PC output on your TV, connect your PC or notebook computer to the TV as shown below.

Selecting the input source

Once you have connected your antenna or external equipment to the TV, you need to select the correct input source.

Press the corresponding button on the remote control to select the correct input source. 

Input button guide:

TV

AV

SCART

PC

1  TV key


Toggle between Digital TV (DTV) and Analog TV (ATV) input sources.

2  AV key


Toggle between AV1/AV2/Component1/Component2 and HDMI  
input sources.

3  SCART key


Toggle between SCART1/SCART2/SCART3 and SCART4 input sources.

4  PC key


Toggle between VGA and DVI input sources.

Y

Yellow

Red

White

R

W

1

2

3

4

Summary of Contents for AT3705-MGW

Page 1: ...necting external audio video devices 14 Connecting a DVD VCR or audio video equipment 14 Connecting a camera camcorder video game or headphones 15 Connecting a PC or notebook computer 15 Selecting the input source 15 OSD navigation 16 Navigating the OSD with the remote control 16 OSD settings 17 Empowering Technology 18 Changing the default setting 18 TV mode 19 Media Gateway mode 20 Advanced feat...

Page 2: ...s either expressed or implied with respect to the contents hereof and specifically disclaims the implied warranties of merchantability or fitness for a particular purpose Record the model number serial number purchase date and place of purchase information in the space provided below The serial number and model number are indicated on the label affixed to your device All correspondence concerning ...

Page 3: ... rating of the equipment plugged into the extension cord does not exceed the extension cord ampere rating Also make sure that the total rating of all products plugged into the wall outlet does not exceed the fuse rating 9 Never push objects of any kind into this product through cabinet slots as they may touch dangerous voltage points or short out parts which could result in a fire or electric shoc...

Page 4: ...European Union EU This device complies with the essential requirements of the European Council The EMC Directive 89 336 EEC as attested by conformity with the following harmonized standards EN55013 2001 A1 2003 Sound and television broadcast receivers and associated equipment Radio disturbance characteristics Limits and methods of measurement EN55020 2002 A1 2003 Sound and television broadcast rec...

Page 5: ...s up to 1080p DCTI DLTI and 3D comb filtering for sharp and accurate images SRS WOW BBE Digital and Dolby Digital audio technology for awesome audio performance Acer Empowering Technology for selecting and defining personalized user preferences Card reader for easy enjoyment of multimedia Integrated media gateway for playback of PC content and web radio Packing checklist Your LCD TV package should...

Page 6: ...5 MGW AT3705 DTV Front view 1 Volume up down 2 Input key 3 Menu key 4 Channel up down 5 Headphone jack 6 Video jack 7 Audio L R jacks 8 Card reader 1 2 3 4 5 6 7 8 Card reader for MGW models only Your LCD TV overview ...

Page 7: ... T antenna in 9 DVI in 14 RJ 45 LAN in 10 VGA in Rear panel view 1 SCART in out SCART1 CVBS in out RGB in Audio R L SCART2 CVBS in out S video in Audio R L SCART3 CVBS in out RGB in Audio R L SCART4 CVBS in out S video in Audio R L 2 Component1 in 3 Component2 in 4 AV1 in 5 AV out RJ 45 LAN in for MGW models only 2 4 5 ...

Page 8: ...PX Press to select the sound input displayed in the top right hand corner mono stereo bilingual 7 SRS BBE Press to toggle audio mode between Stereo SRS and BBE modes 8 Number keys 9 ENTER Press to confirm channel number selection 10 RECALL Press to return to the previous channel 11 MENU Press to open or close the Menu 12 CH LIST Press to launch the channel list See page 26 13 Directional keys OK 1...

Page 9: ...9 1 Navigate the OSD with the four directional keys Press OK to confirm selection or enter next screen 9 2 Press to skip to a designated position in a video 10 Back Press to return to previous screen 11 Online Media mode Shortcut to Online Media 12 Music mode Shortcut to Music mode 13 Picture mode Shortcut to Picture mode 14 Video mode Shortcut to Video mode 15 Rewind Press to rewind during music ...

Page 10: ...Do not tamper with batteries Keep them away from children Aug When you anticipate that the remote control will not be used for an extended period remove the batteries to prevent possible damage as a result of battery leakage Dispose of used batteries according to local regulations Recycle if possible Setting up the remote control 1 Open the cover on the back of the remote unit 2 Insert two AAA bat...

Page 11: ... 2 3 4 5 6 7 8 0 9 CH PG b Press the power button number keys or channel up down button on the remote control 2 Setup Wizard The first time you switch on the TV the Setup Wizard will guide you to complete the language selection and channel scanning OK Press the OK key to begin the setup process You can also adjust these settings using the front control panel Please see Front panel view on page 6 f...

Page 12: ...ocal time and time zone using the remote control Step 3 Ensure that your co axial cables are connected correctly before proceeding see page 11 for details Step 4 Scan for digital channels If you do not have digital service press OK to skip this stage The onscreen menu will ask you for confirmation ...

Page 13: ...ind me Select an option and press OK to exit 3 Changing channels RECALL ENTER 1 2 3 4 5 6 7 8 0 9 ENTER 1 Press 0 9 on the remote control to select a channel The channel changes after 2 seconds Press ENTER to select the channel immediately CH PG 2 Pressing the channel CH up down button on the remote control will also change the channel 4 Adjusting the volume VOL Adjust the volume level using the V...

Page 14: ...ng external audio video devices Connecting a DVD VCR or audio video equipment Connect your DVD player VCR or audio video equipment using the SCART port located at the rear of your LCD TV as shown below AV Recoder R Y Y W R W S PDIF Composite in Audio in S PDIF in COMPOSITE AUDIO Acer recommends using the S PDIF connector to connect to your AV amplifier for 5 1 surround sound while watching digital...

Page 15: ...ing the input source Once you have connected your antenna or external equipment to the TV you need to select the correct input source Press the corresponding button on the remote control to select the correct input source Input button guide TV AV SCART PC 1 TV key Toggle between Digital TV DTV and Analog TV ATV input sources 2 AV key Toggle between AV1 AV2 Component1 Component2 and HDMI input sour...

Page 16: ... desired menu by using the left and right sides of the directional pad to switch between the five menus 3 OK Use the directional pad to interact with the menu The up down directions will scroll through the menu options while left right will adjust the different settings for example in the Picture menu settings such as brightness contrast etc If there are no further adjustments hold down Enter on t...

Page 17: ...udio menu can also be used to adjust the treble balance sound effects and other important sound related settings Adjusting the channel settings 1 Press the MENU key to bring up the OSD 2 Using the directional keys select Channel management from the OSD 3 Use the directional keys to navigate the menus 4 The Channel management menu can be used to adjust delete and reorder the channel list add new se...

Page 18: ...ology functions Empowering Technology has different functions depending on your current mode In TV mode the choice is between Scenario mode and Favorite channel see page 19 for details TV mode Empowering Key settings menu MGW mode Empowering Key settings menu DISPLAY MUTE TV RECALL MENU CH LIST BACK EPG SWAP ACTIVE POSITION SIZE MODE TELETEXT MPX HOLD SIZE SUBTITLE VOL PIP PBP POP CH PG ENTER AV S...

Page 19: ...ation between the bright outdoor playing field and darker auditoriums Sports mode also brilliantly enhances colors and presents swiftly moving pictures without residual images All of this is achieved via specific Gamma corrections and saturation adjustments Precise audio can be heard thanks to BBE performance Concert Concert mode places you in a virtual concert hall opera house or other dim enviro...

Page 20: ...r See page 19 for details Media Gateway Media Gateway is a handy way to quickly navigate the menus and subscreens of the Media Gateway function Press the Empowering Key at any time when using Media Gateway and you will instantly return to the Media Gateway home page saving lots of time Please note that Media Gateway is not the default setting for the Empowering Key To set Media Gateway as the defa...

Page 21: ...nt between the primary and the subscreen PIP PIP Swap SWAP ACTIVE POSITION SIZE MODE PIP PBP POP 3 Press the POSITION key to select the location of the subscreens from upper left upper right lower right lower left as shown in the image PIP PIP PIP PIP SWAP ACTIVE POSITION SIZE MODE PIP PBP POP 4 Press the SIZE MODE key to select the size of the subscreen from 25 37 5 50 as shown in the image PIP P...

Page 22: ... SWAP key to change the content between the primary and the PBP screen PBP PBP Swap POP SWAP ACTIVE POSITION SIZE MODE PIP PBP POP 1a Press the ACTIVE key to toggle between POP screens 1 2 3 4 5 6 7 8 0 9 CH PG 1b Press the number keys or CH up or down to change the TV channel on the active screen SWAP ACTIVE POSITION SIZE MODE PIP PBP POP 2 Press the SIZE MODE key to access the 1 5 or 1 12 pictur...

Page 23: ... Enter a four digit password Type it again and press OK to reconfirm 4 MENU Press MENU to exit DISPLAY MUTE TV RECALL MENU CH LIST BACK EPG SWAP ACTIVE POSITION SIZE MODE TELETEXT MPX HOLD SIZE SUBTITLE VOL PIP PBP POP CH PG ENTER AV SCART PC SLEEP WIDE ZOOM ROTATE SLIDE OPTION SRS BBE CARD MGW 1 2 3 4 5 6 7 8 0 9 OK DISPLAY MUTE TV RECALL MENU CH LIST BACK EPG SWAP ACTIVE POSITION SIZE MODE TELET...

Page 24: ...channel 3 1 2 3 4 5 6 7 8 0 9 MENU OK Enter your PIN Type it again and press OK to reconfirm 4 MENU Press MENU to exit Locking your TV 1 MENU Press the MENU key on the remote control to bring up the OSD 2 OK Use the arrow keys to navigate to the Settings menu Then select Lock TV 3 1 2 3 4 5 6 7 8 0 9 MENU OK Enter your PIN Type it again and press OK to reconfirm 4 MENU Press MENU to exit ...

Page 25: ...t from the OSD 2 OK Navigate to the channel you wish to manage 3 OK Navigate down to TV rating system and then select the categories you wish to block 4 1 2 3 4 5 6 7 8 0 9 You will need to enter your PIN before you make any adjustments to the settings 5 MENU OK Press OK to confirm your settings 6 MENU Press MENU to exit DISPLAY MUTE TV RECALL MENU CH LIST BACK EPG SWAP ACTIVE POSITION SIZE MODE T...

Page 26: ... list Channel list Channel list allows you to quickly find the TV channel you are searching for DISPLAY MUTE TV RECALL MENU CH LIST BACK EPG SWAP ACTIVE POSITION SIZE MODE TELETEXT MPX HOLD SIZE SUBTITLE VOL PIP PBP POP CH PG ENTER AV SCART PC SLEEP WIDE ZOOM ROTATE SLIDE OPTION SRS BBE CARD MGW 1 2 3 4 5 6 7 8 0 9 OK DISPLAY MUTE TV RECALL MENU CH LIST BACK EPG SWAP ACTIVE POSITION SIZE MODE TELE...

Page 27: ...nnels The first time you completed the setup wizard all available channels were listed If you need to re scan for new channels please follow the steps below DISPLAY MUTE TV RECALL MENU CH LIST BACK EPG SWAP ACTIVE POSITION SIZE MODE TELETEXT MPX HOLD SIZE SUBTITLE VOL PIP PBP POP CH PG ENTER AV SCART PC SLEEP WIDE ZOOM ROTATE SLIDE OPTION SRS BBE CARD MGW 1 2 3 4 5 6 7 8 0 9 OK DISPLAY MUTE TV REC...

Page 28: ...hand corner of the EPG screen is the preview area The preview area will show live TV content from the channel currently highlighted Highlight a new channel or program and press OK to display it in the preview area c Content area The content area is divided into three columns date channel and program Use the directional keys and the OK key to navigate between the items in the content area Highlight...

Page 29: ...w and push OK a marker will appear on the left side of the program name Then when your selected program is due to start a reminder will flash on the screen to warn you The remind feature will also warn you of any conflicts in your selections e g if you select two shows that are due to be broadcast at the same time 1 EPG Press the EPG key on the remote control 2 OK Use the arrow keys to navigate ar...

Page 30: ...uffers some loss of fidelity or subtle distortions caused by the inherent characteristics of the loudspeaker BBE Digital addresses these problems by compensating for phase and amplitude distortions and in effect delivers the signal to the speaker in a form that allows it to reproduce the original performance more fully and more faithfully To enable BBE Digital press the SRS BBE key on the remote c...

Page 31: ...side of the screen Panorama In this mode the picture is progressively stretched toward each side of the screen Letterbox 1 2 and 3 In this mode the picture is enlarged linearly to fit the screen The top and bottom portions of the picture may be cut off DISPLAY MUTE TV RECALL MENU CH LIST BACK EPG SWAP ACTIVE POSITION SIZE MODE TELETEXT MPX HOLD SIZE SUBTITLE VOL PIP PBP POP CH PG ENTER AV SCART PC...

Page 32: ...English 32 Dimensions 1184 70 717 70 430 50 348 28 635 48 828 8 470 90 200 00 400 00 100 00 122 00 282 18 32 00 Unit mm ...

Page 33: ... Card SCART3 RGB SCART3 RGB VGA DVI HDMI TV X SCART1 X X X X X X X X X X X X X X X X SCART2 X X X X X X X X X X X X X X X X SCART3 X X X X X X X X X X X X X X X X SCART4 X X X X X X X X X X X X X X X X Component 1 X X X X X X X X X X X X X X X X Component 2 X X X X X X X X X X X X X X X X AV1 X X X X X X X X X X X X X X X X AV2 X X X X X X X X X X X X X X X X DTV X X DMA Card X X X X X X X X X X X...

Page 34: ...occur due to a VHS camera camcorder or other peripheral being connected at the same time Switch off one of the other peripherals The ghost or double image may be caused by obstruction to the antenna due to high rise buildings or hills Using a highly directional antenna may improve the picture quality The horizontal dotted lines shown on the pictures may be caused by electrical interference e g hai...

Page 35: ...work that all the connections are correctly attached If using a static IP address verify that the values are in the same range as your other network devices and that the address is not already being used by another device Online radio can only be only accessed if your TV is connected to a network through an AP or router and an open Internet connection I am not able to play certain media files Chec...

Page 36: ...ART4 CVBS S video Audio R L Component1 HD 480i 480p 1080i 720p Component2 HD 480i 480p 1080i 720p AV1 CVBS S video Audio R L AV2 CVBS Audio R L AV out CVBS Audio R L PC D sub yes DVI D HDCP yes with HDCP HDMI yes with HDCP PC audio in yes SPDIF out yes Headphone support yes Audio system Speakers 15 W 15 W Sound effects BBE Digital SRS WOW Digital audio effects Dolby Digital MGW specs Formats suppo...

Reviews: