


FUNCTIONS:
Foldable construction for ease of storage and portability.
Side control panel with volume, bass control, and input/output jacks, and band switch.
Ergonomic design with full back support.
Easy to clean heavy duty upholstery grade vinyl cover.
Wireless audio transmission
Insert pin(J)into closure
Step4:
Step1
:
Place the arm bracket(H) on the right
side of the chair. Please pay careful
attention to the drawing to be sure
you have the correct arm bracket for
that side .Use 2bolts(C)with washer
(G)to fasten the arm bracket to the
side of the chair .Tighten the bolts
with the Allen wrench provided(I).
Step2:
Attach the right arm to the
chair using the parts shown in the
illustration. The metal sleeve will
position itself inside the arm hole and
the large washer(F)should be between
the arm and the chair. Tighten the
bolts with the Allen wrench
provided(I).
When assembled correctly the arm
should pivot freely.
Step3:
Push the plastic caps(D)into
the bolts holes to finish the arm
assembly for that side. Repeat steps
1-3 for the left side of the chair.
A
B
C
D
E
G
F
2
1
H
I
1
1
2
6
6
2
6
1
J
1. Lift X Rocker out of box.
2. Keep the chair in the folded position and place it on the floor so that back side of the chair is facing up and
the bottom of the seat is touching the floor.
3. Review the set up diagrams to familiarize yourself with the X Rocker's components, accessories, and set-up.
4. Please complete steps 1-4 to assemble the chair.
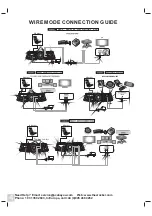
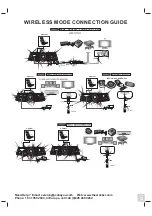
5. When used in wireless mode, make sure that the control panel is not more than 65.6ft / 20 meters from the audio source
and 6.5ft / 2 meters from a power source.
6. Unpack the power adapter and connect it to the main power outlet, then to the power jack on the control panel. (A7)
7. Press the power button (A6) and confirm that the power indicator light (A8) is on. In wireless mode, turn on the power to
the TX box (A13), confirm that its indicator light is on, and check that the band selected on the TX box (A14) is the same
as that selected on the control panel (A5) of the X Rocker.
8. Follow the connection diagrams. They show how to connect the X Rocker to the audio source of your choice .
9. Adjust the bass and volume levels to your preference---start rocking.
C
F
J
I
READ BEFORE USAGE:
Always make sure hinge is locked before moving.
Always make sure hinge is locked before sitting in the chair.
Excessive use of audio equipment could lead to hearing loss.
Excessive sound pressure from earphones and headphones can cause hearing loss.
Children under the age of 13 should not use this product without adult supervision.
Strictly for indoor use. Do not expose to direct sunlight, moisture or extreme temperatures.
If the cover becomes wet, disconnect the power immediately and don't use until it is completely dry.
Do not attempt to remove the cover or any components. Removal of the cover or tampering with components puts you
at risk for injury or death from electrical shock.
When using in wire mode, please keep the band to "OFF" (A5).
The maximum input of the TX box is 1V. If the input is over 1V, the sound can become distorted or fuzzy. If the Sound
coming out of the chair is fuzzy at low volumes, lower the volume on the audio source (ex. The TV, Mp3,etc) and the
distortion should go away.
Do not mix alkaline, standard carbon-zinc, or rechargeable Ni-cad, NiMH, etc.
Do not mix old and new batteries.
3
Need Help? Email: [email protected] Web: www.thexrocker.com
Phone: 1 931 359 2603, In Europe, call +44 (0)845 468 0262


