


4
May we congratulate you on your new Greenhouse
Dear Customer!
The assembly of your new greenhouse re-
quires no technical knowledge. However, it is
important that the assembly instructions are
strictly followed. The assembly instruction
is a combination of text and illustrations. The
profiles are packed seperatly in numbered
packs corresponding to the order in the as-
sembly instruction. Erect one pack at a time.
All nuts and bolts and fittings are found in bag
No. 0 (specified on page 6). Each pack is speci-
fied in separate lists of components.
All detailed illustrations are marked with
symbols:
seen from inside
seen from outside.
Precautions.
• Assembly must only be carried out in dry
and calm weather.
• Always use working gloves while glazing.
Greenhouse glass has sharp edges, espe-
cially if the glass breaks.
• Assistants and especially children must be
warned that broken glass is an element of
danger. Pick up broken glass at once and
remove it with care.
• We recommend to use protective glasses
while fixing the spring wire clips.
• Place the ladder on a level support.
• It is essential to have an assistant.
References
The column marked
indicates the
page(s) on which the component is used.
Page 7: Foundation
The base is not included in this delivery. How-
ever, an optional base can be bought sepa-
rately. It ensures you have a stable and easy to
build base.
If you make your own base the measurements
indicated must be external measurements.
If you buy an optional base you furthermore
need about 75 litres of concrete and 6 plastic-/
concrete pipes of about 800 mm which are
placed in a non-freezing depth for the fasten-
ing of the corner and middle anchors.
The base must be 100% level and square; the
latter is ensured by checking that the two
diagonal measurements are equal.
Tools
The mounting of the greenhouse requires the
tools shown on page 6.
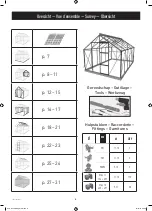
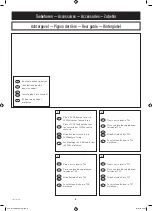
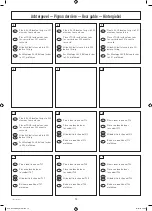
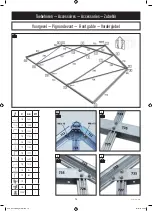
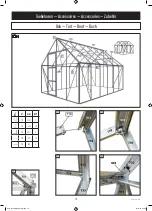
Page 9-26:
Place the components as shown on the illus-
tration and assemble in the order shown in the
pictures. Do not tighten the nuts completely
until the front gable construction has been
assembled.
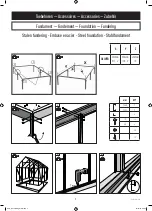
Page 7: (Fastening to the base)
When constructing your own base you have
to drill holes (7 mm) in the ground frame be-
tween all the vertical frames, the greenhouse
is then fastened to the base with screws (A).
Using an optional base the greenhouse is
fastened to each vertical bar as shown on
drawing B.
Fitting of glass/polycarbonate
Important before glazing!
Make sure that gables and sides are level and
square, and that door(s) and window(s) are
functioning perfectly.
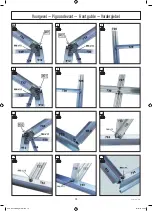
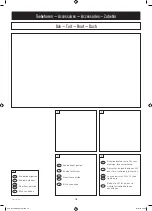
Best order of assembly:
1) Rear gable – 2) Front gable – 3) Sides –
4) Frame assembly – 5) Roof and bracing
6) Doors – 7) Vents – 8) Glazing
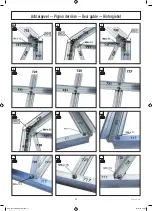
Remember to insert exstra bolts, in profile
no. 723 for roof brace no. 739, 767 and vent sill
profile no. 913.
Also remember to insert extra bolts for stabi-
lizer no. 299
Page 27-31: Glazing
Degrease the sheets and frames with spirit.
Start glazing from below, one glass at a time.
Fit glazing strip (411) to all glazing bars, gable
bars and corner posts before you begin to
glaze the greenhouse.
Spring wire clips and glassholders are to be
fitted as shown.
X = Spring wire clips, > = Glassholders
Page 31: Mounting of polycarbonate
The illustrations at page 31 show where to
mount them. The type indication states the
length in mm. A possible adjustment is made
by means of a fine-tooth saw.
NB! To avoid the formation of algae the poly-
carbonate sheets must not come into contact
with the ground. Rest them on a piece of
cardboard.
L,N -lists are mounted as shown on page 31.
Sealing of the polycarbonate sheets
The sheets may be sealed against insects.
Close the top end off with alu-tape or silicone.
The bottom only with airstrip tape to let con-
densation out (available at your local dealer).
Now your greenhouse is completely assem-
bled. However, please notice the following:
Maintenance
• Grease doors (hinges and lock or door-
track).
• Clean the gutter for leaves, etc.
• Adjustment of windows.
• Replacement of broken glass.
• Clean the greenhouse with disinfectant
before and after the growing season.
Winter Protection
In areas with occurrence of snow we recom-
mend the following winter protection:
• Support the roof ridge at the centre of the
greenhouse.
• Remove greater snow loads from the roof.
• Take precautions against snow falling down
from for instance a tree or a roof.
• Dismount the cylinders for the automatic
window openers, if any (optional extras).
• Secure door(s) and window(s) preventing
wind damage to the greenhouse.
Insurance
Please note that not all insurance companies
cover greenhouses automatically. Please
contact your insurance company to ensure an
insurance coverage.
Guarantee
ACD grants a guarantee of 12 years which
covers replacement of faulty parts. The guar-
antee does not cover polycarbonate, glass,
transport, assembly, freight etc.
ACD grants a guarantee of 2 years on painted
parts, if any. Note that marks in the painting
may occur due to suspension of the profiles.
The guarantee is invalid if the greenhouse is
not assembled according to these instruc-
tions.
USA
GB
20161031-001
ACD_Handleiding Oliver.indd 4
15/12/16 09:49