Copyright © 2002 Accuride International Inc. 3700-9220(9039)-MK026-R6-0407
Copyright © 2002 Accuride International Inc. 3700-9039(9220)-MK525-R6-0407
ACCURIDE INTERNATIONAL INC.
12311 Shoemaker Avenue
Santa Fe Springs, CA 90670
TEL (562) 903-0200
FAX (562) 903-0208
www.accuride.com
Manufacturing, Engineering, and Sales
United States • Germany • Japan • Mexico • United Kingdom • China
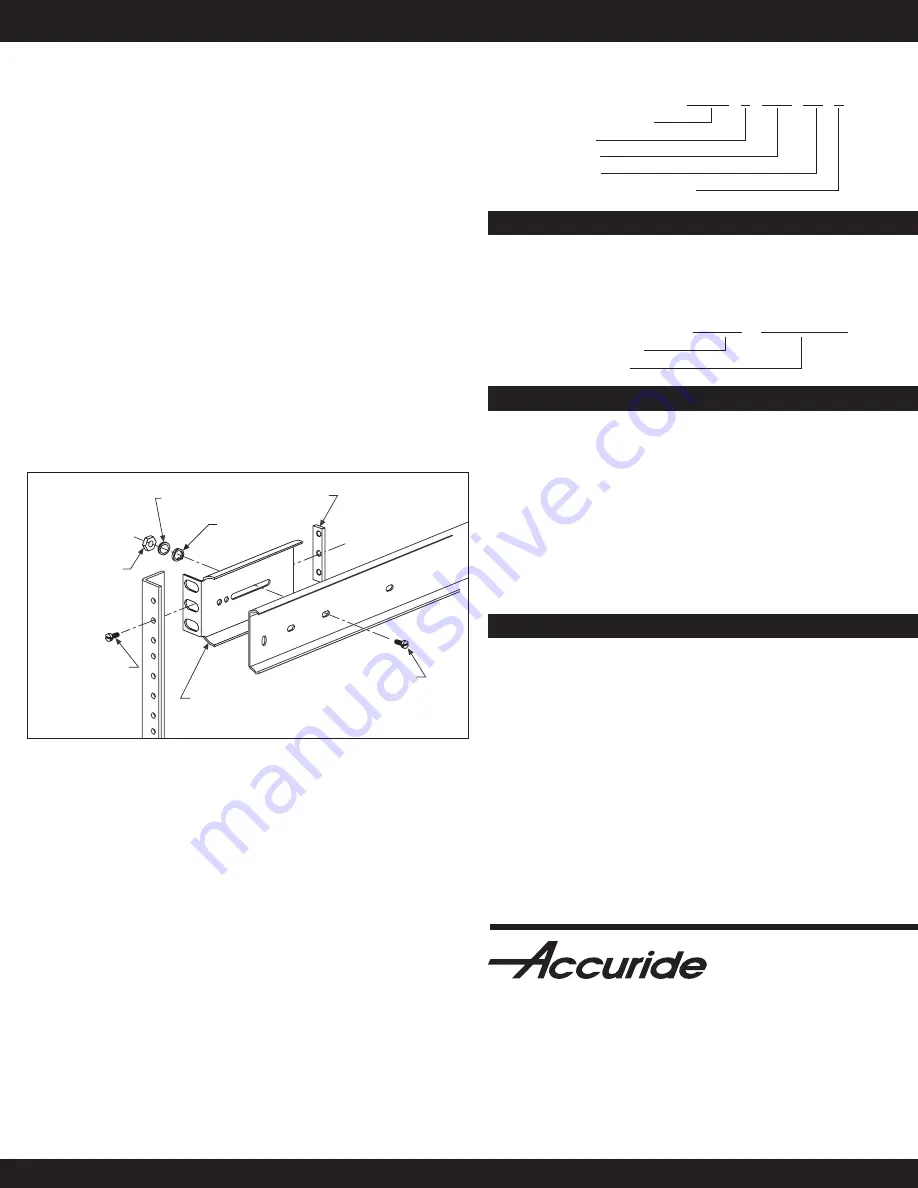
Instructions to Bracket Mount
1. To ensure proper operation of the slides, make certain that all
bracket mounting screws (#8-32) are inserted so the screw heads
are inside the slides. (No washers on the inside of the slides.)
2. Separate slide members by depressing the disconnect lever.
3. Using mounting kits and brackets, mount brackets to slide outer
members (largest). For adjustment purposes, screw the back
brackets on loosely.
4. Install slides into EIA rack with #10-32 screws (customer supplied)
and secure with bar nuts. Rear adjustment is possible by aligning
the back brackets. Do not tighten screws until final adjustment is
made.
5. Mount slide chassis member (smallest) to the chassis. Position
slides 1/4" from the front edge of the chassis making sure both
slides are parallel.
6. With cabinet members in the closed position and ball retainers fully
forward, install chassis by engaging the slide members and close
completely. Check slide alignment by opening and closing the
chassis. Any sign of binding indicates lateral stress or misalignment.
7. Adjust slide position until movement is smooth. Tighten all screws
and if necessary, use more screws to secure slides and complete
installation.
Packaging
Optional Hardware Kits-Ordered Separately
Installation Instructions
Customer
Supplied
#10–32
Mounting
Screw
Hex-Nut
Flat Washer
Bar Nut
Short Mounting Bracket
Part Number 4000-0250-CE
#8–32
Pan Head
Screw
Lock Washer
Figure 1
Instructions to Hard Mount
1. To ensure proper operation of the slide, make certain that all
mounting screws (#8-32) are inserted so the screw heads are
inside the slides. (No washers on the inside of the slides.)
2. Separate slide members by depressing the disconnect lever.
3. With slides fully extended, install slide cabinet members (largest)
into the cabinet using #8 pan head screws. Ensure slides are
parallel.
4. Mount slide drawer members (smallest) to the chassis. Leave all
screws loose for future adjustment. Ensure slides are parallel.
5. With cabinet members in the closed position and ball retainers
fully forward, install chassis by engaging the slide members and
close completely. Check slide alignment by opening and closing
the chassis. Any sign of binding indicates lateral stress or
misalignment.
6. Adjust slide position until movement is smooth. Tighten all screws
and if necessary, use more screws to secure slides and complete
installation.
Complete your slide order for model 3307 by specifying
the following:
10 Pair C 3307 -18 D
Total Slides Required
Slide Finish
Slide Model
Slide Length
Optional Polybag Packaging
Order 1 bracket mounting kit, part number 4180-0219-XE,
for each pair of slides ordered. Each kit contains 4 short
mounting brackets and mounting hardware. Hardware kit
includes screws, hex-nuts, washers, and bar nuts.
10 Each 4180-0219-XE
Total Kits Required
Kit Part Number
Ordering Procedure
Distributor (D) Pack:
Polybag contains one pair of
slides and one slide mounting hardware kit. Brackets
ordered separately.
Lengths 12"–20" 10 pair per box
Lengths 22"–30" 5 pair per box
Bulk (P) Pack:
Slides and optional mounting bracket kit
are ordered and packaged separately.
Lengths 12"–20" 10 pair per box
Length 22" 9 pair per box
Lengths 24"–30" 7 pair per box
Slide members and ball retainers: Cold rolled steel
Ball bearings: Carburized steel
NOTE:
Specifications, materials, prices, terms, and
delivery are subject to change without notice.
Specifications


