10
Step 4:
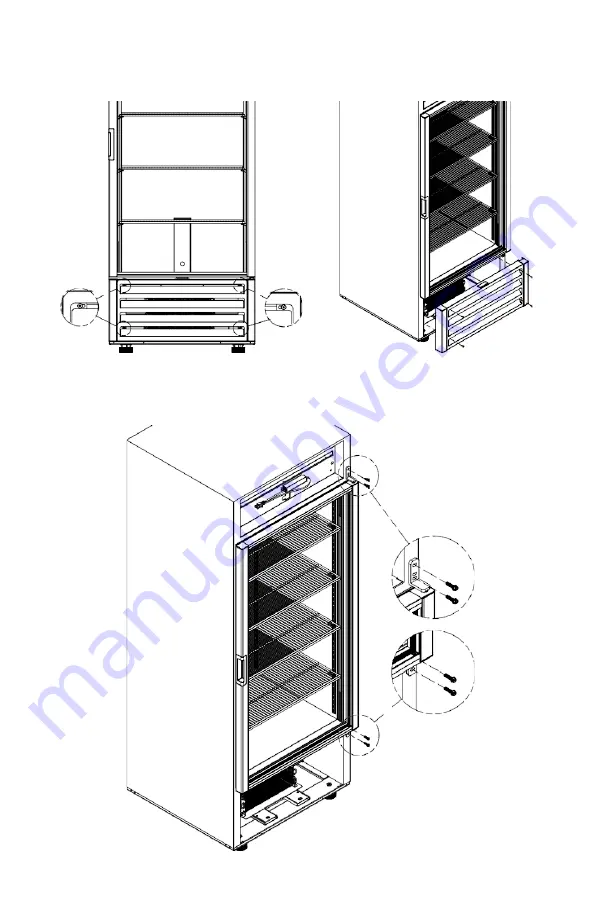
Remove the four screws from the front grill, then remove the front
grill from the cooler.
Step 5:
Remove the screws of the upper and lower hinge. Hold the door
when you are removing the screws.
Page 1: ...01G SCR1802G SCRR432 SCFF436 SCRR261G SCFF262GLH User Manual BEFORE USE PLEASE READ AND FOLLOW ALL SAFETY RULES AND OPERATING INSTRUCTIONS Felix Storch Inc An ISO 9001 2015 registered company 770 Garr...
Page 2: ...y complies with California CARB regulations However we are required by California Law to provide the following disclosure statement in every product sold in California This equipment is prohibited fro...
Page 3: ...e refrigerator freezer follow basic precautions including the following DANGER These appliances are CFC and HFC free and contain a small quantity of liquid propane R290 which is environmentally friend...
Page 4: ...ucted Choose a well ventilated area with temperatures above 59 F 15 C and below 86 F 30 C This unit must be installed in an area protected from the elements such as wind rain water spray or sunlight T...
Page 5: ...r or metal supports if applicable Place the cabinet on a surface solid enough to prevent vibration and strong enough to support the combined weight of the cabinet and the product load Estimate 35 poun...
Page 6: ...wheels must make firm contact with the base rail The top edge of the caster wheels must be in firm contact with the base rail Caster Handbrake NOTE The caster wheels with handbrakes must be placed in...
Page 7: ...ocate the hole on the backside See image right 3 Align the pressure relief valve with the hole using the marking as a guide 4 Push the pressure relief valve until you hear a click this means the valve...
Page 8: ...FOR SINGLE DOOR MODELS Except ACR82L SCR801G If you would like to reverse the door swing follow the steps below TOOLS 3 8 NUT DRIVER BIT PHILLIPS 2 SCREWDRIVER INSTRUCTIONS Step 1 Remove the two screw...
Page 9: ...9 Step 2 Remove the acrylic header sign and place it on the top of the unit Step 3 Remove the four screws from the header sign frame...
Page 10: ...10 Step 4 Remove the four screws from the front grill then remove the front grill from the cooler Step 5 Remove the screws of the upper and lower hinge Hold the door when you are removing the screws...
Page 11: ...ep 7 Install the door on the cooler header sign and front grill according to steps 1 to 5 OPERATING YOUR APPLIANCE Control Panel Your unit is manufactured with a Dixell electronic thermostat to contro...
Page 12: ...art a manual defrost UP To see the maximum stored temperature In programming mode it browses the parameter codes or increases the displayed value DOWN To see the minimum stored temperature In programm...
Page 13: ...nds 4 To memorize the new set point value push the SET key again or wait for 10 seconds HOW TO SEE THE MAXIMUM TEMPERATURE RECORDING 1 Press and release the UP key 2 The Hi message will be displayed f...
Page 14: ...meter 4 Press the SET key to display its value 5 Use UP or DOWN to change its value 6 Press SET to store the new value and move to the following parameter To exit Press SET UP or wait for 15 seconds w...
Page 15: ...Door alarm If the door stays open for more than 3 minutes an audible and visual alarm will go off on the thermostat CARE AND MAINTENANCE Your unit requires little maintenance However periodic cleanin...
Page 16: ...power ON Replace the fuse or circuit breaker Repair or replace wiring Replace the overloaded outlet Replace the relay Warm storage temperatures The appliance is in a location that is too warm Low volt...
Page 17: ...17 NOTES...
Page 18: ...ment parts or repair labor costs for units operated outside the United States 5 Repairs to parts or systems resulting from unauthorized modifications made to the appliance 6 The removal and reinstalla...
Page 19: ...R1040722...