Accu-Scope EXC-400 Series Manual Download Page 21


EXC-400 MICROSCOPE SERIES  


ACCU-SCOPE

®


73 Mall Drive, Commack, NY  11725  •  631-864-1000  •  www.accu-scope.com 

20


TROUBLESHOOTING 

Under certain conditions, performance of this unit may be adversely affected by factors other than defects. If a 
problem occurs, please review the following list and take remedial action as needed. If you cannot solve the 
problem after checking the entire list, please contact your local dealer for assistance. 
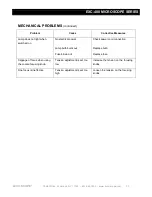
 

OPTICAL 

Problem 

Cause 

Corrective Measure 

The field of view is dark, but 
the bulb is bright 

Field diaphragm is not open enough 


Condenser is too low 


Condenser is not centered 


Light path selection lever is in the 
trinocular position 

Open the field diaphragm more 


Adjust the condenser height 


Center the condenser 


Push the light path selection level into 
the binocular position 

Darkness at the periphery or 
uneven brightness of view field 

Revolving nosepiece not in click 
stop position 

Revolve the nosepiece to click stop 
position by swinging the objective 
correctly into the optical path 

Dirt or dust on the view field 

Dirt or dust on the lens - eyepiece, 
condenser, objective, collector lens 
or specimen 

Clean the lens 

Poor image quality 

No cover glass attached to the slide  


Cover glass is too thick or thin 


Slide maybe upside down 
 
 
Immersion oil is on a dry objective 
(especially the 40xR) 


No immersion oil used with100xR 
objective 
 
Air bubbles in immersion oil 


Condenser aperture is closed or 
open too much 
 
Condenser is positioned too low 

Attach a 0.17mm cover glass 


Use a cover glass of the appropriate 
thickness (0.17mm)  


Turn slide over so the cover glass 
faces up 
 
Check the objectives, clean if 
necessary 


Use immersion oil 
 
 
Remove bubbles 


Open or close properly 
 
 
Position the condenser slightly lower 
than the upper limit 

Summary of Contents for EXC-400 Series

Page 1: ...MANUAL 73 Mall Drive Commack NY 11725 631 864 1000 P 631 543 8900 F www accu scope com info accu scope com EXC 400 MICROSCOPE SERIES...

Page 2: ......

Page 3: ...DIAGRAM PROCEDURE 7 11 ADJUSMENT OPERATION POWERING ON 12 ILLUMINATION 12 SPECIMEN SLIDE 12 STAGE 12 FOCUSING 13 INTERPUPILLARY DISTANCE 14 CONDENSER 14 FIELD IRIS DIAPHRAGM 15 APERTURE DIAPHRAGM 15...

Page 4: ...ine voltage The use of a different input voltage other than indicated will cause severe damage to the microscope CARE AND MAINTENANCE 1 Do not attempt to disassemble any component including eyepieces...

Page 5: ...s in our New York facility Careful quality control procedures ensure each microscope is of the highest quality prior to shipment UNPACKING AND COMPONENTS Your microscope arrived packed in a molded Sty...

Page 6: ...Knob X Axis Adjustment Knob Y Axis Adjustment Knob Field Diaphragm Adjustment Ring Condenser Centering Adjustment Screws Stage Tension Adjustment Knob Objective Trinocular Head Eyepiece Condenser Adj...

Page 7: ...k NY 11725 631 864 1000 www accu scope com 6 Fine Focusing Knob Light Adjustment Knob Coarse Focusing Knob LED Lamp Housing Power Socket Focus Arm Condenser Fuse Nosepiece Power Switch Body Diopter Ad...

Page 8: ...ians at our New York facility prior to shipment Should you need to disassemble assemble your microscope in the future please follow the instructions outlined below When assembling the microscope make...

Page 9: ...ard the back of the microscope as shown Fig 1 Gently slide the lamp housing onto the lamp housing receptacle and tighten the set screw with the included Hex wrench Fig 2 Align the pins in the end of t...

Page 10: ...Installing the Condenser Fig 4 5 Lower the condenser stage carrier to its lowest position by turning the coarse focusing knob counterclockwise Loosen the condenser thumb screw by turning it countercl...

Page 11: ...ht and align the circular mount on the bottom of the stage with the circular bracket on the condenser stage carrier and set the stage in place so that it is centered over the condenser below Tighten t...

Page 12: ...lowest magnification to the highest in a clockwise direction beginning with the first empty objective receptacle in front Install each objective by using two hands to position and gently screw in the...

Page 13: ...wise towards the back of the microscope to increase the brightness Rotate the light adjustment knob counterclockwise towards the front of the microscope to decrease the brightness Placing a Specimen F...

Page 14: ...adjustments Instead rotate the right diopter collar until the sharpest image appears Repeat several times to check NOTE do not counter rotate the focusing knob as this will cause severe problems and...

Page 15: ...nterpupillary distance Range 50 76mm Remember your interpupillary number for future operation NOTE The eyepiece tubes can be rotated 180 to increase the eyepoint height by 34mm to accommodate the need...

Page 16: ...creased however the contrast and range of focus are diminished For optimal viewing conditions set the condenser aperture diaphragm lever to match the magnification of the objective in the optical path...

Page 17: ...f the oil and start again or try to eliminate the bubble by rotating the objective back and forth Rotate the nosepiece so the 100xR oil immersion or 50xR oil immersion objective is in the light path W...

Page 18: ...on the fuse holder and pull toward you until the fuse holder pops out Replace the fuse with a 3 15 amp fuse CAT 350 3277 3 then slide the fuse holder back into place Reinstall the lamp housing see pa...

Page 19: ...focus 4 Remove one observation eyepiece and place a centering telescope CT into the empty eye tube Ensure that the CT is in the eye tube without a diopter adjustment 5 Loosen the lock screw of the cen...

Page 20: ...loosen the set screw on the trinocular head camera port until it is flush with the inside then gently mount the C mount camera into the port and tighten the set screw Observe the image through the eye...

Page 21: ...l into the binocular position Darkness at the periphery or uneven brightness of view field Revolving nosepiece not in click stop position Revolve the nosepiece to click stop position by swinging the o...

Page 22: ...rotating the intensity control dial and or iris diaphragm Insufficient brightness Lamp intensity is too low Aperture diaphragm closed too far Condenser position too low Adjust the light intensity by...

Page 23: ...oes not light when switched on No electrical power Lamp bulb burnt out Fuse blown out Check power cord connection Replace bulb Replace fuse Slippage of focus when using the coarse focusing knob Tensio...

Page 24: ...orkmanship for a period of five years from the date of invoice to the original end user purchaser The LED lamp is warranted for a period of two years from the date of invoice to the original end user...

Reviews: