


Installation Guide
14
15
Cheetah iSharer-3010
Note
: If there is any other DHCP server in the Network, please select “Specify an IP
address,” enter an address based on the default network “192.168.1.***” (***
is between 2 and 252), the Subnet Mask “255.255.255.0,” and the Gateway IP
“192.168.1.1” for configuration.
After finishing the TCP/IP setup, reboot the computer and run the browser to
configure the Cheetah iSharer-3010. After that, set up other PCs on the LAN
according to the procedures described above.
Settings for the Cheetah iSharer-3010
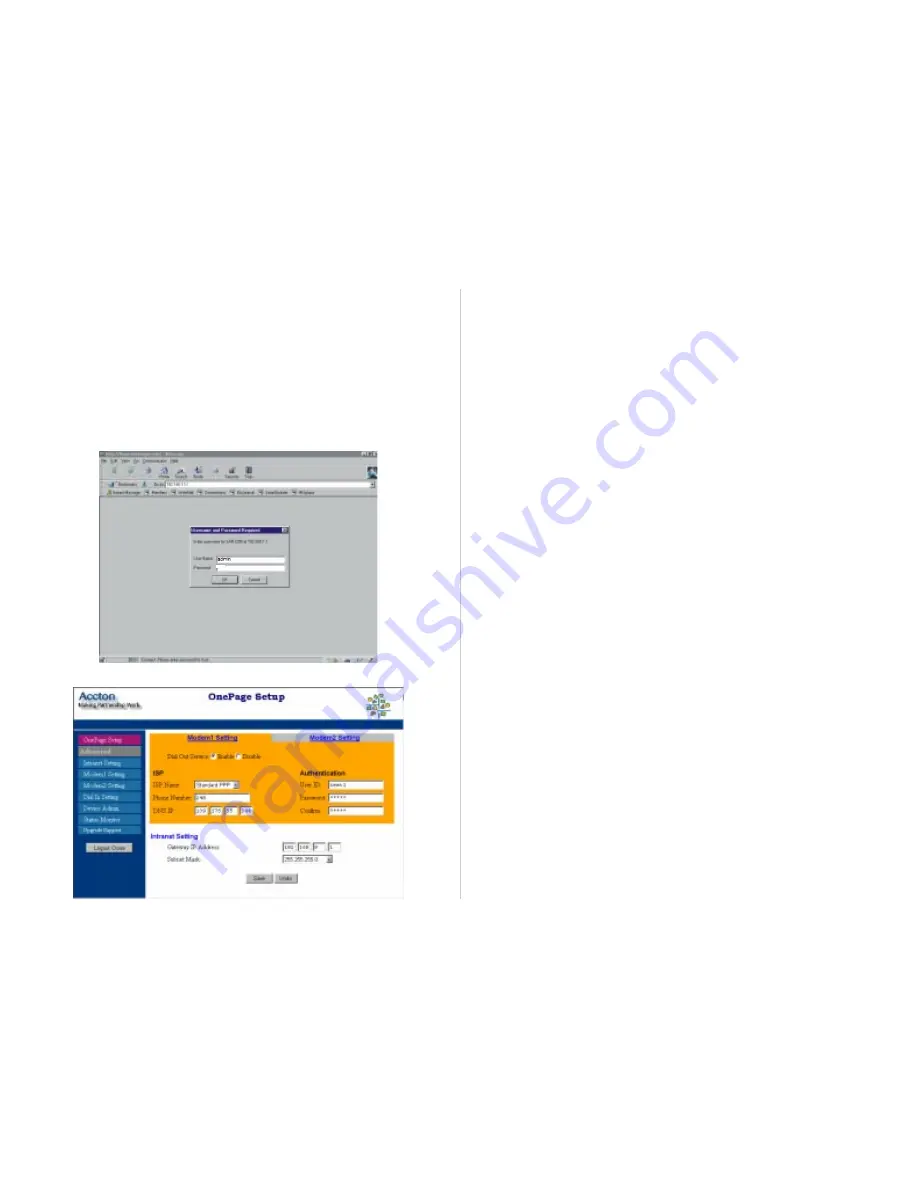
1. Start your Web browser (Netscape Navigator 4.0 or Microsoft Explorer 4.0 later
or other Java compatible browser.), enter 192.168.1.1 for the address, and press
the “ENTER” key on your keyboard. The “Username and Password Required”
window will pop up. Type the User Name “admin,” and leave the Password blank.
Then click “OK” to open the Web Management screen.
2. The OnePage Setup window pops up.
Note
: In Netscape Communicator 4.0, after popping up, the OnePage Setup
screen will be hidden behind the Netscape main screen. Minimize the
Netscape main screen so you can see the Web Management page.
3. For Modem1 Setting, select “Enable” (default value) to initiate Dial-Out Service.
Note:
Modem2 Settings are similar to Modem1. Fill in these fields if you need
to use the second modem.
4. Select the applicable “Connection Type”
from the drop-down box. For most ISPs,
you can select PPP.
5. For most PPP dial-up accounts, you will need to fill in the ISP “Phone Number,”
“DNS IP,” “User ID” and “Password.” This information should be provided by
your ISP as soon as you set up the account.
6. For Intranet Settings, enter the default value “192.168.1.1” and Subnet Mask
“255.255.255.0,” or select another mask from the drop-down box.
7. Check that all the values are correct, and then click “Save” to save the data and
log out.
Test
After you finish setting up the Cheetah iSharer-3010, open another browser window
and key in any external Web site address, such as http://www.yahoo.com to see if
the modem starts dialing. Once the Link LED is on, the Internet connection has been
successfully established. Otherwise, refer to Appendix A “Troubleshooting” for help.
Setting Up Other Client Stations
Follow “Network Settings at Client Site” on page 11-14 to set up other client stations.
If you use a fixed IP configuration, be careful not to assign the same IP to different
computers.
Summary of Contents for Cheetah iSharer-3010
Page 1: ...Cheetah iSharer 3010 Installation Guide IS3010 E012000 R02 85 0B3010 GO...
Page 5: ...Installation Guide 4 5 Cheetah iSharer 3010 CHAPTER 2 BEFORE YOU START...
Page 11: ...Installation Guide 16 17 Cheetah iSharer 3010 CHAPTER 4 ADVANCED CONFIGURATION...
Page 18: ...Installation Guide Cheetah iSharer 3010 30 31 APPENDIX A TROUBLESHOOTING...
Page 20: ...Installation Guide 34 35 Cheetah iSharer 3010 APPENDIX B SPECIFICATIONS...


