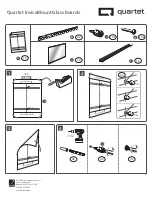
background image

2x

10x

1x

10x

1x

1x

a

b

c

d
e

f

 Paper Installation Template
 Wall Mount Brackets
 Self-Drilling Drywall Anchors
 Phillips Head Screws
 InvisaMount Glass Board
 Accessory Tray


Tape - make sure it's safe for the wall

Push Pin

Phillips Head Screwdriver

Level

Pencil

Power Drill

What’s Included in the Hardware Kit?

What Else Do I Need?

b

e

d

c

Quartet InvisaMount Glass Boards

Extended Directions

Step 1– Set up the Template

Use tape to align the Paper Installation

 Template on your wall.

Place level on  “Top Edge of Board” 

 line to confirm template is level.

Note:

 The paper template is not the size 

of the full glass dry-erase board –it is 

only used to help align the top and 

bottom of the board.

a

Bottom Edge of Board

Top Edge of Board

Cen

ter of boar

d

Push tack here

Top wall Bracket

Push tack here

Bottom  wall Bracket

Bottom Edge of B

oard

Top Edge of Boar

d

Cen

ter of boar

d

Push tack here

Top wall Bracket

Push tack here

Bottom  wall Bracket

a

f

Summary of Contents for Quartet InvisaMount Glass Board

Page 1: ...www acco com a a b c c d e 2 3 4 1 Quartet InvisaMount Glass Boards Bottom Edge of Board Top Edge of Board Center of board Push tack here Top wall Bracket Push tack here Bottom wall Bracket Bottom Edg...

Page 2: ...2x 2x ACCO Brands Returns Center 101 Bolton Ave 9E Booneville MS 38829 USA Tel 800 541 0094 www acco com 6 7 8 5 9 10 11 13 14 Quartet InvisaMount Glass Boards b d b d 4x 4x c 7 32 e 12...

Page 3: ...Extended Directions Step 1 Set up the Template Use tape to align the Paper Installation Template on your wall Place level on Top Edge of Board line to confirm template is level Note The paper templat...

Page 4: ...e template Remove the push pin Use a push pin to mark these spots Use a 7 32 drill bit to create a pilot hole Remove the push pin Steps 3 Remove the Template Step 4 Insert Wall Anchors 2x 2x 2x c 7 32...

Page 5: ...or the bottom bracket Note Do not screw the screw all the way into the anchor There should be a small gap between the Wall Mount Bracket and the head of the screw Rotate bracket to expose pencil marks...

Page 6: ...aining Anchors Use a 7 32 drill bit to create pilot holes Go back and tighten the center screws so they are flush to the wall Steps 10 and 11 Insert Remaining Screws Step 12 Tighten Center Screws Rota...

Page 7: ...tep 13 Place Board on the Brackets Lift your InvisaMount Glass Dry Erase Board against the wall slightly higher that the Wall Mount Brackets Step 14 Attach Accessory Tray Starting at an angle press th...

Reviews: