Phase / Polarity:
Phase / Polarity:
Phase / Polarity:
Phase / Polarity:
Your room’s acoustics play a part in the final acoustic result of any speaker package.
The phase switch may assist you with improving the sound for your seating position.
‘Normal’, or in-phase with the satellites, ‘Reverse’, or inverted
with the satellites.
Play music that contains a constant or repeating bass track, sit in your preferred location
and ask for assistance to flip the switch. Listen for the best result and set (Fig 10).
Calibration of the System:
Calibration of the System:
Calibration of the System:
Calibration of the System:
For the system to operate at its full potential your receiver / amplifier requires configuring.
These settings and the volume levels calibrate the system to deliver the best possible sound balance to suit
your seating location.
Speaker Size:
Speaker Size:
Speaker Size:
Speaker Size:
In the set up menu of your receiver / amplifier, usually located under the speaker menu settings, is speaker
size.
Please select the setting to ‘small’ speakers for all channels i.e. front, centre and surround speakers.
If your receiver / amplifier is equipped with a crossover setting, please select 150 Hz for all channels.
Speaker Distance:
Speaker Distance:
Speaker Distance:
Speaker Distance:
This is how the receiver / amplifier creates the illusion of space. Set the distance in this menu to the distance
between your preferred seating location and each speaker.
Level Calibration:
Level Calibration:
Level Calibration:
Level Calibration:
This sets the volume level to match the distance settings previously entered. Speakers located closer will play
softer while speakers further away will be set to play louder.
Many receiver / amplifiers include auto calibration for these settings, please refer to you receiver / amplifier
manual.
Mounting Brackets:
Mounting Brackets:
Mounting Brackets:
Mounting Brackets:
Any commercially available bracket may be used to mount the Seek
Seek
Seek
Seek satellite speakers. We do not recommend
wall / ceiling mounting of the Hide
Hide
Hide
Hide Subwoofer.
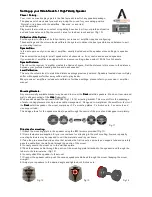
We have developed the optional AN-WCM (Fig 11 & 14) mounting bracket. This mount offers the advantage
of wall or ceiling placement and provides cable management. Designed to compliment the small form factor of
the Seek
Seek
Seek
Seek satellite speaker, the mount comprises of: 2 x mounting plates, 2 x friction nuts, 2 x cam nuts and
one support tube.
This design allows for the speaker cables to pass through the centre of the mount and disappear completely.
Directions for mounting:
Directions for mounting:
Directions for mounting:
Directions for mounting:
1) Attach the mounting plate to the speaker using the (M3) screws provided (Fig 13).
2) Some fasteners are supplied for your convenience for attaching to the wall or ceiling, however specialty
mounting hardware may be required to suit the materials used in your home.
3) Take the pre-assembled mid section that includes the friction nuts, cam nuts and support tube and carefully
pass the cable from the wall side through the centre of the mount.
4) Loosely secure the mount on to the wall base plate.
5) Pass the excess cable through the centre of the mounting plate (attached to the speaker) and through the
tube into the terminal area. (Fig 14)
6) Loosely attach the speaker to the mount.
7) Connect the speaker cable, push the excess speaker cable back through the mount (keeping the mount
straight).
8) Adjust your speakers to the desired angle and tighten both friction nuts.
Setting up your Hide & Seek
Setting up your Hide & Seek
Setting up your Hide & Seek
Setting up your Hide & Seek 5.1 High Fidelity Speaker
5.1 High Fidelity Speaker
5.1 High Fidelity Speaker
5.1 High Fidelity Speaker
Fig 10
Fig 11
Fig 12
Fig 13
Fig 14


