[72] wAppLoxx Pro Control Plus Complete Instructions
V5
Configuration of HyMo output 402 (relay 02) for activation on the Secvest
Configuration of HyMo output 403 (relay 03) for the ready signal on the Secvest
Page 1: ...ons and Operating instructions wAppLoxx Pro Control Plus WLX PRO CTRL PLUS These operating instructions apply to the following items Item no Product description ACCO16000 wAppLoxx Pro Control Plus ACC...
Page 2: ...tions 14 4 LED signalling 15 5 Starting up the wAppLoxx Pro Control Plus using the Manager 16 6 System settings 21 6 1 Date and time 21 6 2 System access 23 6 3 Notifications 26 6 4 Network settings 2...
Page 3: ...0 3 General events 75 11 User Login 77 11 1 Remote functions 78 11 2 Protocol Event Log 79 12 wAppLoxx Pro Plus App 81 12 1 Configuration of the wAppLoxx Pro Plus App 81 12 2 Functions of the wAppLoxx...
Page 4: ...o warn of the risk of injury or health hazards e g caused by electric shock The triangular warning symbol indicates important notes in this user guide which must be observed This symbol indicates spec...
Page 5: ...injury comply with the following instructions When inserting the battery ensure the polarity is correct Do not insert the battery until the wAppLoxx Pro Control Plus is ready for use otherwise the ba...
Page 6: ...year intervals After replacing the batteries you must always check that the device is functioning correctly Batteries must not be disposed of along with household waste in accordance with the battery...
Page 7: ...W D Material White plastic housing Tags Max 1000 Door components 32 door components with one wAppLoxx Pro Control Plus 32 additional door components possible per slave control max 4 slave controls Ma...
Page 8: ...ent is only carried out at the system master control All data such as user locking plan etc are transferred from the master control to the slave controls What are the advantages of the wAppLoxx Pro Pl...
Page 9: ...ly unit listed above Conditions of use Max 80 relative humidity non condensing Radio frequency 868 3 MHz Wireless range Approx 30 metres indoors 100 m free field nominal Encryption AES 128 Bit Exterio...
Page 10: ...time it is activated In open mode ABUS SC Mifare Desfire EV1 and Mifare Classic can be used as locking media In security mode only newer ABUS SC Mifare Desfire EV1 transponders with white marking can...
Page 11: ...following link https mobil abus com product ACCO16000 Initial registration see chapter 5 At initial registration the username of the wAppLoxx Pro Control Plus is Administrator the password is the same...
Page 12: ...ed from the wAppLoxx Pro Control in order to improve the validity Three bars are now only displayed when the signal strength is very good and one bar only when the signal strength is very poor General...
Page 13: ...rol Plus Screw the enclosed external antennas onto the connections provided for this purpose and mount the housing using three screws Make sure not to damage the PCB during this fitting Attach the hou...
Page 14: ...tention To ensure operation within the framework of CE approval we recommend only using the original ABUS power supply unit Item no 505366 We recommend switching to a new original ABUS power supply un...
Page 15: ...nuously red Master Control active continuously green Slave control active continuously yellow System in update mode continuously blue Wireless communication between the wAppLoxx Pro Control Plus and w...
Page 16: ...2 Connect the wAppLoxx Pro Control Plus to the power supply If your router is set to DHCP mode it now assigns a new IP address to the wAppLoxx Pro Control Plus automatically 3 Changes to the router sw...
Page 17: ...o Control Plus must be configured using the wAppLoxx Pro Plus Manager This takes you to the wAppLoxx Pro Control Plus configuration view where you are requested to enter your user name and password Th...
Page 18: ...art up After logging in for the first time a pop up window will appear asking you to change the administrator password Please observe the specified minimum password requirements You can change the pas...
Page 19: ...Pro Control Plus you must allow cloud access This is required for event notifications via e mail and for automatic updates via the cloud You can change your selection at any time in the system settin...
Page 20: ...wAppLoxx Pro Plus Manager controls can be added to the Manager via IP address This may be necessary if an automatic discovery of available controls via mDNS cannot be guaranteed on the network side To...
Page 21: ...6 System settings 6 1 Date and time It is essential to configure the date and time to ensure the device functions correctly The date and time must always be correct to ensure smooth operation Check th...
Page 22: ...ystem is connected to the network NTP Server Select an NTP server In Germany we recommend the NTP server ptbtime1 ptb de Update interval Select an interval in which the time is synchronised via the NT...
Page 23: ...new username and password for the administrator Be sure to take security guidelines into consideration Please ensure the administrator access is changed after initial commissioning Administrator 2 Set...
Page 24: ...Selecting the two men role mode means the event log can only be accessed when a second user is registered in the log menu The two men role mode only functions with access via the website It is not po...
Page 25: ...EV1 mode locking media will be supported If secure mode is disabled the ACCO16000 product variants and Mifare Classic and Mifare DESFire EV1 tags from ABUS or another provider can also be read The pos...
Page 26: ...red to enable e mail notifications You can use an existing account or create a new one for your Control Enter your e mail address under Recipient e mail address 1 and then click Save Further e mail ad...
Page 27: ...ed to a router with DHCP function All connection data is now automatically assigned by the router If no DHCP function is available you can remove the tick and enter the connection data manually If nec...
Page 28: ...as soon as new firmware updates are available Click on the notification to automatically download and install the updates Manual firmware update The latest firmware for wAppLoxx Pro Control Plus is av...
Page 29: ...file conf This file contains all settings with the exception of all cylinders repeaters and slave controls These must be registered again from scratch To import a configuration file select this using...
Page 30: ...ID of the Control can be copied in the Manager and manually pasted in the Manager of another device under Edit If the WLX PRO CTRL PLUS is to be accessed with a smartphone or tablet the QR code from...
Page 31: ...restore 7 1 wAppLoxx Pro Plus Slave Control wAppLoxx Pro Control Plus cascading The cascading function allows you to connect up to five wAppLoxx Pro Control Plus in master slave mode in a local netwo...
Page 32: ...ck into a cascadable state 1 Establish the power supply for all slave controls 2 In the master control go to the Slave Controls menu item and click on the green plus sign to add slave controls If DHCP...
Page 33: ...ntrol will remain unaffected Changes are generally exchanged directly between the master and slave controls In the event of a poor network connection this communication can become disrupted or delayed...
Page 34: ...Ds will light up for 2 sec If LED 1 is lit steadily the repeater is ready to install Start up with batteries 1 Install the antenna 2 Insert battery and connect battery cable to the BAT 3 Clamp and plu...
Page 35: ...akes place between the wAppLoxx Pro Repeater and wAppLoxx Pro Control Plus the most recent signal strength measurement is displayed as a bar chart No bar no wireless connection to the wAppLoxx Pro Rep...
Page 36: ...Control This process may take a few seconds 6 Successful programming is confirmed by LED 2 lighting up blue Walk Test Press the walk test button B on the repeater to start a walk test Once the signal...
Page 37: ...by the LED signal The repeater will automatically be removed from the wAppLoxx Pro Control Plus Via wAppLoxx Pro Control Plus The wAppLoxx Pro Repeater will automatically be removed from the wAppLoxx...
Page 38: ...o components must be assigned to a slave control or a repeater during programming A subsequent change in the assignment of a cylinder to its repeater or its control can only be reset after unpairing A...
Page 39: ...ive a battery warning at the right time and that it will no longer be possible to open the door Signal strength Every time communication takes place between the wAppLoxx Pro Cylinder and wAppLoxx Pro...
Page 40: ...rd is then written on each cylinder used in the system analogous to a fallback user and is thus a unique identification medium This ensures that a cylinder can only be reset using the unique reset car...
Page 41: ...m system to the cylinder This function is only available for Intrusion cylinders and not for Access cylinders Reader To use the wAppLoxx Pro to read in new tags activate this function in the selection...
Page 42: ...ylinder knob While you are doing so you will be able to see the cylinder s signal strength in the software The signal strength of a bridge box will be displayed during the walk test by pressing the co...
Page 43: ...any locked day profiles for the set schedule will not be taken into consideration Programming the reset card 1 You can program the enclosed reset card under the system settings in the System access me...
Page 44: ...Intrusion weiss Pairing the Bridge Box with the wAppLoxx Pro Control Plus 1 Click on wAppLoxx under Devices 2 Click the green plus sign to add a Bridge Box 3 Enter the name of the Wall Reader door 4...
Page 45: ...Box for at least three seconds Once the pairing LEDs start to flash blue release the pairing button 2 Now the pairing LEDs will start to flash red 3 Now present the reset card or a fallback medium to...
Page 46: ...changed at any time At the first start up after programming all wAppLoxx Pro Plus slave controls and wAppLoxx Pro Repeaters see chapter 7 proceed as follows 1 Create doors and program Reset Card see...
Page 47: ...struction offices Parent door group The respective door group can be assigned to a superordinate door group If you have selected root then the door group has no other superordinate group and is the hi...
Page 48: ...n name If the user is to be allocated a tag click on Register to receive a previously unallocated tag for the wAppLoxx Pro Cylinder defined as a tag reader Web access If the user is to be granted web...
Page 49: ...see chapter 12 Permissions The Permissions area allows you to assign various rights to the user as required for the selected door groups Guard user If users have access as a guard user they can only...
Page 50: ...en there is no wireless connection to the wAppLoxx Pro Control This requires the tag to be presented to the wAppLoxx Pro Cylinder three times wait for the signal each time if the wireless connection i...
Page 51: ...access to both the relevant wAppLoxx Pro Cylinder and the web Identify User To identify a tag click on Identify and present the tag to the wAppLoxx Pro Cylinder that is used to read tags This now dis...
Page 52: ...tton The file is exported in CSV format 1 Open an empty workbook in MS Excel 2 In the Data tab click on From Text CSV 3 Select the exported CSV file and then click Load To guarantee the protection of...
Page 53: ...s system For a successful user import the data and column names must be created as a csv file as shown in the example To guarantee the protection of personal data user data for web access is not inclu...
Page 54: ...roups To create a new user group select User groups in the main menu and click on the green plus sign Name Enter a name for the user group e g Management team Schedule Here you have the option to sele...
Page 55: ...roups for various doors Holiday schedules can be set up to establish different access times regardless of the day of the week for holidays for example Create schedules To create a schedule select Sche...
Page 56: ...on click Apply Example The bar above 6 corresponds to the period from 06 00 to 06 15 Example The early shift has access from Monday to Friday between 6 00 am and 2 00 pm On Saturdays access is restric...
Page 57: ...te groups Grant single permission Access authorisation is granted for the selected door group Delete permission Access authorisation is removed from the selected door group and all subordinate groups...
Page 58: ...already installed If you would like to add a new IP camera click on the green plus sign Name Assign a name under which your IP camera will appear in the overview of all cameras Login data Enter the u...
Page 59: ...Arming output You can use the arming output to arm disarm a connected alarm system Relay 1 is the default arm disarm option Activity signal Select between the various relay types required by the alar...
Page 60: ...ming Status It is displayed whether this input is active Arm input You can use the Arm input to arm and disarm the WAppLoxx Pro Control Plus from a connected alarm panel Each time the connected alarm...
Page 61: ...status is active Low If 12 V are applied at the input the alarm status is not active Status The current status of the input is displayed Connection to the alarm panel There are four options for connec...
Page 62: ...he Arm Output of the alarm panel This involves using the alarm panel to lock the wAppLoxx Pro Control Plus in its armed position until the alarm panel unlocks it again It is not possible to use the wA...
Page 63: ...Complete Instructions V5 Only the Arm Output of the wAppLoxx Pro Control Plus is configured although it is not connected This makes it possible to lock the cylinders with an Arm command until a valid...
Page 64: ...ith an alarm area the wAppLoxx Pro Control Plus can be connected directly to the Secvest If two alarm areas are required the Secvest Hybrid Module is connected 10 2 1 One alarm area On the wAppLoxx Pr...
Page 65: ...65 wAppLoxx Pro Control Plus Complete Instructions V5 Configuration of the wAppLoxx Pro Control Plus to the Secvest alarm panel interface...
Page 66: ...66 wAppLoxx Pro Control Plus Complete Instructions V5 Configuration of wired zone 301 as key switch duration on the Secvest...
Page 67: ...V5 Configuration of the wired output 301 relay 01 for the ready signal on the Secvest Configuration of the wired output 302 relay 02 for the activation on the Secvest Configuration of the output mode...
Page 68: ...wo alarm areas In addition to wiring with an alarm area the wAppLoxx Pro Control Plus uses input 4 for arming preparation and input 5 for arming acknowledgement In addition output 2 of the wAppLoxx Pr...
Page 69: ...69 wAppLoxx Pro Control Plus Complete Instructions V5 Configuration of the wAppLoxx Pro Control Plus to the Secvest alarm panel interface...
Page 70: ...70 wAppLoxx Pro Control Plus Complete Instructions V5 Configuration of HyMo Zone 401 as key switch duration on the Secvest...
Page 71: ...71 wAppLoxx Pro Control Plus Complete Instructions V5 Configuration of HyMo Zone 402 as key switch duration on the Secvest Configuration of HyMo output 401 relay 01 for the ready signal on the Secvest...
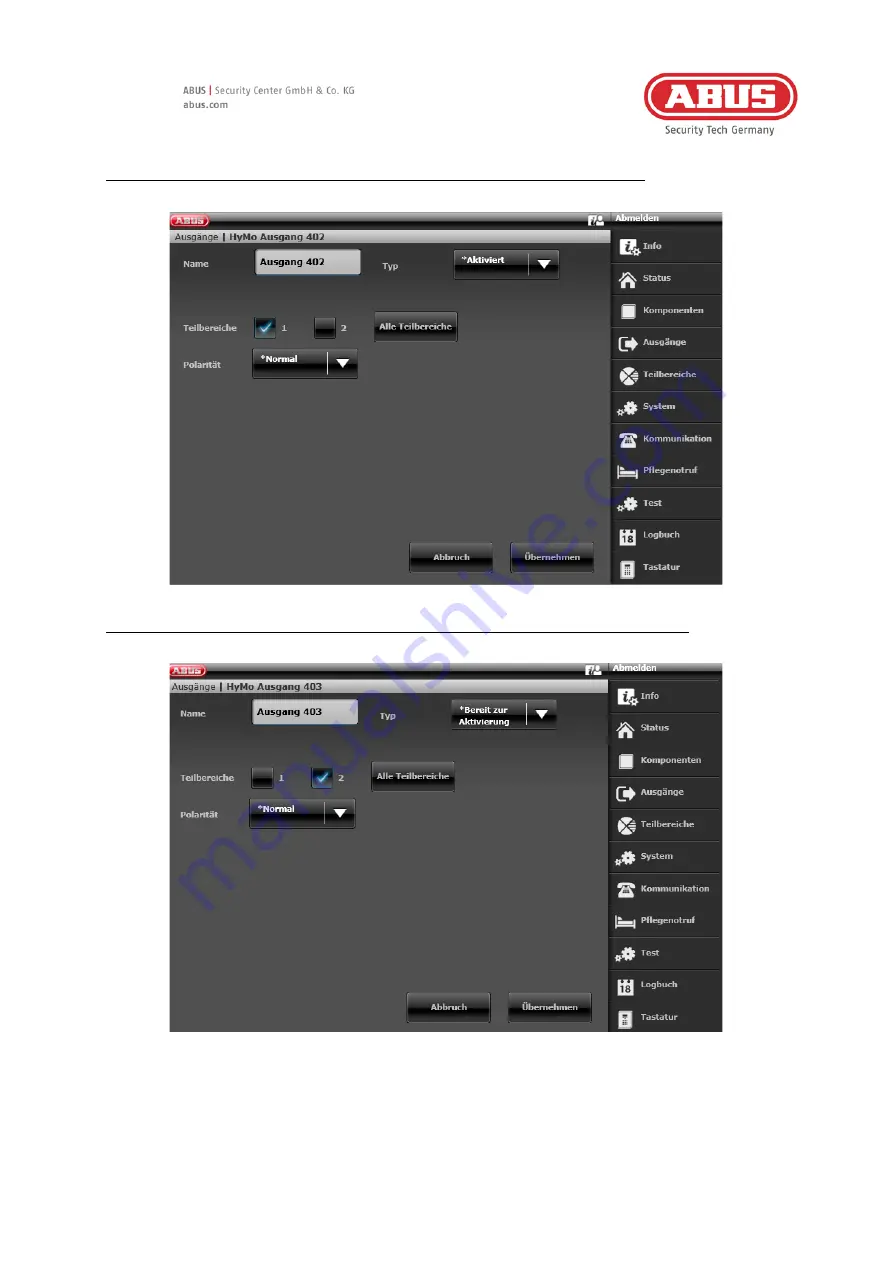
Page 72: ...2 wAppLoxx Pro Control Plus Complete Instructions V5 Configuration of HyMo output 402 relay 02 for activation on the Secvest Configuration of HyMo output 403 relay 03 for the ready signal on the Secve...
Page 73: ...AppLoxx Pro Control Plus Complete Instructions V5 Configuration of HyMo output 404 relay 04 for activation on the Secvest Configuration of the output mode for partition 1 on the Secvest not pre config...
Page 74: ...74 wAppLoxx Pro Control Plus Complete Instructions V5 Configuration of the output mode for partition 2 on the Secvest not pre configured...
Page 75: ...s soon as access is granted Access denied Action starts as soon as access is denied Access blocked and access outside the permitted time frame Arm Action starts as soon as the alarm system has been su...
Page 76: ...as soon as the input is active Alarm input Action starts as soon as the alarm input is active and an alarm has been triggered Signal loss Action starts as soon as a cylinder does not respond during s...
Page 77: ...e administrator user menu see Chapter 8 2 Users are required to change their password after starting up for the first time Later it is possible to change the password in the menu item System settings...
Page 78: ...linder for 30 seconds Pressing it again stops the function immediately After activating the remote opening function the outer knob on the wAppLoxx Pro Cylinder must be turned to carry out an opening O...
Page 79: ...ble event entries Access granted User logged in Access denied Two men role mode Remote Access Login failed Unknown tag System start up Armed System restart Disarmed Reset to factory default Battery wa...
Page 80: ...80 wAppLoxx Pro Control Plus Complete Instructions V5...
Page 81: ...pt the connection from all mobile devices that are added later Proceed as follows 1 Installing the wAppLoxx Pro Plus App Scan the QR code with your smartphone and open the link displayed Alternatively...
Page 82: ...s by the administrator A QR code icon is then displayed in the user overview Click on the icon and scan the QR code with your smartphone The QR code is personalised to you so you do not need a user na...
Page 83: ...Loxx Pro Control Plus with your smartphone all controls available in this network will be displayed below the camera window Select your control and enter your user name and password to add the control...
Page 84: ...o login You can select whether you want to log into your wAppLoxx Pro Control Plus automatically after starting the app If you are operating several controls you can specify the control into which you...
Page 85: ...installation location of your wAppLoxx Pro Control Plus Share device You can generate a QR code yourself in your wAppLoxx Pro Plus app Other users can scan this with their smartphone in the wAppLoxx...
Page 86: ...l readers are displayed on the overview page You can search for a specific door component in the Enter name field Filter function To the right of the search function the three icons for cylinders hotk...
Page 87: ...trigger the hotkey A confirmation that the hotkey has been triggered will appear Viewing and exporting logbook entries View logbook entries If you have been created by the administrator as a user with...
Page 88: ...alarm system can be armed or disarmed by clicking on the tile If you do not have authorisation to arm or disarm the alarm system the message Missing permissions will appear Camera functions After cam...
Page 89: ...following functions by clicking the icons at the bottom of the screen Switch between low and high resolution of the live stream Create a snapshot of the currently open camera View snapshots created in...
Page 90: ...configure a wAppLoxx Pro Plus access control system The corresponding data is transmitted directly to the control unit via a secure connection so that it can control access and other connections accor...
Page 91: ...lication Any liability for damages on the part of ABUS Security Center with the provision of the free application irrespective of the legal grounds shall be limited to the extent permitted by law to c...
Page 92: ...change in good time and request the user s consent Further use of the application may be made dependent on consent Should individual provisions of these Terms of Use be or become invalid this shall no...
Page 93: ...ource licences take precedence over all other licence conditions and contractual agreements with ABUS in respect of the corresponding OSS software components contained in the product In general licens...
Page 94: ...te At the end of its lifespan dispose of the product according to the applicable legal requirements Please contact your dealer or dispose of the products at the local collection point for electronic w...