BIOS Setup
3-11
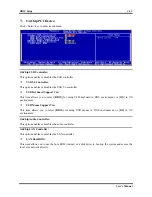
Memory Hole At 15M-16M:
When set to [Enabled], the memory address space at 15M-16M will be reserved for ISA expansion cards
that specifically requires this setting. This makes the memory from 15MB and up unavailable to the
system. Leave this item to its default setting.
Delay Prior to Thermal:
This item selects the delay time before thermal activation.
AGP Aperture Size:
This option specifies the amount of system memory that can be used by the AGP device. The aperture is a
portion of the PCI memory address range dedicated for graphics memory address space.
Init Display First:
This item selects to initialize AGP or PCI Slot first when the system boots.
[AGP]:
When the system boots, it will first initialize AGP.
[PCI Slot]:
When the system boots, it will first initialize PCI.
DRAM Data Integrity Mode:
This item selects the type of DRAM in your system. ECC is “Error Checking and Correction”. Choose the
ECC option only when your memory is ECC type.
AGP Data Rate Capability:
This item selects the data transfer rate of AGP device. A higher rate delivers faster and better graphics to
your system. Make sure your graphics card supports the mode you select.
Game Accelerator:
This item selects the mode for Game Accelerator among the options of [Auto], [Turbo], [Street Racer],
and [F1].
NOTE: The option [Street Racer] and [F1] mode will stress the DDR memory critically; not every kind of
DDR memories could be stable with these two options. [Turbo] mode is okay for most of DDR memories.
Refresh Cycle Time:
This item determines the DRAM Refresh Cycle among [Auto], [Normal], [Enhanced], [Strengthened],
and [Aggressive].
Read Delay (tRD):
This item determines the timing of DRAM Read Delay.
Read delay Adjust(tRDA):
This item determines to adjust the timing of DRAM Read Delay.
Command Per Clock(CPC):
This item determines the address command timing according to the DRAM strobe clock.
User’s Manual
Summary of Contents for IC7-MAX3
Page 1: ...IC7 MAX3 Socket 478 System Board User s Manual 4200 0370 12 Rev 1 01 ...
Page 5: ...1 User s Manual ...
Page 18: ...14 14 IC7 MAX3 IC7 MAX3 ...
Page 21: ...Introduction 1 3 1 2 Layout Diagram User s Manual ...
Page 22: ...1 4 Chapter 1 1 4 Chapter 1 IC7 MAX3 IC7 MAX3 ...
Page 42: ...2 20 Chapter 2 2 20 Chapter 2 IC7 MAX3 IC7 MAX3 ...
Page 66: ...3 24 Chapter 3 3 24 Chapter 3 IC7 MAX3 IC7 MAX3 ...
Page 68: ...A 2 Appendix A A 2 Appendix A IC7 MAX3 IC7 MAX3 ...
Page 70: ...B 2 Appendix B Click Next 5 Click Finish to complete setup 6 IC7 MAX3 ...
Page 74: ...C 2 Appendix C C 2 Appendix C IC7 MAX3 IC7 MAX3 ...
Page 76: ...D 2 Appendix D D 2 Appendix D IC7 MAX3 IC7 MAX3 ...
Page 82: ...F 2 Appendix F F 2 Appendix F IC7 MAX3 IC7 MAX3 ...


