background image


40 


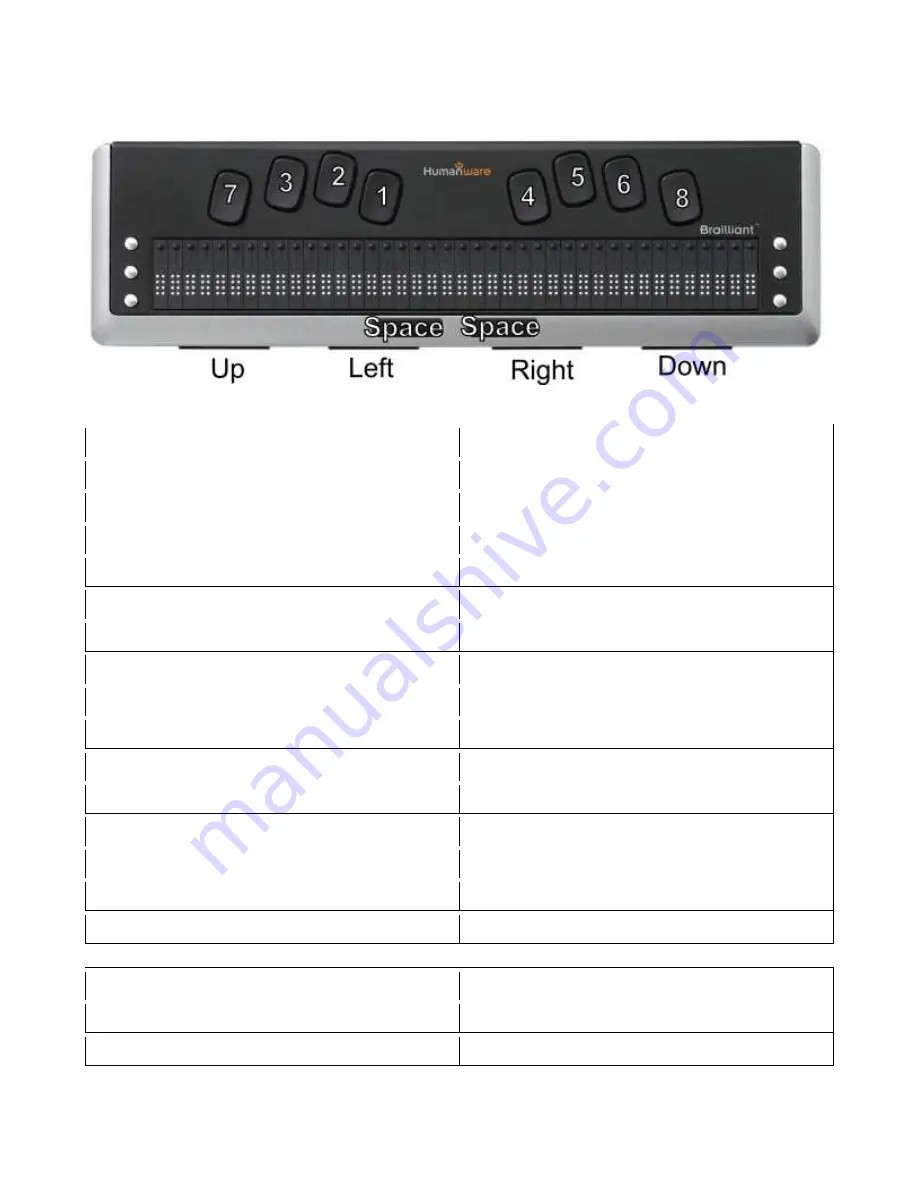
Humanware Brailliant bi40 


Table of corresponding controls for the Humanware Brailliant bi40 


Control on Ace Plus: 

Control on Braille Display. 

Right Roller Up: 

SPACE+1 or Left. 

Right Roller Down: 

SPACE+4 or Right. 

Left Roller Up: 

SPACE+1+2. 

Left Roller Down: 

SPACE+4+5. 

Action: 

SPACE+8. 

Back: 

SPACE+1+5 (E-chord) or SPACE+7. 

Scan: 

SPACE+2+3+4 (S-chord). 

Daisy Center: 

SPACE+3+4 (ST-chord). 

Daisy Left: 

SPACE+3. 

Daisy Right: 

SPACE+6. 

Daisy Up: 

SPACE+1+2+3 (L-chord). 

Daisy Down: 

SPACE+4+5+6. 

Home: 

SPACE+1+2+3+4+5+6 (FOR-chord). 

Volume Down: 

SPACE+2+3. 

Volume Up: 

SPACE+5+6. 


Function: 

Control on Braille Display. 

Pan Display Left: 

Up. 

Pan Display Right: 

Down. 


Summary of Contents for Eye-Pal Ace Plus

Page 1: ...1 Eye Pal Ace Plus Version 1 7 User Manual ABiSee Inc 30 Sudbury Rd Unit 1B Acton MA 01720 www abisee com ...

Page 2: ...gister the Device and Obtain an Email Account 11 How to Add an Available Network to your Device 12 How to Enter Passwords and Characters 12 How to Connect to a Network 12 Navigation and Settings 13 Main Menu 13 Scan and Read 13 Voice Mode 14 Voice Mode Settings 15 Text Mode 16 Generic Scan and Read Settings 16 Managing Documents 17 Saving Documents and Books 17 Saving a Single page Document 17 Sav...

Page 3: ... Settings 27 Help 28 WARRANTY 29 Appendix A Safety Rules 30 Appendix B Troubleshooting 31 Appendix C Braille Display Information 33 Freedom Scientific Focus 14 34 ALVA BC640 36 APH Refreshabraille 18 37 HIMS Braille Edge 40 38 Humanware PDI Brailliant 40 39 Humanware Brailliant bi40 40 Contact ABiSee 41 ...

Page 4: ... a truly portable device weighing only 3 5 pounds characterized by a contemporary design with time tested simple controls Thus it is easy to operate for senior citizens and people with disabilities whether it is being used to read to record and schedule voice reminders or to listen to the alerts The additional talking clock feature comes in handy many times a day This manual will familiarize you w...

Page 5: ...ce has panel with a set Daisy arrow buttons on the left side a large round button in the center a volume knob on the right toward the back and a half moon shaped Scan Button The front of the device has a Screen with Thumb Wheels at the top of each side When taking the device out of the box and setting it up to scan a document place the device on a flat surface with the front of the device facing y...

Page 6: ...Left Roller function can easily be switched to control reading speed rather than font size Back Button press this when in a sub menu to return to the previous menu or to turn the camera lights on or off Set of five Daisy Buttons press the Daisy arrow Buttons to move up down left right press the center Daisy Button to remind you of which function you are currently using hear your battery status and...

Page 7: ... located on the right side of the device above the Right Roller Press this Button to select the desired menu option In Reading mode this Button is used to pause and resume reading When using a Network Account or Adding a Network the Action Button is used to select letter and character choices for passwords title searches and adding email addresses to your Address Book Right Roller This is located ...

Page 8: ...on the front of the device in the lower left corner below the Power Button The audio socket can be used for plugging in external speakers or a headset Side Connections On the left side panel there is an outlet for the power connector and a USB port To summarize in general use the Right Roller to scroll through the menu items and the Action Button to confirm the menu selection Use the Back Button w...

Page 9: ...heck which screen you are in press the Center Daisy Button If you want to return to the Main Menu press the Home Button Power Down Press and hold the Power Button for approximately three seconds to power down the Ace Plus completely You will hear a short series of beeps as it powers off Checking the Battery Charge Status To quickly check the battery status press the round Center Daisy Button You w...

Page 10: ...Plus device Extending Battery Life In order to ensure that the battery operates efficiently for a long time disconnect the Ace Plus from the power source at least once a month and operate it on battery power until the battery charge goes down to below 15 Internet Connection Before we move on to describe how to Scan and Read documents and all the other Menu options and functions here s a note about...

Page 11: ...ail Account and then proceed to Step Two below Step One Go to www abisee org Select Create New Account Enter the Device Serial Number Enter PIN provided to you by ABiSee with the shipment of your device Enter Password any password you d like to create Enter your email address not the abisee org but the alternative one Enter the contact name for this device Enter phone number for the contact name S...

Page 12: ...nternet functions you will be able to enter characters to spell out Bookshare book titles you want to search for and enter characters to add names and email addresses to your Address Book When signing on to your Bookshare Account or some Wireless Network Accounts you will need to enter a password Later in this manual you will learn how to scroll to and select specific functions like the Address Bo...

Page 13: ...bottle labels including the fine print The Ace Plus reads printed text aloud and displays magnified text on the screen Positioning a document The Ace Plus can scan and read a document that fits in the 8 by 11 inch field directly in front of the device on a flat surface Use the base of the device as a guide and place the long side of the paper so that it is aligned with the length of the base The o...

Page 14: ...ing the text read aloud the default choice Text Mode convenient for reading text on the screen quietly without hearing the voice output The Scan and Read modes can be changed under the Settings menu item of the Main Menu In order to change the Scan and Read mode press the Home Button to go the Main Menu Use the Right Roller to scroll down to the Settings menu option and choose this option by press...

Page 15: ...on use this same process but when you are in the General Settings menu and you then choose Left Roller Mode you will need to scroll past Reading Speed until you come to Font Magnification and then press the Action Button to set the mode to Font Magnification In order to change and set the Reading speed from the Settings press the Home Button to go to the Main Menu Use the Right Roller to scroll do...

Page 16: ...cement switched to table mode Press the same two buttons again when you want to switch back Press the up and down arrow buttons simultaneously to hear the orientation of the document Text Mode In Text Mode the scanned document is presented on the screen as an electronic book e book The number of lines on the page depends on magnification Because the width of the Ace Plus screen is the same as the ...

Page 17: ...four inches from the camera lens For packages where the entire dimension of the box is four inches or less place the package under the right camera only When placing a package press and hold the Scan Button for three seconds that way the camera will bring the item into sharp focus before taking the snap shot Managing Documents Saving Documents and Books The Ace Plus allows you to save single page ...

Page 18: ...hear another beep and the voice label will be played back to you You will then hear Confirm Save If you are satisfied with your recording press the Action Button and you will hear an announcement with the first line of the document that the document has been saved If you were not satisfied with the voice label you recorded that was played back press the Back Button to be prompted to record again N...

Page 19: ...page When you have finished adding pages press and hold the Action Button then press the Back Button You will hear Book saved Opening a Single page Document To open a previously saved single page document go to the Main Menu and select the Scan and Read Option with the Action Button and then press the Back Button Use the Right Roller to scroll down to Open and press the Action Button The Ace Plus ...

Page 20: ... Scroll with the Right Roller to Convert Book to MP3 and press the Action Button to select You will hear Please wait Do not interrupt the process of conversion images to MP3 Next you ll hear Conversion complete Now you can take out the flash drive and insert it in your computer or MP3 player to listen to the saved book Book Navigation While reading the saved book use the Daisy Buttons as follows P...

Page 21: ...ct to a Network Now you are ready to sign on to your Bookshare account How to sign on to your Bookshare Account Before downloading books you will need to sign on to Bookshare with your Bookshare password To do this begin from the Main Menu screen and use the Right Roller to scroll to Settings and select it with the Action Button Next scroll to and select System Settings Then scroll to and select N...

Page 22: ...ed in the section above on Internet Options If you have access to a wireless network that the Ace Plus can connect to you can use the Email option by following these instructions below and referring to the section above under Internet Options as needed A Sign on to your email account by entering your Username To do this begin at the Main Menu screen and then scroll to Settings and select it with t...

Page 23: ...ment you can either Add an Image along with it or just send the Voice Attachment To add image scroll to and select Add Images You will be prompted to Press the Scan Button to add image You can then either add another image or if you are ready to send the email scroll to and select Send e mail You will hear for example Sending voice attachment and one image Alternatively a person can elect to send ...

Page 24: ...e Calendar menu item and press the Action Button to confirm the menu item selection Use the Right Roller to scroll down to one of these options Add reminder All reminders next 7 days next 31 day Reminders by day Press the Action Button to confirm the menu item selection then follow the voice commands Next use the Right Roller to scroll through available options Press the Action Button one final ti...

Page 25: ... store anything from family photos to curriculum oriented power point slides for educational purposes Slides that depict reminders for activities of daily living can be loaded into the albums as well as brain teasers quizzes and games To use the Photo Album functions start from the Main Menu and scroll to and select photo Album You will be given sub menu options to View Album Add Photos to Album D...

Page 26: ...l hear Are you sure you want to delete this photo If you are NOT sure you want to delete it press the back button on the left shoulder of the device If you are sure you want to delete it press the action button and the photo will be deleted To Delete an Album start at the Main Menu Scroll to and select Photo Album Scroll to and select Delete Album Scroll to the album you would like to delete and s...

Page 27: ... Button one more time and scroll to and select Set Alarm Time Use the same process as when setting the clock To Set the Alarm Mode from the Clock sub menu scroll to Set Alarm Mode You can scroll between and select your preference for One Time Alarm Daily Alarm or Off To change the clock from 12 to 24 hour mode start from the Main Menu and Scroll to and select Settings Next select General Settings ...

Page 28: ...unctionality and how to use each function You can interrupt the Help talk by pressing any Button and the Ace Plus will explain the function of the selected Button If you press the Home Button it will bring you to the Main Menu If you would like to have continual voice instruction as you navigate through menu options you can Enable Additional Voice Guidance by choosing the Setting Menu from the Mai...

Page 29: ...roduct is defective in materials or workmanship we shall at no charge to you repair or replace the product at our discretion and return the product to you You are responsible for shipping costs to ABiSee Inc but there is no charge for the inspection or the return postage This warranty excludes claims for incidental or consequential damages in connection with the warranty problem Some jurisdictions...

Page 30: ...the battery is built in and cannot be removed Do not expose the Ace Plus to excessive heat or direct sunlight to avoid risk of fire Do not use the Ace Plus near inadequately shielded medical devices To avoid risk of electrical damage keep your Ace Plus away from water or fluid chemicals To clean the device always unplug it first Use a soft fabric with no chemicals or abrasives to clean the Ace Plu...

Page 31: ... 3 If the battery does not power the Ace Plus The battery may need to be charged Connect the power adaptor to charge the battery Troubleshooting Scan and Read Application 1 If the text you are reading does not make sense Do not stress the Scan Button Press it and wait for the shutter sound Make sure your reading language is the same as the language of your document Switch to from tables reading mo...

Page 32: ...g your Ace Plus is close to the device 2 If you think that you did not hear the reminder you have entered at the right date time Go to the Main Menu and select Calendar Use the Right Roller to scroll to All Reminders and press the Action Button to select Check whether the expected reminder exists It is most likely that the reminder has not been scheduled for the time you tried to hear it ...

Page 33: ...n Button Connect the Braille display to Ace Plus using the USB port located on the left side of the device Wait for about 30 seconds for the Braille display to start The next steps are for either type of Braille display Choose the Scan and Read menu option from the Main Menu Take a picture by pressing the Scan button It will start reading aloud When scanning a document by pressing the Scan button ...

Page 34: ...e is a table that lists each control on the Ace Plus in the first column followed by the corresponding control on the Braille display in the second column If you are scanning and reading this manual you will need to press the left and right Daisy arrows at the same time to switch to table mode in order to hear the information in the correct order Freedom Scientific Focus 14 ...

Page 35: ...t NAV Rocker Up Right Roller Down Right NAV Rocker Down Left Roller Up Left NAV Rocker Up Left Roller Down Left NAV Rocker Down Action Right Mode Button Back Left Mode Button Scan Right Selector Button Home Left Selector Button Function Control on Braille Display Pan Display Left Left Panning Button Pan Display Right Right Panning Button ...

Page 36: ...Thumb Key 2 Right Roller Down Smartpad Down or Thumb Key 3 Left Roller Up F4 Smartpad Left Left Roller Down F4 Smartpad Right Action Smartpad Right Back Smartpad Left Scan Center thumb key Home F2 Volume Down F4 Smartpad Down Volume Up F4 Smartpad Up Function Control on Braille Display Pan Display Left Thumb Key 1 Pan Display Right Thumb Key 4 ...

Page 37: ...Left Roller Down SPACE 4 5 Action SPACE 8 Back SPACE 1 5 E chord or SPACE 7 Scan Joystick Press or SPACE 2 3 4 S chord Daisy Center SPACE 3 4 ST chord Daisy Left SPACE 3 Daisy Right SPACE 6 Daisy Up SPACE 1 2 3 L chord Daisy Down SPACE 4 5 6 Home SPACE 1 2 3 4 5 6 FOR chord Volume Down SPACE 2 3 Volume Up SPACE 5 6 Function Control on Braille Display Pan Display Left Left Bar or Joystick Left Pan ...

Page 38: ...ional pad or SPACE 4 Left Roller Up SPACE 1 2 Left Roller Down SPACE 4 5 Action SPACE 8 Back SPACE 1 5 E chord or SPACE 7 Scan SPACE 2 3 4 S chord Daisy Center SPACE 3 4 ST chord Daisy Left SPACE 3 Daisy Right SPACE 6 Daisy Up SPACE 1 2 3 L chord Daisy Down SPACE 4 5 6 Home SPACE 1 2 3 4 5 6 FOR chord Volume Down SPACE 2 3 Volume Up SPACE 5 6 Function Control on Braille Display Pan Display Left Ba...

Page 39: ...le Display Right Roller Up 1 Right Roller Down 4 Left Roller Up 1 2 Left Roller Down 4 5 Action 1 5 E Back 1 3 4 6 X Scan 2 3 4 S Daisy Center 3 4 ST Daisy Left 3 Daisy Right 6 Daisy Up 1 2 3 L Daisy Down 4 5 6 Home 1 2 3 4 5 6 FOR Volume Down 2 3 Volume Up 5 6 Function Control on Braille Display Pan Display Left 2 Pan Display Right 5 ...

Page 40: ...ght Left Roller Up SPACE 1 2 Left Roller Down SPACE 4 5 Action SPACE 8 Back SPACE 1 5 E chord or SPACE 7 Scan SPACE 2 3 4 S chord Daisy Center SPACE 3 4 ST chord Daisy Left SPACE 3 Daisy Right SPACE 6 Daisy Up SPACE 1 2 3 L chord Daisy Down SPACE 4 5 6 Home SPACE 1 2 3 4 5 6 FOR chord Volume Down SPACE 2 3 Volume Up SPACE 5 6 Function Control on Braille Display Pan Display Left Up Pan Display Righ...

Page 41: ...nday through Friday 8 30 am to 5 00 pm EST By Phone 1 978 637 2900 or Toll Free in the U S at 1 855 354 4080 By Fax 1 253 595 3623 By E mail Sales sales ABiSee com Tech Support support ABiSee com General Info info ABiSee com By Mail ABiSee Inc 30 Sudbury Rd Unit 1B Acton Massachusetts 01720 ...

Reviews: