background image


26 


IMPORTANT INFORMATION 


The area of use for this fitness equipment is home exercise. 


The exercise machine should only be operated as described in this manual. 


The owner of the equipment is responsible that all users of the exercise machine are 

familiar with the contents of these precautions. 


During assembly; make sure that all nuts and bolts are in their right places and 

properly entered before tightening any of them. 


Place the exercise machine on a flat and smooth surface. 


The exercise equipment must not be used outdoors, or in rooms with extraordinary 

humidity. It is not recommended to user the machine in a garage, carport or covered 

terrace. 


It is recommended to use a protective mat to eliminate the risk of damage to the floor 

during the use of the exercise machine. 


Store the exercise machine in a frost free and dry environment. The display should 

never be exposed to direct sunlight. 


Before every use; make sure that all nuts and bolts are securely tightened. If any 

loose or defective parts are revealed, make sure that no one uses the exercise 

machine until it has been properly replaced or tightened. 


Always use shoes with a proper rubber sole when using the exercise machine. 


The exercise machine should only be used by one person at the time. 


This bike is not constructed to be ridden standing up. Always sit on the seat while 

using it. 


When adjusting seat and handlebar position; make sure the adjustment screws are 

well tightened before using the exercise machine. Loose adjustment screws will lead 

to more movement and more wear than necessary. 


Children must not use the equipment unattended, and they should not be around 

while the exercise machine is being used by others. 


The maximum user weight for this exercise machine is 150 kg. 


The exercise machine should not be used for medical purposes or physical therapy, 

unless it is specifically recommended by your doctor or physical therapist. 


With reservation for any misprints.  


Summary of Contents for StreamTour

Page 1: ...Art nr 300 936 ModelAT 817J2...

Page 2: ...llista Parts List 7 Montering Assembly 12 Viktig informasjon 13 Betjening av computeren 17 Garantibestemmelser 18 Kontaktinformasjon 19 Viktig information 20 Betj ning av datorn 24 Garantivillkor 25 K...

Page 3: ...59 16L 15 18 19 57 25 24 21 20 105 16R 58 31 66 33 36 69 68 73 116 67 39 46 52A 47 52B 53 65 49 95 54 94 99 100 96 103 103 117 98 50 4 10 90 93 114 10 113 115 98 9A 13 80 85 41 104 83 76 81 82 51 88 7...

Page 4: ...5x20L 8pcs 9 D15 4xD8 2x2T 8pcs 7 D16xD8 5x1 2T 8pcs 13 D15 4xD8 2x2T 4pcs 7 D16xD8 5x1 2T 4pcs 13 D22xD8 5x1 5T 2pcs 11 M8x1 25x50L 4pcs 8 M8x1 25x50L 2pcs 8 M8x1 25x15L 4pcs 9A D16xD8 5x1 2T 4pcs 13...

Page 5: ...pedal 1 75 Backrest supporting tube 1 17 Screw ST4 2 1 4 15L 2 76 C clip S 12 1T 3 18 Crank axle 1 77 Anti loose nut M6 1 6T 1 19 C clip D22 5 D18 5 1 2T 2 78 Anti slip nut 2 20 Bolt M6x1 0x15L 4 79...

Page 6: ...M8 1 25 8T 2 51 Bushing 2 117 Tension cable 1 52A Upper computer cable 1 118 Buffer 1 52B Lower computer cable 1 119 Screw ST4 1 4L 25L 2 53 Sensor cable 1 120 Screw 4 54 Electric cable 1 121 Screw co...

Page 7: ...abilizer 3 and the rear stabilizer 2 to the main frame 1 by the spring washer 7 the Allen bolt 9 and the flat washer 13 2 Adjust the proper height by turning the wheel of rear foot cap 99 FIG 1 M8 20L...

Page 8: ...6 47 the upper computer cable 52A the lower computer cable 52B like fig b 3 Insert the handlebar post 5 on the main frame and tighten it by using the spring washer 7 the Allen bolt 8 and the flat wash...

Page 9: ...computer cable 52A to the computer 60 2 Assemble the computer 60 to the handlebar post 5 by the Screw 98 3 Assemble the right pedal 16R and left pedal 16L to the right crank 15 and left crank 106 1 5...

Page 10: ...ssemble the handlebar 48 to the main frame 1 by the allen bolt 8 and curved washer 11 2 Connect the plug of handle pulse cable 49 with the lower handle pulse cable 47 FIG 4 x2 a M8 50L D22 D8 5 1 5T 8...

Page 11: ...asher 13 and the screw 9A 2 Assemble the backrest 38 to the backrest supporting tube by the screw 120 and the screw cover 121 3 Plug the adaptor 39 and turn on the computer M6 13 15 FIG 5 1 4 20 40L D...

Page 12: ...r aldri utsettes for direkte sollys F r hver bruk p se at alle skruer og muttere er godt strammet til Dersom det oppdages l se eller defekte deler s rg for at ingen benytter seg av sykkelen f r den er...

Page 13: ...RSK BESKRIVELSE MODE FUNKSJON Skifter mellom de ulike funksjonene og bekrefter hvert enkelt valg RESET NULLSTILL Nullstiller hver enkelt verdi UP OPP Justerer mostand el verdier opp DOWN NED Justerer...

Page 14: ...DOWN knappen for velge trening i manuell modus Bekreft med MODE knappen Forh ndsinnstilling Hvis nskelig kan computeren forh ndsinnstilles til Telle ned fra en gitt tid Telle ned fra en gitt distanse...

Page 15: ...ART for starte treningen og sykkelen vil justere motstanden avhengig av hvor fort du tr r rundt CARDIO CARDIO er en funksjon der maskinen justerer motstanden opp eller ned avhengig av pulsen din Treni...

Page 16: ...TET Anaerob intervalltrening MIDDELS INTENSITET kt kondisjon og oksygenopptak LAV INTENSITET Lange kter for maks fettforbrenning BLUETOOTH FUNKSJON Last ned APPen iConsole eller iConsole for f tilgang...

Page 17: ...bedre rettigheter enn det som f lger av loven Normal REKLAMASJONSRETT er ulovlig omtale som GARANTI i salgs eller markedsf ringsmateriell Med Andre utskiftbare komponenter menes alle andre l se deler...

Page 18: ...t kontaktskjema gir du oss den informasjonen vi trenger for kunne hjelpe deg s effektivt som mulig VIGTIGT OM SERVICE I tilf lde af problemer af nogen art skal du kontakte Mylna Service Vi vil gerne h...

Page 19: ...olljus F re varje anv ndningstillf lle kontrollera att alla skruvar och muttrar r ordentligt tdragna Om du uppt cker l sa eller defekta delar se till att ingen anv nder tr ningsredskapet f rr n det be...

Page 20: ...NGELSKA SVENSKA BESKRIVNING MODE FUNKTION Skiftar mellan de olika funktionerna och bekr ftar varje enskilt val RESET NOLLST LL Nollst ller varje enskilt v rde UP UPP F r och v lja h gre data motst nd...

Page 21: ...nv nd UP eller DOWN f r att v lja utbildning i manuellt l ge bekr fta med MODE knappen F rinst llning Om nskv rt kan datorn f rinst llas att R kna ner fr n en given tid R kna ner fr n en given distans...

Page 22: ...tid och tryck sedan p START f r att b rja tr na och cykeln kommer att justera motst ndet beroende p hur snabbt du trampar runt CARDIO Cardio r en funktion d r datorn justerar motst ndet upp t eller n...

Page 23: ...tervalltr ning GENOMSNITTLIG INTENSITET kad kondition och syreupptagning L G INTENSITET L nga tr ningspass f r maximal fettf rbr nning BLUETOOTH FUNKTION Ladda ner appen iConsole eller iConsole f r at...

Page 24: ...andra utbytbara komponenter avses alla andra l sa delar som finns p apparaterna Exempel p s dana delar kan vara sadeldynor verdrag pedaler tr ningsdatorer och annan elektronik F r denna typ av delar g...

Page 25: ...tt vi kan erbjuda dig b sta m jliga hj lp Bes k v r hemsida www mylnasport se h r hittar du information om produkterna bruksanvisningar ett kontaktformul r som du kan anv nda f r att komma i kontakt m...

Page 26: ...xposed to direct sunlight Before every use make sure that all nuts and bolts are securely tightened If any loose or defective parts are revealed make sure that no one uses the exercise machine until i...

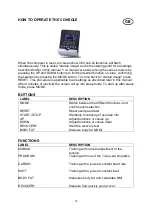
Page 27: ...r 4 minutes of inactivity the screen will go into sleep mode To start up after sleep mode press MODE BUTTONS LABEL DESCRIPTION MODE Switch between the different functions and confirm each selection RE...

Page 28: ...om a given time Counting down from a given distance Counting down from a given calorie consumption Give an audible signal alarm when the pulse exceeds the given limit To pre set computer press the MOD...

Page 29: ...nding on your pulse Training with steady pulse is important to achieve the best possible results in relation to the objectives you have set yourself See also the pulse table in the back of the User Gu...

Page 30: ...INTENSITY Anaerob interval training MEDIUM INTENSITY Increase stamina LOW INTENSITY Long sessions for max fat burning BLUETOOTH FUNCTION Download the APP named iConsole or iConsole to access more pro...

Page 31: ...r parts is implied all other replaceable parts on the machine or device Examples of such parts could be seat cushions foam padding pedals exercise computers and other electronics For the consumer mark...

Page 32: ...so we can offer you the best possible help Visit our website www mylnasport no here you will find information about the products user manuals a contact form to get in touch with us and possibility to...

Reviews: