

8
7
10
12
14
9
11
13
Federal Communication Commission
Interference Statement
III.
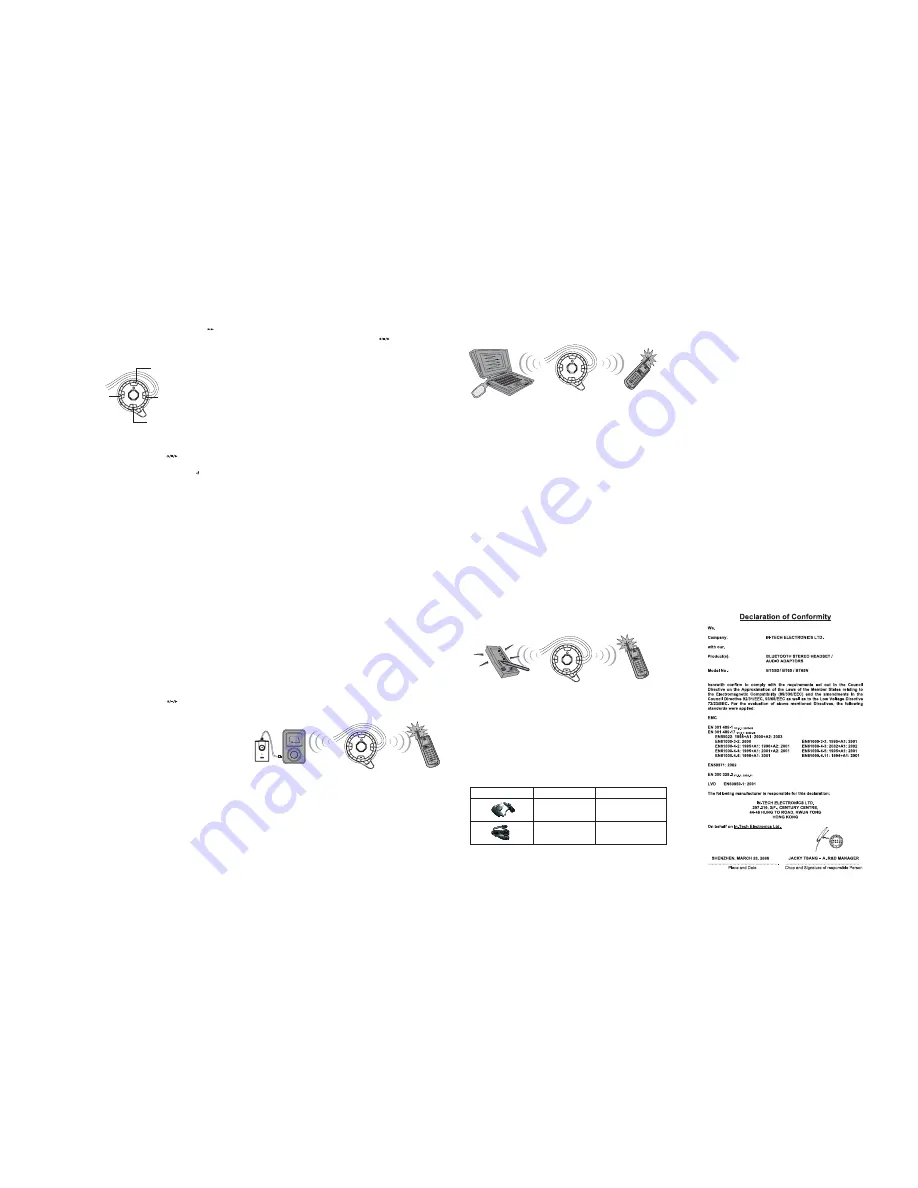
Stereo Headset paired with USB Bluetooth Dongle Guide
[ C ]
1.Pairing
a.
While the Headset is powered off, press and hold
button for 4 seconds.
The LED will flash red and green alternatively, which indicates the Headset in
Pairing Mode. The Pairing Mode will last for one minute.
b.
Put the Headset, the USB
dongle and the PC close to each other,
c.
Insert the USB
Dongle into a USB port of your Notebook PC / desktop
PC to start the pairing process. Typically, this has to be done by executing a
application program supporting the Audio Visual (A/V) Profile, to
discover the Headset.
It may take some time to search it depending on the
number of
devices nearby.
0.5
to 3 meters.
d.
Your PC will display the model name “BT55D” if it has found the Headset; and
ask for a passkey. Enter a sequence of “0000”. After successful pairing, follow
the instructions to establish the
connection with the Headset.
e.
If the pairing is successful, the LED will flash green, which indicates it is in
Standby Mode and ready to receive audio signals from the dongle. If pairing
does not occur as expected, turn the Headset and the PC off.
Wait for 10
seconds and repeat the pairing process from the beginning.
2. Listening to music
a. Put the earpiece on.
b. Start a music application such as Windows Media Play or RealOne Player and
play the music; you will listen to the stereo music from the earpiece.
c. The speaker volume of the earpiece can be adjusted by pressing the VOL + / VOL
- buttons.
d.
While listening to music (for example, song 2), press the Headset’s FORWARD
>> button will skip to next song (for example, song 3); press the BACKWARD <<
button will replay the current song (for example, song 2).
Double press the
BACKWARD button will play the last song (for example, song 1). This remote
control function is supported only by the AVRCP profile of your
application program.
e.
Turn the Headset off after use.
Bluetooth
Bluetooth
Bluetooth
Bluetooth
Bluetooth
Bluetooth
d.
The speaker volume of the earpiece can be adjusted by pressing and releasing
the VOL + / VOL- buttons.
e.
Turn the Headset off after use.
The Audio Adaptor will be turned off
automatically. Next time, you don’t need to pair them again. Turn them on, and
then they will be paired automatically and ready to transmit music from the audio
source.
IV.
Stereo Headset paired with Bluetooth enabled PDA Guide
[ D ]
1. Pairing
a.
While the Headset is powered off, press and hold
button for 4 seconds. The
LED will flash red and green alternatively, which indicates the Headset in Pairing
Mode. The Pairing Mode will last for one minute.
b.
Put the Headset and the
enabled PDA (with A/V profile) close to each
other,
c.
Follow the operation instructions of your
enabled PDA (with A/V
profile) to start the pairing process. Typically, this has to be done by going to a
setup or connect menu to discover the Headset. It may take some time to search
it depending on the number of
devices nearby.
d.
Your PDA will display the model name “BT55D” if it has found the Headset; and
ask for a passkey. Enter a sequence of “0000”. After successful pairing, follow
the instructions to establish the
connection with the Headset.
e.
If the pairing is successful, the LED will flash green, which indicates it is in
Standby Mode and ready to receive audio signals from the PDA. If pairing does
not occur as expected, turn the Headset and the PDA off. Wait for 10 seconds
and repeat the pairing process from the beginning.
0.5 to 3 meters.
2. Listening to music
a.
Put the earpiece on.
b.
Play the music on the PDA as normal; you will listen to the stereo music from the
earpiece.
c.
The speaker volume of the earpiece can be adjusted by pressing the VOL+/
VOL- buttons.
d.
While listening to music (for example, song 2), press the Headset’s FORWARD
>> button will skip to next song (for example, song 3); press the BACKWARD <<
button will replay the current song (for example, song 2).
Double press the
BACKWARD button will play the last song (for example, song 1). This remote
control function is supported only by the AVRCP profile of your Bluetooth
application program.
e.
Turn the Headset off after use.
Bluetooth
Bluetooth
Bluetooth
Bluetooth
Advance functions: The following user scenarios provide you a true
wireless freedom to monitor the mobile phone call status while you
are enjoying stereo music at the same time. You don't even need to
put down your earpiece.
V.
Stereo Headset paired with
Audio Adaptor and Bluetooth mobile phone Guide
[ A & B ]
1.Pairing
a.
Follow the Pairing process [ B ] to pair the Headset and the Audio Adaptor.
b.
After successful pairing, turn the Headset off. The Audio Adaptor will turn off
automatically.
C. Follow the pairing process [ A ] to pair the Headset and the
mobile
phone.
d.
After successful pairing, turn on the Audio Adaptor.
e.
All three devices are in Standby Mode and the LED’s should flash green.
2. Listening to music
a.
Follow the Listen to music process [ B ] to enjoy the music.
3. Monitoring mobile phone calls
a.
Follow the
] in [ A ] to monitor phone calls.
Bluetooth
[Advance function
Bluetooth
Audio Adaptor
[ B ]
Bluetooth
mobile phone
[ A ]
Bluetooth
Stereo Headset
* Advance functions are not supported in Sony Ericsson T610, T630
VII.
Stereo Headset paired with
Bluetooth enabled PDA and Bluetooth mobile phone Guide
[ A & D ]
1. Pairing
a. Follow the Pairing process [ D] to pair the Headset and the
enabled PDA.
b. After successful pairing, turn the Headset off.
c. Follow the pairing process [ A ] to pair the Headset and the
mobile
phone.
d. After successful pairing, please follow the PDA
application program
instructions to re-establish
connection between the PDA and the
Headset.
e. All three devices are in Standby Mode and the LED’s should flash green.
2. Listening to music
a. Follow the Listen to music process [ D ] to enjoy the music.
3. Monitoring mobile phone calls
a. Follow the
in [ A ] to monitor phone calls.
Bluetooth
Bluetooth
Bluetooth
Bluetooth
[Advance function]
Accessories Table
Description
A/C Switching Adaptor
Status
Provided
USB Charging cable
Optional
Bluetooth
mobile phone
[ A ]
Bluetooth
enabled PDA
[ D ]
Bluetooth
Stereo Headset
VI.
Stereo Headset paired with
USB Bluetooth dongle and Bluetooth mobile phone Guide
[ A & C ]
1. Pairing
a. Follow the Pairing process [ C ] to pair the Headset and the USB
dongle.
b. After successful pairing, turn the Headset off.
c. Follow the pairing process [ A ] to pair the Headset and the
mobile
phone.
d. After successful pairing, please follow the PC
application program
instructions to re-establish the
connection between the
dongle and the Headset.
e. All three devices are in Standby Mode and the LED’s should flash green.
2. Listening to music
a. Follow the Listen to music process [ C ] to enjoy the music.
3. Monitoring mobile phone calls
a. Follow the
in [ A ] to monitor phone calls
Bluetooth
Bluetooth
Bluetooth
Bluetooth
Bluetooth
[Advance function]
USB
dongle
[ C ]
Bluetooth
Bluetooth
mobile phone
[ A ]
Bluetooth
Stereo Headset
II.
Stereo Headset paired with Stereo Audio Adaptor Guide
[ B ]
1. Pairing
a.
While the Headset is powered off, press and hold
button for 4 seconds.
The LED will flash red and green alternatively, which indicates the Headset in
Pairing Mode. The Pairing Mode will last for one minute.
b.
While the Stereo Audio Adaptor is powered off, press and hold
button. The
LED will flash red and green alternatively, which indicates the Audio Adaptor is in
Pairing Mode. The Pairing Mode will last for one minute.
c. Put the Headset and the Audio Adaptor close to each other, 0.5 to 3 meters. After
a few seconds, their LED’s will turn into flashing green, which indicates
successful pairing. Both units are in Standby Mode and ready to transmit audio
signal, or music from the audio source.
2. Listening to music
a. After successful pairing, plug the jack of the Audio Adaptor to the 3.5 mm socket
of any audio source such as iPod, MP3, CD player, Notebook PC, or others.
b. Put the earpiece on.
c.
Play the music on the audio source as normal; you will listen to the stereo music
from the earpiece.
7.Transfer call
a. To transfer a call from the Headset to your mobile phone
If the mobile phone is enabled with the Hands-free profile, press the
button
while the call is in session and it will be transferred to your mobile phone.
If the mobile phone is enabled with the Headset profile, follow the instructions
of your mobile phone manual to do call transfers.
b.
To transfer a call from your mobile phone to the Headset
Follow the instructions of the mobile phone manual to do call transfers
!
!
!
This equipment has been tested and found to comply with the limits for
a Class B digital device, pursuant to Part 15 of the FCC Rules. These
limits are designed to provide reasonable protection against harmful
interference in a residential installation.
This equipment generates,
uses and can radiate radio frequency energy and, if not installed and
used in accordance with the instructions, may cause harmful
interference to radio communications. However, there is no guarantee
that interference will not occur in a particular installation.
If this
equipment does cause harmful interference to radio or television
reception, which can be determined by turning the equipment off and
on, the user is encouraged to try to correct the interference by one of
the following measures:
-
Reorient or relocate the receiving antenna.
-
Increase the separation between the equipment and receiver.
-
Connect the equipment into an outlet on a circuit different from that
to which the receiver is connected.
-
Consult the dealer or an experienced radio/TV technician for help.
This device complies with Part 15 of the FCC Rules. Operation is
subject to the following two conditions: (1) This device may not cause
harmful interference, and (2) this device must accept any interference
received, including interference that may cause undesired operation.
FCC Caution: Any changes or modifications not expressly approved by
the party responsible for compliance could void the user's authority to
operate this equipment.
This equipment complies with FCC radiation exposure limits set forth
for an uncontrolled environment. End users must follow the specific
operating instructions for satisfying RF exposure compliance.
This transmitter must not be co-located or operating in conjunction with
any other antenna or transmitter.
IMPORTANT NOTE:
FCC Radiation Exposure Statement:
Backward
Forward
Volume
up
Volume
down
+
+
+
+


