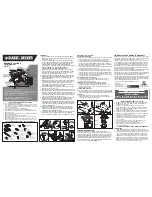
Step
å
Turn the assembly onto its back edges.
å
Fasten the FRAMES (H and K) to the TOP (A)
and SHELVES (L). Tighten sixteen 1-15/16" HEX
HEAD SCREWS (15) using the L-WRENCH (8).
å
NOTE: You should start each SCREW a few turns before
completely tightening any of them.
å
Fasten the LOWER FRAMES (K) to the BRACES (G).
Tighten four 1-3/16" HEX HEAD SCREWS (12) using
the L-WRENCH (8).
å
NOTE: You should start each SCREW a few turns before
completely tightening any of them.
Step 7
H
K
K
H
L
L
L
G
G
A
8
1-3/16" HEX HEAD SCREW
(4 used in this step)
12
1-15/16" HEX HEAD SCREW
(16 used in this step)
15
Meet Part (L). This component has
been engineered to be lighter, stronger,
faster… well ok. Not technically faster.
But defi nitely makes for a sturdier wall-
mounted bookcase With door that’s
easier to assemble and friendlier to
the environment.
These holes
must be closer
to this edge