background image

Installation Guide


28/34  94-1100-00002873 A0 EN

TruFit

®

 Power Distribution Unit 


4.9.5


Thermocouple Installation 

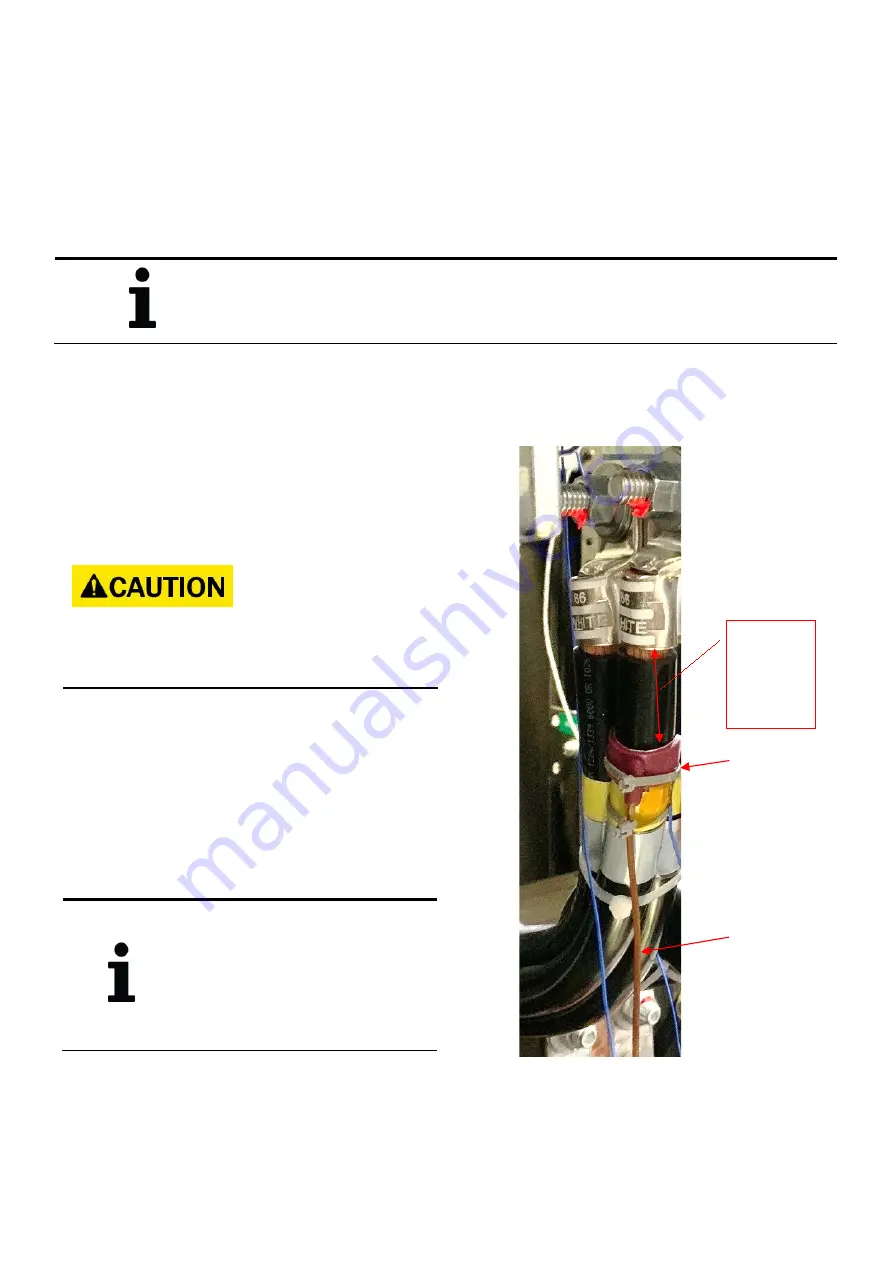
Thermocouples are used for PDU systems equipped with Powerview Thermal Monitoring.  The thermocouple 
sensor is encased inside of a molded silicone housing, which allows for flexible installation around a curved power 
wire.  The silicone housing has a self-adhesive foil backing to aid in securing the sensor to the power wire. 
 
Thermocouple sensors have a standard cable length of 15ft.  Terminals or crimped connections should not be 
used to extend cable lengths, as signal loss will occur, and affect temperature readings. 


Thermocouple cable installation is typically performed by ABB personnel, but 
individual situations may dictate otherwise.   


If installing thermocouple cables to the Powerview Thermocouple Interface 
Board (TIB), please contact ABB Service Center at 1-800-292-3739 for support.


To install:


Position the sensor head (

A

) with the foil 

backing in contact with the cable insulation. 


The foil backing provides 
quick response to 
temperature changes, but 
inherently has a low 
resistance and lack of 
isolation.  

Care must be 

taken to ensure the 

thermocouple is 

positioned with a 

minimum clearance of 2” 
creepage over surface 


Remove paper liner from foil backing to expose 
adhesive and apply pressure while wrapping 
silicone housing around the cable. 


Secure sensor head and thermocouple cable to 
power wire with 

plastic

  cable ties.  Ensure 

cable tie is taut, preventing rotation or 
slippage of any component in the securing 
scheme. Take care not to overtighten or 
deform the sensor head or thermocouple cable. 


The thermocouple cable (

B

) should be routed 

away from the back of the sensor as shown.


Securing tension is 
dependent on the cable tie 
used 

and 

should be 

specified 

by the 

manufacturer.  For example, 
Thomas & Betts TY23M Ty-
Rap

®

  is installed with Tool 

ERG50, at tension setting 6 


Figure 4.9.10 – Thermocouple installation


Minimum 

2” 

creepage 

over 

surface 

Summary of Contents for TruFit 50kVA

Page 1: ... INSTALLATION GUIDE TruFit Power Distribution Unit 50 300kVA TruFit PDU 50 300 kVA ...

Page 2: ...o the highest standards of quality will give you complete satisfaction Please read carefully the Installation Guide which contains all the necessary information and describes all you need to know about the installation of the PDU Thank you for choosing ABB Start up and commissioning An ABB Global Services Field Engineer must perform start up and commissioning of the PDU Please contact ABB Service ...

Page 3: ...on quality products systems and services that meet or exceed our customers expectations For more information Further publications for the TruFit Power Distribution Unit and accessories are available for download from http new abb com PDU power distribution or by scanning the QR code below Contacting ABB for support To contact ABB for general information call 800 238 5000 or preventative and remedi...

Page 4: ...lation 14 4 4 1 PDU location 14 4 4 2 Positioning of the PDU 15 4 4 3 Access 15 4 5 Handling and moving the equipment 15 4 6 Checking the supplied parts 16 4 6 1 Packaging 16 4 6 2 After Positioning the PDU 16 4 7 Ventilation and cooling 17 4 8 Installation Instructions 18 4 8 1 Main Cabinet Installation 18 4 8 2 Sidecar Installation 19 4 8 3 Floor Stand Installation Instructions 19 4 8 4 Kick Pla...

Page 5: ...damentals of electricity wiring electrical components and electrical schematic symbols Read all safety and operating instructions before operating the PDU Adhere to all warnings on the unit and in this manual 1 1 1 List of symbols These symbols may appear on your PDU or on labels inside the PDU Most international safety agents accept them Everyone in your organization who works with your system sh...

Page 6: ...is should be performed by qualified service personnel This PDU contains potentially hazardous voltages End user must follow applicable regional occupational safety codes regulations during installation operation and equipment maintenance This may require additional field marking or labelling defining appropriate level of PPE Personal Protection Equipment to reduce the risk of Arc flash related inj...

Page 7: ... current protection is to be supplied by the user in accordance with nameplate ratings in applications where the PDU has no main breaker 1 4 Safety considerations The TruFit PDU is designed for commercial applications and should be handled with appropriate care following these guidelines Keep surroundings clean and free from excess moisture Do not operate the PDU system close to gas or electric he...

Page 8: ...nly environmentally friendly material at the end of its service life must be recovered conforming to the local applicable regulations PDU packing materials must be recycled in compliance with all applicable regulations Recycling at the end of service life ABB in compliance with environment protection recommends to the User that the PDU equipment at the end of its service life must be recovered con...

Page 9: ...Installation Guide TruFit Power Distribution Unit 94 1100 00002873 A0 EN 9 34 3 Layout 3 1 Layout TruFit PDU 50 300kVA Figure 3 1 1 Main cabinet with Doors Closed ...

Page 10: ...Installation Guide 10 34 94 1100 00002873 A0 EN TruFit Power Distribution Unit Figure 3 1 2 Main cabinet with Doors Open Sub Feed Breaker Panelboard Configuration Displayed ...

Page 11: ...Installation Guide TruFit Power Distribution Unit 94 1100 00002873 A0 EN 11 34 Figure 3 1 3 Main cabinet with Doors Open Logic and Main Connections ...

Page 12: ...ous damage or rough handling DO NOT remove the packaging material until the PDU is ready for installation A thorough internal inspection should be conducted only after the enclosure has been positioned for installation and prior to making electrical connections Before moving the load the unit and transport device i e pallet jack or forklift make sure that the pathway is wide enough for the load an...

Page 13: ...Dimensions W x D x H TruFit PDU 50 300kVA 42 00 x 36 00 x 78 00 inches 1067 x 914 x 1981 mm 24 inch 610 mm Wide Side Car 24 00 x 36 00 x 78 00 610 x 914 x 1981 mm Approximate Weight TruFit PDU 50 300kVA 300kVA Cabinet 2800 lbs 1270 kg 24 in 610 mm Wide Side Car 350 lbs 159 kg Estimated Floor Loading TruFit PDU 50 300kVA 300kVA Cabinet 267 lbs ft2 1302 kg m2 24 in 610 mm Wide Side Car 58 lbsft2 285...

Page 14: ...only by an ABB Service Technician If optional cabinets and accessories are included with the PDU please refer to those accompanying manuals for installation and operating instructions The PDU is intended for use in a restricted access location only Do not locate or stock easily flammable materials in the same room as the PDU The PDU is designed for indoor applications only and must be protected fr...

Page 15: ... typically require forty two inches 42 of FRONT ACCESS for service area Please refer to supplied outline drawing for exact service and operational access requirements The forty two inches 42 of front access allows the unit to be fully serviced while also complying with most local electrical codes for access to circuit breaker distribution equipment Please refer to applicable local electrical codes...

Page 16: ...lly remove the stretch wrap by cutting the material at one of the rear corners of the system REMEMBER this stretch wrap is the final layer of packing material on the system so be careful in both cutting and removing the stretch wrap Verify model numbers match the numbers shown on your order Model and serial numbers as well as rating configuration are located on the inside front door Record these n...

Page 17: ...s could be required when the PDU operates in a dirty environment In order to prevent the system from overheating proper ventilation must be provided in order to extract the heat generated by the PDU Ensure that the ambient temperature is kept within the specified operating range of 32 F to 104 F 0 C to 40 C Contact your ABB Service Center for appropriate solutions The below table indicates the hea...

Page 18: ...or knowingly sells this product for use with life support applications or other FDA designated critical applications All wiring should be performed by qualified electricians and in accordance with local and national electrical safety codes Before placing the unit into service a thorough inspection and supervised start up should be performed by a qualified technician 4 8 1 Main Cabinet Installation...

Page 19: ...d Installation Instructions Inspect concrete prior to installation floor stand cannot be bolted on cracked or damaged concrete Bolt the floor stand to the floor using HILTI HIT RE 500 HAS 1 2 x 6 1 2 adhesive anchor system Ensure a minimum depth of 3 embedded into concrete After installation inspect the concrete for cracks or damage All anchors must be perpendicular to the concrete with the nuts t...

Page 20: ...Installation Guide 20 34 94 1100 00002873 A0 EN TruFit Power Distribution Unit Figure 4 8 2 Cabinet position on floor stand ...

Page 21: ...r moving the unit and routing cable Be sure to identify the kick plate kit during unpackaging and store it safely until the unit is in position and ready for installation of the kick plates Kick plate kit parts list 16 20 screws 2 Front back kick plates 2 Side kick plates 16 Cosmetic screw caps and washers Assembly procedure Attach each side front and back kick plate to the frame using 4 20 screws...

Page 22: ...Installation Guide 22 34 94 1100 00002873 A0 EN TruFit Power Distribution Unit Figure 4 8 4 Kick plate positioning at bottom of unit ...

Page 23: ... Main Input Terminals Plated copper bus bars to accommodate standard NEMA two 2 hole lugs are provided internal to the unit for input power and grounding power connections and are accessible from the front as shown in Figure 3 1 3 4 9 2 2 Subfeed Terminals Phase connections to subfeed circuit breakers are to be made directly on the breaker in accordance with the breaker manufacturer s recommendati...

Page 24: ... secondary is opened The CT Strip Assemblies are designed to sense branch currents from panelboards The power wire from each branch circuit breaker will pass through a CT with 1 turn on the CT Strip Assembly A secondary sensing signal is brought to the PowerView Module via the wire harnesses Type and AWG of CT Load Wire All 8AWG THHN 6AWG or Equivalent Internal Hex Hex Size Lbs Ins Min Max 3 16 10...

Page 25: ...1100 00002873 A0 EN 25 34 Neutral Ground bus terminals Terminals are provided for Panelboard neutral and ground connections as shown below Recommended Torque values Wire AWG Torque lb in 14 10 Cu 12 10 AL 20 8 25 6 4 35 two 14 or 12 Cu two 12 or 10 AL 25 ...

Page 26: ...5 593PH 6 256 30695 868PH 125 250AF 200AT 1 x 4 0 54868BEPH 6 256 30695 868PH 150 250AF 225AT 1 x 300kcmil 54870BEPH 4 256 30695 733PH 225 400AF 350AT 2 x 3 0 54864BEPH 3 54811BEPH 300 600AF 450AT 2 x 250MCM 54870BEPH 1 54857BEPH Maximum Recommended Cable Sizes and Compression Lugs Main Breaker Use lugs consistent with applicable codes ABB recommends the long barrel NEMA 2 Hole compression lugs sh...

Page 27: ...Installation Guide TruFit Power Distribution Unit 94 1100 00002873 A0 EN 27 34 Figure 4 9 8 Suggested control wire routing to UIB from bottom Figure 4 9 9 Suggested control wire routing to UIB from top ...

Page 28: ...292 3739 for support To install Position the sensor head A with the foil backing in contact with the cable insulation The foil backing provides quick response to temperature changes but inherently has a low resistance and lack of isolation Care must be taken to ensure the thermocouple is positioned with a minimum clearance of 2 creepage over surface Remove paper liner from foil backing to expose a...

Page 29: ... when relay coil is de energized CFA Closed for Alarm OFA Open for Alarm 2 Remote Emergency Power Off REPO user input Closing the circuit between J8 11 and J8 12 forces a shunt trip on the input breaker For use with isolated dry contacts 3 Ethernet connection J7 RJ 45 connecter is for an Ethernet connection to the PDU For cybersecurity compliance and list of open ports refer to TruFit User s Manua...

Page 30: ...tion Guide 30 34 94 1100 00002873 A0 EN TruFit Power Distribution Unit Figure 4 10 1 Suggested control wire routing to UIB from top FX BOARD RS 485 FULL DUPLEX SHIELD Slave Master BMS RS 485 FULL DUPLEX SHIELD ...

Page 31: ...ure kickplates are installed if they were removed during installation Inspect side panels for damage Inspect all connectors for proper electrical and physical integrity Ensure proper cabinet grounding verify external ground wire has been brought into the cabinet and connected to the ground bus bar only Verify all power wire connections are crimped or tightened properly Recommended torque values ar...

Page 32: ...Power Distribution Unit 5 Appendix 5 1 Notes Form It is recommended to note in this section Notes with date and short description all the operations performed on the PDU as maintenance components replacement abnormal situations etc Date Description Done by ...

Page 33: ...he table below As applicable torque seal has been utilized to indicate bolt torqueing Table 5 1 Recommended tightening torque Thread Size SAE Grade 5 120 000 psi Medium Carbon Heat T Inch Lb ft N M 1 4 6 8 5 16 11 15 3 8 20 27 1 2 48 65 All internal bolts are SAE Grade 5 Note bolt head markings above to distinguish between grades All internal machine screws are Grade 2 ...

Page 34: ...this document without prior notice With regard to purchase orders the agreed particulars shall prevail ABB does not accept any responsibility whatsoever for potential errors or possible lack of information in this document We reserve all rights in this document and in the subject matter and illustrations contained therein Any reproduction disclosure to third parties or utilization of its contents ...

Reviews: