background image

LMT10 0 A N D LMT 20 0 |

  M AG N E TOS T R I C T I V E  L E V EL  T R A N SM I T T ER S  |  FF  O I/L M T 10 0/ 2 0 0/FF - EN  R E V.  A

61

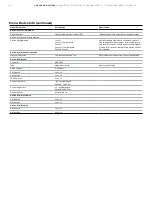
Menu: Device Info

Serial Number

Device 

Configuration

Mount 

Orientation

Top

Bottom

ITK Version

Sensor

Sensor ID

Type

Probe Length

SW Version

HW Version

FPGA Version

Sensor Low Limit

Sensor High Limit

Sensor Offset (Lvl)
Sensor Offset (Int)

1 Level

1 Level + 

Temperature

2 Level

2 Level + 

Temperature

Electronics

Display

SW Version

HW Version

SW Version

HW Version

Summary of Contents for LMT Series

Page 1: ...BB MEASUREMENT ANALY TICS OPER ATING INSTRUCTION LMT100 and LMT200 Magnetostrictive level transmitters Foundation Fieldbus High accuracy liquid level and interface level detection Measurement made eas...

Page 2: ...ation 8 3 Transmitter overview 9 Transmitter components overview 9 4 Unpacking 10 Identification 10 Optional wired on SST plate 11 Unpacking and handling 11 Transport and storage 11 5 Mounting 12 Gene...

Page 3: ...4 Configuration with a handheld terminal 25 8 Operation 26 Menu navigation 26 Control button functions 26 HMI menu structure 26 Easy Setup 27 Device Setup 27 Display 27 Calibrate 27 Diagnostics 27 Dev...

Page 4: ...3 Fieldbus device structure 63 Device Application Process DAP 63 Control Application Process CAP 64 10 Maintenance 65 Personnel qualifications 65 Required tools 65 Electronic replacement 65 Safety Ins...

Page 5: ...ide specific industrial output signals according to Fieldbus digital communication The LMT Series consists of two models LMT100 LMT200 Sensor Sensor Wire Sensor Tube Current pulse Figure 1 LMT100 inse...

Page 6: ...include but are not limited to Training or instruction authorization to operate and maintain devices or systems according to safety engineering standards for electrical circuits high pressures and ag...

Page 7: ...Returning devices For the purpose of returning the device for repair or recalibration use the original packaging or other suitably secure shipping method The sender should contact the factory for ret...

Page 8: ...Pressure bearing walls lining of the level device Measurement related function Leak tightness Wear corrosion WARNING There are electric circuits within the housing which are dangerous if touched There...

Page 9: ...sing the LMT Series level transmitter see Figure 3 Figure 3 Exploded view of LMT Series transmitter 1 TopWorks Window Cover 2 HMI Display Assembly 3 HMI Connector 4 Communication Board 5 TopWorks Hous...

Page 10: ...MPORTANT NOTE The name plates shown here are only examples The name plates attached to the device may be different to what you see below A Name plate 1 Manufacturing Logo 2 Manufacturing Address 3 Mod...

Page 11: ...re and assistance Transport and storage After unpacking the level transmitter inspect it for damage Check the packaging for accessories During intermediate storage or transport only store the level tr...

Page 12: ...ntly fixed on the neck of the transmitter top housing For specific conditions for safe use of the LMT100 and LMT200 refer to the LMT Series Safety Manual SM LMT100200 EN A CAUTION When the certificati...

Page 13: ...timal accuracy and performance Precisely spaced magnets create a 360 magnetic field coverage safeguarding level transmitter and gauge performance even the most challenging applications Several materia...

Page 14: ...xt section of tube and thread together using thread locking fluid Loctite 242 to secure joints 5 Repeat step 4 for each middle tube section 6 Add the last section TOP of the tube with 1 in compression...

Page 15: ...e scale of the center of the bottom process connection and tighten all gear clamps CAUTION Do not mount the LMT200 directly next to or touching the steam tracing if installed on chamber It is not reco...

Page 16: ...applications As an option some cryogenic transmitters are mounted in insulation wells attached to the level gauge This allows the removal of the transmitter from service without removing the insulati...

Page 17: ...conformity It is designed in accordance with safe engineering practices to meet state of the art safety requirements has been tested and left the factory in a condition in which they are safe to opera...

Page 18: ...egral display rotation When the optional integral display meter is installed it is possible to mount the display in 4 different positions rotated clockwise or counterclockwise with 90 steps To rotate...

Page 19: ...tions up to 2 5mm2 AWG 14 IMPORTANT NOTE With transmitters for use in Zone 2 a qualified cable gland for this type of protection must be installed by the customer Refer to the LMT Series Safety Manual...

Page 20: ...e with the intended type of protection for example intrinsically safe and explosion proof and the degree of protection for example IP6x according to IEC EN 60529 or NEMA 4x See also the addendum for E...

Page 21: ...ion with the equipotential bonding Equipotential bonding minimum diameter of 4mm AWG 12 is required throughout the cable routing area In case of transmitters with integrated lightning protection optio...

Page 22: ...ing the signal cable to length and terminating it The signal cable is available in four standard lengths 5 m 16 4 ft 10 m 32 8 ft 20 m 65 6 ft and 30 m 98 4 ft The cable ends are already prepared for...

Page 23: ...ansmitter to make the electrical connection between the measuring sensor and the transmitter 2 Unscrew the cover of the terminal boxes on the transmitter and the measuring sensor 3 Tailor the signal c...

Page 24: ...s when selected The push buttons are located under the identification nameplate To gain access to the local adjustments release the fixing screws of the nameplate and rotate clockwise the identificati...

Page 25: ...o the local adjustments release the attaching screws on the nameplate and rotate the identification plate clockwise The lower range value and span parameters can be set directly on the transmitter usi...

Page 26: ...way to configure the device For a detailed description of all device menus and parameters see the Operation section of this manual 1 Log on to the LMT at the Standard or Advanced access level 2 Selec...

Page 27: ...Process 375 475 and AMS provided the LMT Series EDD is downloaded and enabled in the terminal Figure 26 Connection examples with Emerson 475 For additional information refer to the operating instructi...

Page 28: ...enu navigation 2 Menu name 3 Menu number 4 Marker for indicating relative position within the menu 5 Function currently assigned to the and control buttons Control button functions Function Meaning Ex...

Page 29: ...f functions relevant to the display itself These include the display language and contrast It is also possible to customize the screen display to one or two lines with or without the bar graphs There...

Page 30: ...Product Display Figure 28 Product Display 1 Present process values 2 Symbol indication button function 3 Area where indicator for Parameterization protected state shows Symbol Description Call up inf...

Page 31: ...nsisting of an icon and text appears at the bottom of the product display The displayed text indicates where the error has occurred 1 Press to switch to the operator menu 2 Press or to navigate to Dia...

Page 32: ...ss repeatedly until the cursor reaches the end position Press once more to move the cursor to the lower right corner where Cancel will be displayed 2 Press to cancel editing and exit the menu item Men...

Page 33: ...s Level URV may also display as Volume Level URV or Flow URV IMPORTANT NOTE If the device is configured with two levels two further parameters will be included in the Easy Setup menu Depending on the...

Page 34: ...r primary variable Level LRV also Volume Level LRV or Flow LRV depending on configurations Non linearized Minus 10 to half of probe length Linearized 999999999 to 999999999 Sets lower point which is a...

Page 35: ...ice Variables Level Level Units Lower Range Upper Range Level Offset Interface Lower Range Upper Range Interface Offset Distance Ullage Temperature Volume Level Volume Interface Flow Units Lower Range...

Page 36: ...etup continued Linearization Device Configuration Setup Access Control Mount Orientation Standard Password Advanced Password Service Password Reset to Defaults Points Configure Tables Clear Restore Sa...

Page 37: ...second gallons minute gallons hour gallons day imperial gallons second imperial gallons minute imperial gallons hour imperial gallons day barrels second barrels minutes barrels hour barrels day cubic...

Page 38: ...o 999999999 Device Setup Device Variables Volume Interface Lower Range 999999999 to 999999999 Upper Range 999999999 to 999999999 Device Setup Device Variables Flow Lower Range 999999999 to 999999999 U...

Page 39: ...le Device Setup Linearization Configure Tables Clear Restore Save Device Setup Device Configuration Device Configuration 1 Level 1 Level with Temperature 2 Levels 2 Levels with Temperature Device Setu...

Page 40: ...al for the controller and so forth The damping adjustment can be performed through the HMI display or handheld terminal Adjusting damping settings through HMI display 1 Enter the menu Device Setup 2 P...

Page 41: ...eferred to the Control System A cylindrical tank in a horizontal position is also very common in the industry but unlike its vertical counterpart the volume is not a linear function of the measured le...

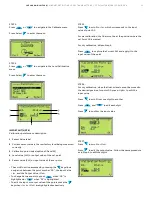
Page 42: ...on menu STEP 1 Log in as an Advanced user by pressing STEP 2 Press to navigate to Device Setup menu Press to enter the Device Setup menu STEP 3 Press to navigate to Linearization submenu Press to ente...

Page 43: ...nfirm the selection Press to go back to the Linearization Setup root menu IMPORTANT NOTE Only level values can be used for Input Units Input Units in the Linearization menu are independent of the Leve...

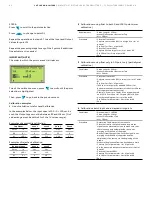
Page 44: ...he currently selected point The scroll function accessed by pressing the key allows navigation between the point number 00 the Input Value In and the Output Value Out To change between points press or...

Page 45: ...A 45 STEP 5 Press to edit the output value of the point Repeat Step 2 5 to enable and assign input and output values for other points IMPORTANT NOTE At least 2 points must be used but 2 points will be...

Page 46: ...RICTIVE LEVEL TR ANSMITTERS FF OI LMT100 200 FF EN REV A Menu Display Language Contrast Operator Pages Display Mode Operator Page 1 4 Autoscroll Timer Autoscroll Linearization Format Temperature Forma...

Page 47: ...tance Ullage Level Interface Configure each line 2nd Line Raw Level Distance Ullage Level Interface Configure each line 3rd Line Raw Level Distance Ullage Level Interface Configure each line Bargraph...

Page 48: ...ibration Process Temperature Calibration Temperature Offset Reset Calibration Calibration Points Reset Calibration Calibration Points Reset Calibration Interface URV Distance Ullage LRV Volume Interfa...

Page 49: ...Level Points Corresponds to points 00 and 01 In Sensor value Out Level value Reset Calibration Resets calibration points to factory defaults Calibrate Interface Calibration Calibration Points Out valu...

Page 50: ...Mount Charts In other words the SVL can be seen as the level output of the instrument based only on the factory trim After the factory trim the SVL at any given point on the probe will remain unchang...

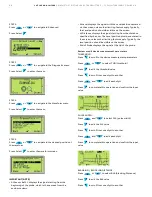
Page 51: ...e In and the Output Value Out To change between points press when 00 is highlighted or when 01 is highlighted To edit the input or output value of the points press the key when In or Out are highlight...

Page 52: ...Out of point 01 Place the float at 100 Capture SVL to assign it to In of point 00 Set 200 cm for Out of point 00 End 3 Calibration moving float only to 0 point only partially wet calibration Conditio...

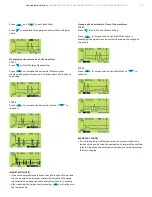
Page 53: ...ML 200 cm Previously calibrated for a different mount orientation Procedure Record the current Level Value before the mount orientation change Change the mount orientation from Top to Bottom or vice v...

Page 54: ...g History Maintenance Required Check Function Off Specification Info None Level Sim Interface Sim Ullage Sim Temperature Sim Volume Level Sim Volume Interface Sim Flow Sim Diagnostic History Clear Dia...

Page 55: ...el Sim Level Sim Level Sim Level value in selected units Enable or disable level value simulation Diagnostics Simulation Interface Sim Enable Enable Enable Disable Enable or disable Interface value si...

Page 56: ...s Temp Min Gives minimum recorded temperature of process Diagnostics History Process Temp Max Process Temp Max Gives maximum recorded temperature of process Diagnostics History Proc Temp Reset Proc Te...

Page 57: ...4 Value of the parameter selected in item 3 5 Scale of the waveform screen currently displayed The choices are one of the following For metric units 5 cm DIV 10 cm DIV 20 cm DIV or 40 cm DIV For imper...

Page 58: ...ance displays the signal starting from the distance specified by the user The Level position must be centered in the screen unless other limiting factors apply Typically the level position should be v...

Page 59: ...gth of the probe then the navigation to larger scale will be rejected because the selected one already covers everything that is to display After reaching the upper scale pressing will rollover to the...

Page 60: ...oblems like weakening of the magnetic flux of the float or sensor deterioration issues If the signal is present but the amplitude does not cross the threshold line verify that The float is present and...

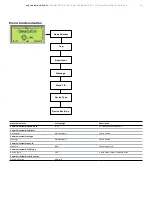
Page 61: ...vice Configuration Mount Orientation Top Bottom ITK Version Sensor Sensor ID Type Probe Length SW Version HW Version FPGA Version Sensor Low Limit Sensor High Limit Sensor Offset Lvl Sensor Offset Int...
Page 62: ...ent from single level to two levels However if the device is not equipped with an RTD then the temperature option will not be available Device Info Mount Orientation Mount Orientation Top Bottom Defau...

Page 63: ...eter Value Range Description Communication Node Address 0 63 FF address zero is default Communication Descriptor Descriptor Alphanumeric User defined Communication Message Message Alphanumeric User de...

Page 64: ...Advanced levels can be accessed without password protection It is strongly recommended to set passwords for these access levels Access Level The Access Level is entered via the Operator menu Enter Co...

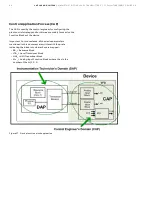
Page 65: ...ion details are available from the Fieldbus Foundation webpage Fieldbus device structure The Foundation Fieldbus devices can be divided into two parts under the point of view of technical competence w...

Page 66: ...his reason mainly focused on the Function Blocks of the device Important For convenience all the device parameters mentioned in this document are written with the prefix indicating the block into wher...

Page 67: ...ese qualifications include knowledge of information in this instruction manual knowledge of the product and its operating principles knowledge of the application in which the transmitter is being appl...

Page 68: ...will still report the float position regardless of the actual process fluid level This by definition is a Dangerous Undetectable failure To prevent this failure the float will need to be inspected for...

Page 69: ...the electronics module be replaced at the earliest convenience It will not be necessary however to shut down a transmitter or remove it from service based on an HMI failure Fieldbus communication 1 Ap...

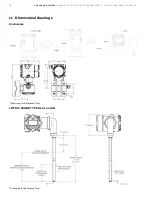
Page 70: ...MT100 AND LMT200 MAGNETOSTRICTIVE LEVEL TR ANSMITTERS FF OI LMT100 200 FF EN REV A 11 Dimensional drawings Enclosures LMT100 PROBE TYPE R1 C1 and H1 Drawings for Reference Only Drawings for Reference...

Page 71: ...LMT100 AND LMT200 MAGNETOSTRICTIVE LEVEL TR ANSMITTERS FF OI LMT100 200 FF EN REV A 71 LMT100 PROBE TYPE R2 R3 C2 and H2 Drawings for Reference Only LMT100 PROBE TYPE R4 Drawings for Reference Only...

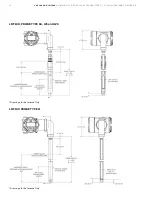
Page 72: ...72 LMT100 AND LMT200 MAGNETOSTRICTIVE LEVEL TR ANSMITTERS FF OI LMT100 200 FF EN REV A LMT100 PROBE TYPE R5 Drawings for Reference Only LMT100 PROBE TYPE W1 Drawings for Reference Only...

Page 73: ...LMT100 AND LMT200 MAGNETOSTRICTIVE LEVEL TR ANSMITTERS FF OI LMT100 200 FF EN REV A 73 LMT100 PROBE TYPE W2 Drawings for Reference Only LMT100 PROBE TYPE C3 W4 Drawings for Reference Only...

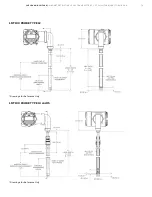
Page 74: ...74 LMT100 AND LMT200 MAGNETOSTRICTIVE LEVEL TR ANSMITTERS FF OI LMT100 200 FF EN REV A LMT100 PROBE TYPE C4 W5 and W6 Drawings for Reference Only LMT100 PROBE TYPE J1 Drawings for Reference Only...

Page 75: ...LMT100 AND LMT200 MAGNETOSTRICTIVE LEVEL TR ANSMITTERS FF OI LMT100 200 FF EN REV A 75 LMT100 PROBE TYPE J2 Drawings for Reference Only LMT100 PROBE TYPE J4 and J5 Drawings for Reference Only...

Page 76: ...76 LMT100 AND LMT200 MAGNETOSTRICTIVE LEVEL TR ANSMITTERS FF OI LMT100 200 FF EN REV A LMT100 PROBE TYPE W3 Drawings for Reference Only LMT100 W3 Well with Probe Drawings for Reference Only...

Page 77: ...LMT100 AND LMT200 MAGNETOSTRICTIVE LEVEL TR ANSMITTERS FF OI LMT100 200 FF EN REV A 77 LMT100 PROBE TYPE W7 Drawings for Reference Only Drawings for Reference Only...

Page 78: ...AND LMT200 MAGNETOSTRICTIVE LEVEL TR ANSMITTERS FF OI LMT100 200 FF EN REV A LMT200 Probe Type R1 R2 R3 Top Mount Drawings for Reference Only LMT200 Probe Type R1 R2 R3 Bottom Mount Drawings for Refer...

Page 79: ...RICTIVE LEVEL TR ANSMITTERS FF OI LMT100 200 FF EN REV A 79 LMT200 SEH 90 degree bend housing extension Top Mount Drawings for Reference Only LMT200 SEH 90 degree bend housing extension Bottom Mount D...

Page 80: ...2 Bearing clamp assemblies For measurement lengths ML of 914 4mm 36in or less a minimum of two VI KIT assemblies are recommended for installation in high vibration applications For ML greater than 914...

Page 81: ...itter Mounting Option Example Installation LMT200 Valve Position Transmitter and Hydraulic Control Valve Close up of Magnet Assembly Valve Transmitter Actuator Magnet Assembly Example Installation LMT...

Page 82: ...pplicable Material Safety Data Sheets MSDS and decontamination tags by affixing these documents in close proximity to the shipment label for identification purposes January 18 2006 Return Authorizatio...

Page 83: ...LMT100 AND LMT200 MAGNETOSTRICTIVE LEVEL TR ANSMITTERS FF OI LMT100 200 FF EN REV A 83 Note...

Page 84: ...sclosure to third parties or utilization of its contents in whole or in parts is forbidden without prior written consent of ABB Copyright 2016 ABB All rights reserved 3KXL141000R4201 ABB Inc Industria...

Reviews: