background image

22 

PME120-AI / PME120-AN (Contrac)

 ELECTRICAL ROTARY ACTUATOR  |  SEI/PME120-EN REV. A 


… 6  Electrical connections 

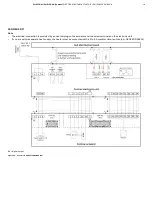
… Fuses 


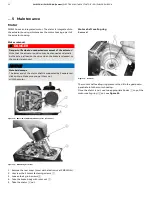
Fuse location 

Integrated electronic unit (PME120-AI) 


1

  Main pcb 

2

  Mains fuse 

3

  Spare fuse for mains supply


4

  Fuse for analog setpoint input 

5

  Heater fuse  

(only for −25

 °C version)


Figure 27:  Fuse location PME120-AI 


EAN823 


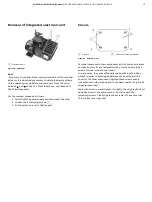
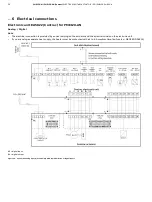
NOTICE 

Remove the cover of the connection chamber carefully in 
order to avoid any damage 


1

  Tap holes for cable glands


2

  Cable gland 

3

  Analog input fuse 

4

  Terminals (signals) 

5

  Anti-dewing heater fuse 

6

  Terminals (motor cable) 

7

  Power supply fuse 

8

  Terminals (power supply) 

Figure 28:  Fuse location EAN823 


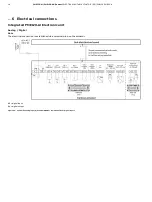
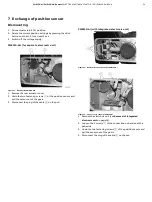
EAS822 


1

  Digital output fuses 

Mains fuse 

Figure 29:  Fuse location EAS822 


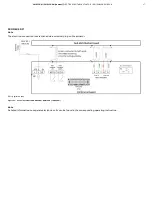
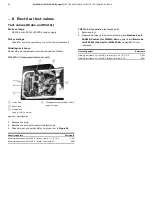
Details: Digital output fuses 


1

  Fuse for DO3 

2

  Fuse for DO2 

3

  Fuse for DO1 

Figure 30:  Detail view of output fuses 


Summary of Contents for Contrac PME120AI

Page 1: ...nal control elements with preferably 90 rotary movement such as valve flaps ball valves etc The nominal torque is transferred through a lever actuator A special electronic unit controls the actuator The special electronic unit serves as the interface between actuator and control system Additional Information Additional documentation on PME120 AI PME120 AN Contrac is available for download free of ...

Page 2: ...PME120 AI 14 PME120 AN 14 Removal of integrated electronic unit 15 Covers 15 Integrated PME120 AI Electronic unit 16 Analog Digital 16 PROFIBUS DP 17 Electronic unit EAN823 Contrac for PME120 AN 18 Analog Digital 18 PROFIBUS DP 19 Electronic unit EAS822 Contrac for PME120 AN 20 Analog Digital 20 Fuses 21 Fuse location 22 7 Exchange of position sensor 23 Dismounting 23 PME120 AN for separate electr...

Page 3: ...irs to the product may only be performed if expressly permitted by these instructions Information and symbols on the product must be observed These may not be removed and must be fully legible at all times The operating company must strictly observe the applicable national regulations relating to the installation function testing repair and maintenance of electrical products Warnings The warnings ...

Page 4: ... connection between the product and your network or any other network as the case may be Operator shall establish and maintain any appropriate measures such as but not limited to the installation of firewalls application of authentication measures encryption of data installation of anti virus programs etc to protect the product the network its system and the interface against any kind of security ...

Page 5: ...h the respective local regulations Make sure that no waste oil reaches the water cycle Only qualified specialists who have been trained for these tasks are authorized to mount and adjust the control actuator and to make the electrical connection When working on the actuator itself or the electronics always observe the locally valid accident prevention regulations and the regulations concerning the...

Page 6: ...tain the max oil quantity when leaving the manufacturer Once the actuator is installed replace the uppermost check plug by the separately supplied venting plug 1 Control screw 2 Vent valve Figure 4 Permissible mounting positions The mounting positions presented are permissible To facilitate mounting and maintenance however it is recommended that you use position IMB 3 For each mounting position yo...

Page 7: ...tion vessel 5 Make sure all of the oil has been removed from the actuator housing 6 Screw the drain plug back in 7 Refill with the proper volume of oil in accordance with Filling volumes on page 7 and securely tighten the vent valve PME oil types Actuator type Ambient temperature Oil types DIN 51517 Motor bearing grease with heat without heat PME120 AI with integrated electronic unit 25 to 55 C 15...

Page 8: ... load factors e g torques forces temperatures etc and derives the remaining operating time until the next routine maintenance is required Use the configuration program to view this information Apart from the load dependent maintenance intervals determined by the microprocessor we recommend routine maintenance at least every 10 years The following description of the maintenance work provide that th...

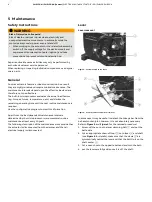
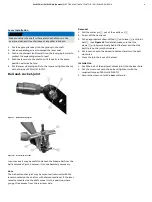
Page 9: ... the linkage bar from the ball and socket joint however it is not absolutely necessary Note The ball and socket joint may be mounted removed with the lever mounted on the shaft or with dismounted lever If the lever remains mounted on the shaft move it into a position where you get free access from the rear lever side Removal 1 Pull the cotter pin 1 out of the castle nut 2 2 Screw off the castle nu...

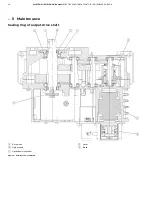
Page 10: ...PME120 AN Contrac ELECTRICAL ROTARY ACTUATOR SEI PME120 EN REV A 5 Maintenance Sealing ring of output drive shaft A Drive pinion B Output shaft C Handwheel mechanism D Motor E Brake Figure 9 Sectional view of PME120 ...

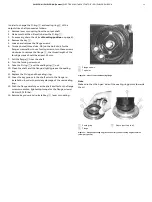
Page 11: ...from the shaft 8 Turn the forcing screws out 9 Take the O ring 1 and the sealing ring 2 out 10 Clean the shaft and the flange slightly grease the sealing ring 11 Replace the O ring and the sealing ring 12 Cover the key groove in the shaft prior to the flange re installation in order to avoid any damage of the new sealing ring 13 Push the flange carefully over the shaft and fasten the flange screws...

Page 12: ...OTICE Material damage The lower end of the stator shaft is supported by 2 separated disk springs Make sure you get them out with the motor Figure 12 Rear view of PME120 without cover electronics Figure 13 Brake body with rotor 1 Remove the rear cover cover with electronics at PME120 AI 2 Unscrew the 4 motor fastening screws 1 3 Loosen the 4 grub screws 2 4 Take the brake body with rotor out 3 5 Ta...

Page 13: ...ense rotor stator housing 6 Use appropriate retainer DELO ML 5228 or LOCTITE 243 both medium firm detachable to secure the grub screws Refer to Figure 12 and Figure 13 on page 12 for reference no Brake Brake adjustment WARNING Risk of injury Note that the actuator position may be changed accidentally by the external load on the drive when the brake is released or the motor is removed In automatic ...

Page 14: ...ble end sleeve 7 Male carrier Figure 17 Exemplary illustration of cable connection to the actuator plug housing may contain alternatively a terminal carrier or a crimp carrier The cable between actuator and electronic unit is connected to the electronic unit via terminals and to the actuator via a plug The plug housing may contain a carrier for terminals or for the cable ends with crimp sockets Ac...

Page 15: ... 1 3 Pull the electronic unit slightly apart Covers A Screws B Cover or similar component Figure 21 Exemplary cover Terminal covers and other components at the Contrac actuators and electronic units are fastened with 4 or more screws only 2 screws for local control panel cover In some cases they are additionally sealed with a soft rubber gasket In order to avoid a gap between the housing and the c...

Page 16: ...6 Electrical connections Integrated PME120 AI Electronic unit Analog Digital Note The electrical connection is established via a universal plug on the actuator BE digital input BA digital output Figure 22 Control via analog input 0 4 to 20 mA HART communication or digital inputs ...

Page 17: ...FIBUS DP Note The electrical connection is established via a universal plug on the actuator DO digital output Figure 23 Control via fieldbus PROFIBUS DP PME120 AI LME620 AI Note Detailed information on separate electronic units can be found in the corresponding operating instruction ...

Page 18: ...e The electrical connection is provided by a universal plug on the actuator and the screw terminals on the electronic unit If you are using a separate heat supply the heater must be protected with a 2 to 6 A medium time lag fuse e g NEOZED D01 E14 BE digital input BA digital output Figure 24 Control via analog input 0 4 to 20 mA HART communication or digital inputs ...

Page 19: ...lectrical connection is provided by a universal plug on the actuator and the screw terminals on the electronic unit If you are using a separate heat supply the heater must be protected with a 2 to 6 A medium time lag fuse e g NEOZED D01 E14 BA digital output Figure 25 Control via fieldbus PROFIBUS DP ...

Page 20: ...e The electrical connection is provided by a universal plug on the actuator and the screw terminals on the electronic unit If you are using a separate heat supply the heater must be protected with a 2 to 6 A medium time lag fuse e g NEOZED D01 E14 BE digital input BA digital output Figure 26 Control via analog input 0 4 to 20 mA HART communication or digital inputs ...

Page 21: ...ater only for actuators for 25 C ambient temperature Main pcb 2 A slow 5 20 mm EAN823 External fuse External 16 A slow Mains fuse Connection area 6 7 A slow 3 15 A slow 5 20 mm Analogue setpoint input Connection area 40 mA fast 5 20 mm Anti condensation heater heater only for actuators for 25 C ambient temperature Connection area 2 A slow 5 20 mm EAS822 External fuse External 16 A slow Mains fuse ...

Page 22: ...ion PME120 AI EAN823 NOTICE Remove the cover of the connection chamber carefully in order to avoid any damage 1 Tap holes for cable glands 2 Cable gland 3 Analog input fuse 4 Terminals signals 5 Anti dewing heater fuse 6 Terminals motor cable 7 Power supply fuse 8 Terminals power supply Figure 28 Fuse location EAN823 EAS822 1 Digital output fuses 2 Mains fuse Figure 29 Fuse location EAS822 Details...

Page 23: ...tor cover 2 Undo the two fastening screws 1 of the position sensor and pull the sensor out of the gears 3 Disconnect the plug of the cable 2 on the pcb PME120 AI with integrated electronic unit Figure 32 Removal of connection pcb at PME120 AI Figure 33 Free access to sensor of PME120 AI 1 Remove the electronic unit see Removal of integrated electronic unit on page 15 2 Loosen the 4 screws 1 of the...

Page 24: ...position as seen in Figure 34 2 Connect the plug of the cable 2 to the sensor pcb 3 Align the sensor and its gears with the actuator set the first toothed gear in 11 00 o clock position see Figure 34 onto the drive shaft gear 4 4 Slightly move the sensor back and forth to pre tension the toothed gears until the second toothed gear snaps in 5 Fasten the screws 1 tightly 6 Fasten the rear cover or c...

Page 25: ...separate anti condensation heater option and take precautions to prevent unintentional switch on Note Check wiring and proper terminal connections before you start the test procedure Test values position sensor 1 Signal terminals Figure 35 Signal terminal location The in output signals are assigned to terminals of the electronic unit as follows Terminal Value 17 DC 15 V 15 supply refer to terminal...

Page 26: ...point input Figure 36 Pin assignment 1 Remove the plug 2 Remove the actuator hood with electronics 3 Check pins at pin carrier Refer to pin carrier in Figure 36 Measuring points Resistance Winding resistance 5 at 20 C motor pin 6 7 7 8 6 8 3 4 Ω Winding resistance 5 at 20 C brake terminal 9 10 50 Ω PME120 AN separate electronic unit 1 Remove plug 2 Measure between pins at actuator plug see Electro...

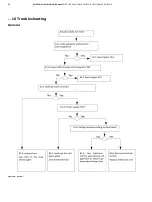
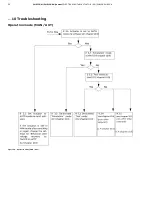
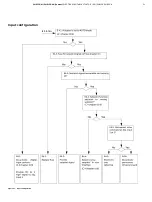
Page 27: ...Both LED flash alternatively Actuator failure e g out of adjusted range actuator cannot be moved via command buttons or commands from the process control system reset is only possible once the failure reason is eliminated Figure 37 Commissioning and service field 10Troubleshooting NOTICE Check wiring polarity and all plug and terminal connections before you start detailed trouble shooting The foll...

Page 28: ...28 PME120 AI PME120 AN Contrac ELECTRICAL ROTARY ACTUATOR SEI PME120 EN REV A 10Troubleshooting General Figure 38 General ...

Page 29: ...PME120 AI PME120 AN Contrac ELECTRICAL ROTARY ACTUATOR SEI PME120 EN REV A 29 Failures at brake fuse or wiring Figure 39 Failures at brake fuse or wiring ...

Page 30: ...30 PME120 AI PME120 AN Contrac ELECTRICAL ROTARY ACTUATOR SEI PME120 EN REV A 10Troubleshooting Operation mode MAN AUT Figure 40 Operation mode MAN AUT ...

Page 31: ...PME120 AI PME120 AN Contrac ELECTRICAL ROTARY ACTUATOR SEI PME120 EN REV A 31 Input configuration Figure 41 Input configuration ...

Page 32: ...32 PME120 AI PME120 AN Contrac ELECTRICAL ROTARY ACTUATOR SEI PME120 EN REV A 10Troubleshooting Operation behind step controller Figure 42 Operation behind step controller ...

Page 33: ...PME120 AI PME120 AN Contrac ELECTRICAL ROTARY ACTUATOR SEI PME120 EN REV A 33 Failure Diagram Figure 43 Failure Diagram ...

Page 34: ...elect step controller Actuator over runs end position s Change the software settings for the end position behavior to Position dependent switch off and enter the associated switch off position Adjust the mechanical limit stops in order to avoid an end position over run Actuator moves into an end position once it reaches a setpoint De activate close tight in the software settings for modulating con...

Page 35: ... Some of the subjects in Troubleshooting on page 27 refer to the user interface Use the numbering in table 5 to facilitate the navigation The user interface software does not use any numbering in the menus A Operate B Diagnosis C Configure D Service A 1 Positioner B 1 Status C 1 General D 1 Initial setting A 2 Controller B 2 Alarms Failures C 2 Operation D 2 Test B 3 Maintenance C 3 End positioner...

Page 36: ... notice With regard to purchase orders the agreed particulars shall prevail ABB does not accept any responsibility whatsoever for potential errors or possible lack of information in this document We reserve all rights in this document and in the subject matter and illustrations contained therein Any reproduction disclosure to third parties or utilization of its contents in whole or in parts is for...

Reviews: