background image

13

WARNING:

Before

assembly, remove the battery pack
from the product.

Your hedge trimmer is equipped with a
battery pack, which powers the unit.

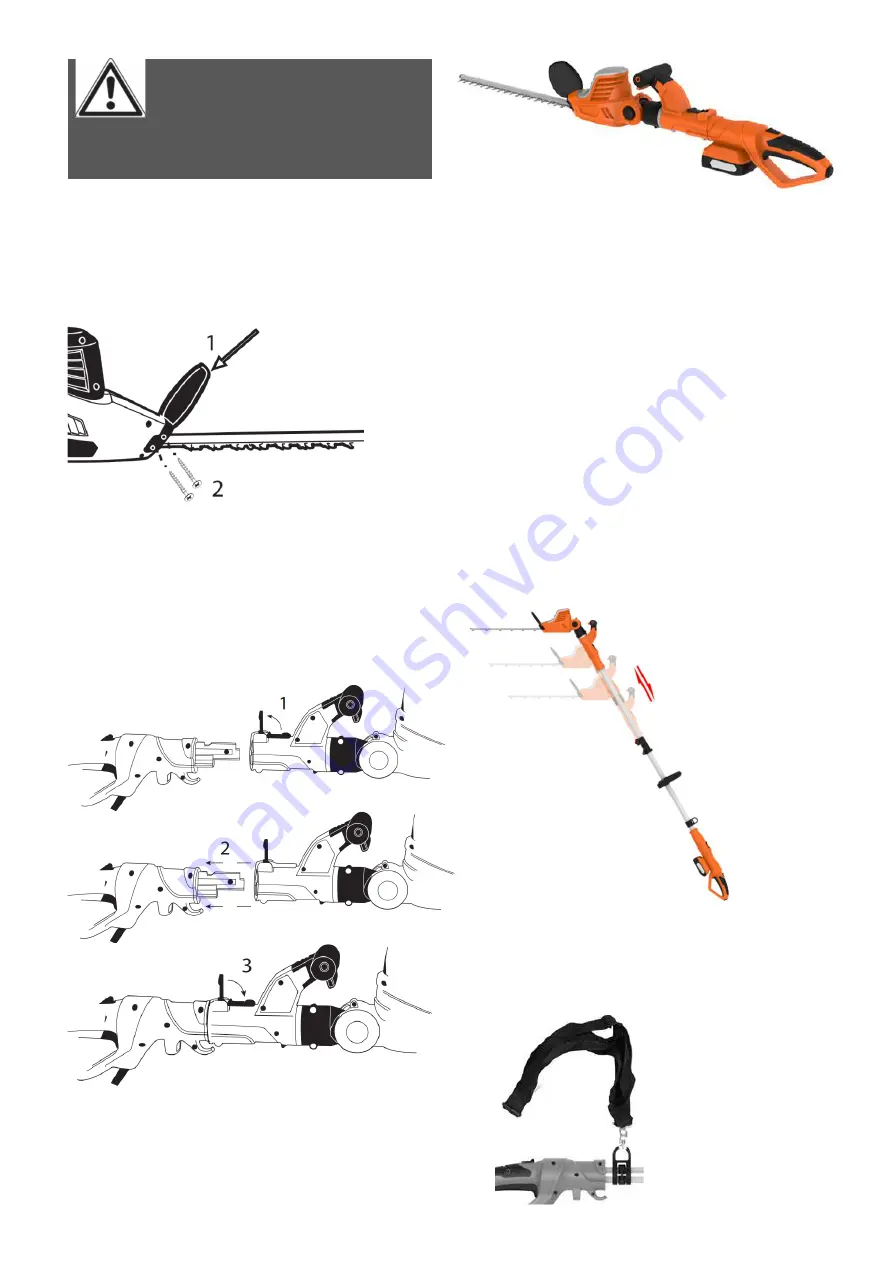
The Guard

Place guard as shown this Figure, Insert
the 4pcs screws and tighten

The Normal Hedge Trimmer:

1. Open the lock buckle1 of the front

handle.

2. Insert the rear handle into the

opening of front handle.

3. Lock the lock buckle1 of the front

handle.

The Pole Hedge Trimmer:

1. Unlock the lock buckle1 of the front

handle.

2. Insert the front hexagonal aluminum

pipe joint into the opening of the
front handle.

3. Lock the lock buckle1 of the front

handle.

4. Unlock the lock buckle 2 of telescopic

tube.

5. Insert the rear handle into the

opening of rear hexagonal aluminum
pipe joint.

6. Lock the lock buckle2 of the

telescopic tube.

The Shoulder Strap

1. Use your thumb or fingers to squeeze

the safety lock piece, put the hook to
the hanging part of the tool.

Summary of Contents for A11704

Page 1: ...l before assembling operating and maintaining this unit You are responsible for operating the product properly safely Version V1 20171106 A A V I X O U T D O O R S FOR SERVICE CALL USA 1 866 591 8921...

Page 2: ...or serious injury Working Area Safety 1 Keep the work area clean and well lit Cluttered or dark areas invite accidents Only use the product in daylight or good artificial light 2 Do not operate the pr...

Page 3: ...can be caught in moving parts Power Tool Use And Care 1 Do not force the power tool Use the correct power tool for your application The correct power tool will do the job better and safer at the rate...

Page 4: ...1 Charge only by using the charger provided with the tool Do not attempt to charge the battery pack with any other charger than the one supplied 2 Never attempt to open the battery pack for any reaso...

Page 5: ...not play with the charger Cleaning and user maintenance shall not be made by children without supervision 2 Disconnect the charger from the power supply and allow it to cool down before cleaning main...

Page 6: ...and could give the operator an electric shock 5 THIS TOOL CAN CAUSE SERIOUS INJURIES Use both hands when operating the hedge trimmer Using one hand could cause loss of control and result in serious pe...

Page 7: ...f the fingers and their capacity to regulate temperature generating a lack of sensibility This sickness could in extreme cases cause problems with the nerve endings The exposure to the vibrations is t...

Page 8: ...n if the product is being used over long periods of time or not adequately managed and properly maintained 2 Injuries and damage to property due to broken cutting attachments or the sudden impact of h...

Page 9: ...s away from blades Don t touch the blades when starting or while operating the unit Do not dispose of battery in household water Do not dispose of battery in household fire Do not subject the battery...

Page 10: ...e Length 20inch 508mm Max Cutting Diameter 3 4inch 19mm Weight 10 3lbs 4 7kg Protection Class II Battery Li lon Model A112601 Max Voltage 20V Capacity 2 0Ah Charge Time Approx 1hr Charger Model A11270...

Page 11: ...t 5 Front Handle 18 Allen Key Set 6 Lock Buckle 1 19 Unlock Button Head Turn 7 Rear Handle 20 Angle Ring 8 Lock Switch 21 Unlock Button Head Rotation 9 Trigger Switch 22 Blade Sheath 10 Battery Pack 2...

Page 12: ...rred during shipping 3 Do not discard the packing material until you have carefully inspected and satisfactorily operated the product 4 If any parts are damaged or missing contact our customer service...

Page 13: ...le 3 Lock the lock buckle1 of the front handle The Pole Hedge Trimmer 1 Unlock the lock buckle1 of the front handle 2 Insert the front hexagonal aluminum pipe joint into the opening of the front handl...

Page 14: ...25 and place battery pack 10 in your hedge trimmer Align raised rib on battery pack with groove inside hedge trimmer See image below 2 Make sure the latches on each side of your battery pack snap in p...

Page 15: ...mer NOTE To help prevent the motor from starting accidentally the lock switch and trigger switch must both be engaged to start the unit Starting 1 Remove the blade sheath 2 Place one hand on the rear...

Page 16: ...gle Adjustment Rotating The Head To Left And Right 1 Slide the unlock button 1 and then turn the swivel handle to the desired position Release the lock button again and check whether the button is loc...

Page 17: ...al and does not indicate a problem 2 Remove it from the tool and insert it into the battery charger The battery pack will only fit into the charge in one way Do not force Be sure that battery is fully...

Page 18: ...l condition and does not indicate a problem 3 Use the charger in normal room temperatures whenever possible To prevent overheating do not cover the charger and do not charge battery packs in direct su...

Page 19: ...ure concentrated work and full control over the product Lack of rest and fatigue can cause accidents and damage 4 Do not try to grasp or remove trimmings when the product is running Only remove trimmi...

Page 20: ...action from side to side 8 We recommend that you test yourself firstly with small branches in an easy position so as to get some experience before starting with more complex cuts 9 Stand so that you a...

Page 21: ...ct the cutting device for damage before using the product again Make sure the product has stopped completely Check that the temperature of the blade is not extremely high Always allow the unit to cool...

Page 22: ...rts to stop Failure to follow these instructions can result in serious personal injury or property damage NEVER perform maintenance or repairs while the unit is running WARNING When servicing Use only...

Page 23: ...p ensure safe use and prolong the life of the product 4 Clean dirt and debris from the body of the hedge trimmer using a slightly damp cloth with a mild detergent Use a brush to clean the blade Never...

Page 24: ...center 5 Blade sharpening must be carried out by the service dealer Do not sharpen the blade yourself The blade must be sharpened guaranteeing the cutting angle and blade equilibrium Blade sharpening...

Page 25: ...le when the product is not running and always at a safe distance from your body 2 When transporting or storing the product Attach the blade with a Blade Sheath A proper use of the product will result...

Page 26: ...vice center Do not repair cable with insulating tape The unit is damaged Contact our customer service center The blades move slowly making noise and the blades heat up The blades are dry Oil the blade...

Reviews: