background image

10 Model 53i IP Phone User Guide

Getting Started

Phone Options via the Aastra Web UI

In addition to the IP Phone UI options, you can also customize additional 
options on the IP Phone using the Aastra Web UI. In order to access your 
phone using the Aastra Web UI, you need to know your phone’s IP 
address.

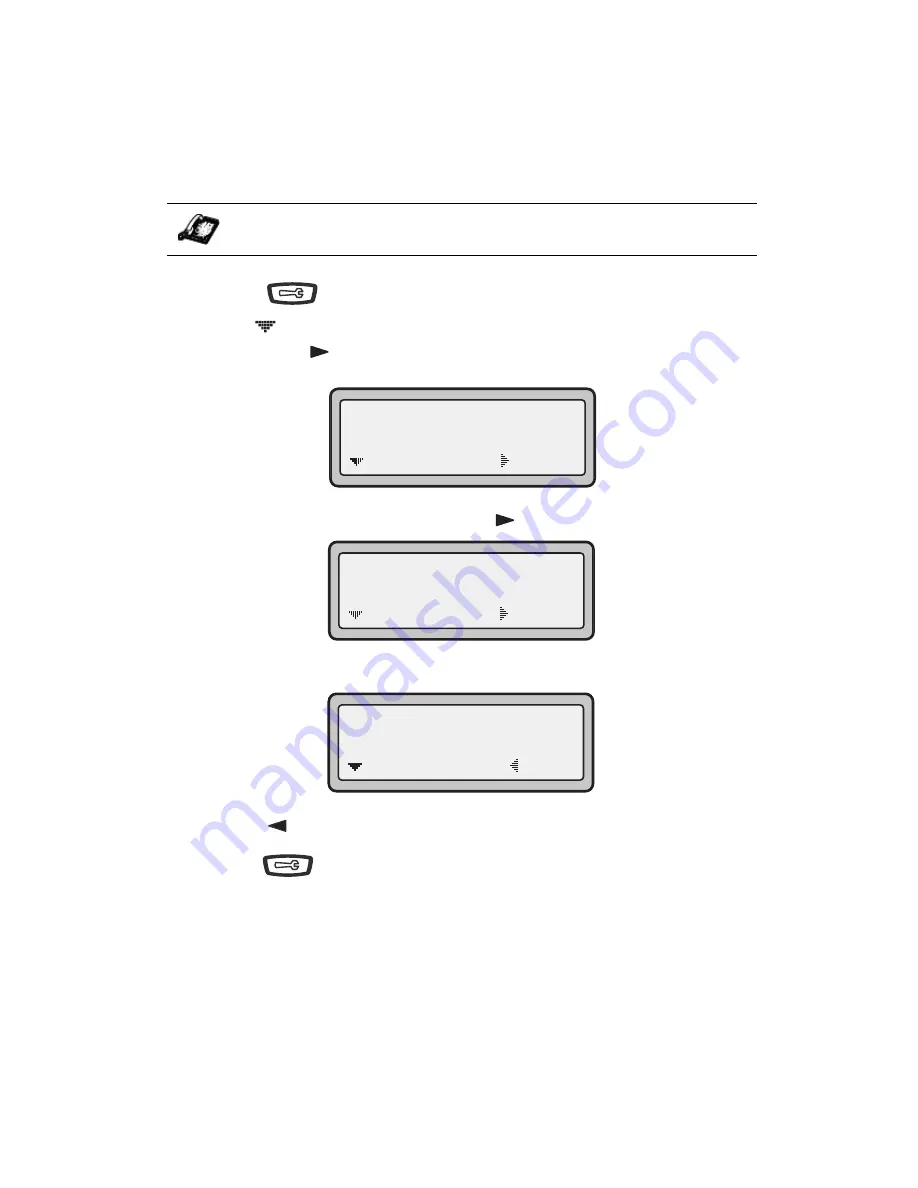
Finding Your Phone’s IP Address

1. Press the 

 button on the phone to enter the Option List.

2. Use the 

 key to scroll down the list of options and select "Phone Sta-

tus". Press the 

 key to display the Phone Status selections.

3. Select "Network Port 1" and press the 

key.

The IP address of your 53i IP phone displays in the "IP Address" field.

4. Press the 

 key to exit the IP Address screen.

5. Press the

 button to exit the Options list.

IP Phone UI

11 Phone Status

 
=Enter

 
=Next

1 Network Port  1

 
=Enter

 
=Next

IP Address:
10.40.50.112

 
=Exit

 
=Next

Summary of Contents for 53I IP PHONE - RELEASE 2.0

Page 1: ...53i IP Phone User Guide Release 2 0 41 001199 00 Rev 01...

Page 2: ...awful use While every effort has been made to ensure accuracy Aastra Telecom will not be liable for technical or editorial errors or omissions contained within this documentation The information conta...

Page 3: ...ibute transcribe translate or reduce to electronic medium or machine readable form or language derive source code with out the express written consent of the Seller and its Suppliers or dissemi nate o...

Page 4: ......

Page 5: ...a the Aastra Web UI 10 User Password 13 Using Your Phone 15 Key Panel 15 Multiple Line and Call Appearances 18 Programmable Keys 19 Setting a Line Key 21 Setting a Speeddial Key 22 Setting a Do Not Di...

Page 6: ...ing 61 Additional Features 65 Star Codes 65 Suppress DTMF Playback 65 Display DTMF Digits 66 Stuttered Dial Tone 67 Play Call Waiting Tone 68 Incoming Intercom Calls and Auto Answer 69 Using Redial Ke...

Page 7: ...the 53i phone up on the network and contains advanced configuration instructions for the 53i This is an administrator level guide This guide can be downloaded from www aastra com Introduction This 53...

Page 8: ...t LAN Category 5 5e straight through cabling Power over Ethernet PoE inline power injector optional accessory necessary only if your network provides no inline power and if you do not use the IP Phone...

Page 9: ...ing startup screens The 53i phone then checks settings and looks for new configuration and firmware updates for the phone from a server If a new update is found the phone displays the message Updating...

Page 10: ...screen The Idle State screen lists your name SIP screen name extension or phone number and day date and time The 1 in the upper corner in the above example indicates the idle screen for the first line...

Page 11: ...D On Do Not Disturb Number of missed calls When more than one status message displays the is shown after the message to indicate you can use the and navigation keys to scroll through the remaining mes...

Page 12: ...r phone displays a No Service message without any extension or user name at the end of the start up sequence instead of the Idle State screen this means your system administrator has not set up your e...

Page 13: ...d to restart your phone For more information on restarting your phone see Restarting your phone on page 39 For more information about connecting your phone refer to the Aastra 53i Installation Guide u...

Page 14: ...is also an administrator level function only These options should only be set up and changed by your system administrator Using the IP Phone UI 1 Press the Options key on the phone to enter the optio...

Page 15: ...option 4 Use the softkeys to change a selected option 5 Press the Set button to save the change 6 Press the button the button or the N button at any time to exit without saving changes Reference For...

Page 16: ...Your Phone s IP Address 1 Press the button on the phone to enter the Option List 2 Use the key to scroll down the list of options and select Phone Sta tus Press the key to display the Phone Status sel...

Page 17: ...wing redirect screen displays fol lowed by the Security Alert window This process redirects HTTP to use HTTPS for a more secure connection 2 Click YES to accept the certificate 3 At the prompt enter y...

Page 18: ...nfigure up to 6 programmable keys for a specific function none line speeddial do not disturb DND Busy Lamp Field BLF BLF list flash Extensible Markup Language XML flash sprecode park pickup Last Call...

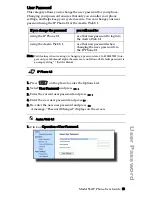
Page 19: ...alpha characters are not allowed Default password is an empty string field is blank 1 Press on the phone to enter the Options List 2 Select User Password and press 3 Enter the current user password an...

Page 20: ...eld enter the current user password Note By default the user name is user all lowercase and the password field is left blank 3 In the New Password field enter the new user password 4 In the Password C...

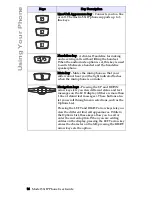
Page 21: ...list such as the Options List without saving changes Options key Accesses options to customize your phone Your System Administrator may have already customized some of your settings Check with your S...

Page 22: ...tor flashes when the microphone is on mute Navigation keys Pressing the UP and DOWN arrow keys lets you view different status and text messages on the LCD display if there is more than 1 line of statu...

Page 23: ...u to delete entries from the Directory List and Callers List Must enter the Directory or Callers list and select an entry then press twice to delete entry 3 DIRECTORY Displays up to 200 names and phon...

Page 24: ...ok the phone automatically selects a line for you When you have more than one call you can use the left and right navigation buttons 3 and 4 to scroll left and right to the different call information...

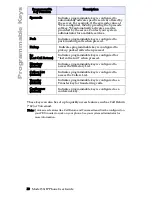
Page 25: ...not disturb in the Aastra Web UI BLF Indicates programmable key is configured for Busy Lamp Field BLF use User can dial out on a BLF configured key BLF List Indicates programmable key is configured fo...

Page 26: ...precode softkey 82 automatically activates a service provided by the server Contact your system administrator for available services Park Indicates programmable key is configured to park incoming call...

Page 27: ...n use the Aastra Web UI only to set a programmable key as a line Use the following procedure to set a programmable key to function as a line 1 Click on Operation Programmable Keys 2 Select from Key 1...

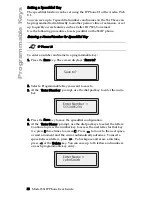
Page 28: ...ss the Save key The screen displays Save to 2 Select a Programmable Key you want to save to 3 At the Enter Number prompt use the dial pad key to enter the num ber 4 Press the Save key to save the spee...

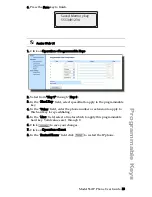
Page 29: ...o apply to the programmable key 4 In the Value field enter the phone number or extension to apply to this hard key for speeddialing 5 In the Line field select a line for which to apply this programmab...

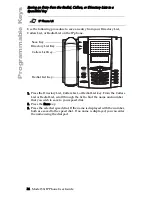
Page 30: ...s the Directory List Callers List or Redial List key From the Callers List or Redial List scroll through the list to find the name and number that you wish to save to your speed dial 2 Press the Save...

Page 31: ...set up the configuration server The second line on the screen of the IP phone shows when DND is set If the phone shares a line with other phones only the phone that has DND configured is affected You...

Page 32: ...o each BLF programmable key The LED illuminates steady to indicate the monitored line is off hook or unregistered The LED goes off when the line is idle You can set BLF on the programmable keys using...

Page 33: ...D goes off when the is idle When the monitored extension is ringing the LED flashes Note The Broadworks BLF feature is not the same as the Broadworks Shared Call Appearance SCA feature and does not pe...

Page 34: ...ist defined on the BroadSoft BroadWorks Busy Lamp field page for your particular user For example my53i blf list as broadworks com Note Contact your System Administrator for the BLF List URI 6 Click t...

Page 35: ...ble key to flash The IP phone generates flash events only when a call is connected and there is an active RTP stream for example when the call is not on hold 1 Click on Operation Programmable Keys 2 S...

Page 36: ...e phone allows you to access the special XML services If you set a programmable key type as XML you must also enter the XML URI in the Value field This allows the phone to perform an HTTP GET on the U...

Page 37: ...ey configured for XML on the 53i phone A Custom Features screen displays or the title you specified 2 Use the and to scroll through the customized features 3 For menu and directory services select a s...

Page 38: ...e services Use the following procedure to configure a sprecode softkey on the 53i phone 1 Click on Operation Programmable Keys 2 Select a key from Key 1 through Key 6 3 In the Hard Key field select sp...

Page 39: ...e using Asterisk BroadWorks Sylantro or ININ PBX The park pickup feature performs as follows When a call comes in and you pickup the handset you can press the applicable Park programmable key to park...

Page 40: ...r the first key For the second key select Pickup 4 In the Value fields enter the appropriate values based on the server in your network Note For values to enter in this field see the table Park Pickup...

Page 41: ...ocedure and press the Park softkey again to retry step 2 Pickup a Parked Call 1 Pick up the handset on the phone 2 Enter the extension number where the call was parked 3 Press the Pickup softkey If th...

Page 42: ...he IP phone UI Use the following illustration for reference 1 Press the Save key The screen displays Save to 2 Select a Programmable Key you want to save to Note Save a new number to the appropriate p...

Page 43: ...space between letters press To backspace and erase a mistake press or the Delete key You can save up to 16 letters and numbers on each programmable key entry 6 Press the Save key to finish 1 Click on...

Page 44: ...e key function using the Aastra Web UI 1 Click on Operation Programmable Keys 2 For Key 1 through Key 6 select none from the Hard Key field 3 Click to save your changes 4 Click on Operation Reset 5 In...

Page 45: ...rience any unexpected behavior 1 Press the button on the phone to enter the Options List 2 Use the key to scroll down the list of options to Phone Status and press the key to select 3 Press the key to...

Page 46: ...ords the length of your call Using Handsfree Speakerphone The handsfree feature allows you to speak to someone without using the handset or headset Your phone must be in either the Speaker or Speaker...

Page 47: ...3 Press 7 to jump directly to this option and press to select 4 Press to scroll down to headset mic volume and press to select 5 Use to scroll down the list and press to select your desired volume 6 P...

Page 48: ...lls If auto answer is enabled on the IP phone the phone plays a tone to alert the user before answering the intercom call If auto answer is disabled the phone rejects the incoming intercom call and se...

Page 49: ...Directory list appears on screen The redial list stores up to the last 100 numbers you called allowing you to scroll through and select the number you wish to redial Note Your system administrator can...

Page 50: ...at the prompt to erase all items Mute Press the button at any time to mute handset headset or handsfree The speaker light will flash slowly and you can hear the caller but they cannot hear you To swi...

Page 51: ...ration If the phone is already connected to a call pressing the line call appearance button for the new incoming call automatically places the connected call on hold and answers the new call To reconn...

Page 52: ...at the phone Note The phone will not beep to remind you that you still have a call on hold if you are connected to another call When on Hold To let your caller know that they are still on hold music...

Page 53: ...The call goes directly to the extension or outside line you transferred to If the party you are transferring the call to does not answer the transferred call rings back to your extension Consultive T...

Page 54: ...stem supports up to 3 parties including yourself in a conference call Note Your system administrator can set your Conference key to speeddial a specific number Contact your system administrator for mo...

Page 55: ...th active calls on two different lines 2 Press the Conference key A new line will open 3 Press the line key of the call you wish to conference with 4 Press the Conference key again The two lines link...

Page 56: ...ry by adding them manually or by saving the number and name from other lists stored on your phone Each entry can contain a maximum of 16 letters and numbers Accessing Your Directory Use the following...

Page 57: ...cancel Saving Numbers and Names to the Directory You can save a number to your Directory from your display during a call from the Redial list or Callers list or by entering a new number and name Savi...

Page 58: ...ess the Callers List Key or the Redial List button From the Callers or Redial List scroll through the list to find the name and num ber that you wish to save to your directory 2 Press the Save key 3 P...

Page 59: ...one second pause during number editing press N 3 Press the Save Key At the Enter Name prompt use the dial pad to select the letters Continue to press the number key to access the next letter for that...

Page 60: ...to edit by pressing the first letter of the name on the dial pad and to scroll through the list 3 To begin editing press Press again to erase the numbers or let ters to the left or use the dial pad to...

Page 61: ...lustration as a reference 1 Press the Directory Key 2 Press to find the item you want to delete 3 Press the Delete Key 4 Press the Delete Key again at the prompt to erase the item Use the following pr...

Page 62: ...nd delete line items in the Callers List from the IP phone UI You can also directly dial from a displayed line item in the Callers List You can also download the Callers List to your PC for viewing us...

Page 63: ...ers List Use the following illustration as a reference 1 Press the Callers List Key Press to move through the Callers list Press to see the most recent call or to see the oldest call on your list 2 To...

Page 64: ...following illustration as a reference 1 Press the Callers List Key 2 Press to find the entry you want to edit Press to view the most recent call or to see the oldest call on your list 5 Press any key...

Page 65: ...llers List Use the following illustration as a reference 1 Press the Callers List Key 2 Press to find the item you want to delete 3 Press the Delete Key 4 Press the Delete Key again at the prompt to e...

Page 66: ...Aastra Web UI 1 Click on Operation Directory 2 In the Callers List field click on A File Download message displays 3 Click OK 4 Enter the location on your computer where you want to download the Calle...

Page 67: ...up to 9 individual lines For global and local call forwarding you can set the following Call forward mode Destination number Number of rings before forwarding the call from 1 to 9 rings The following...

Page 68: ...e If you leave the Number field blank call forwarding is disabled 5 Press to scroll to Cfwd Mode and press 6 Use the to select a value and press Valid values are Off All Busy NoAns No Answer BusyNoAns...

Page 69: ...the Number field enter the call forward number for which you want your calls to be call forwarded 4 In the Number of Rings field enter the number of rings you want to set before the call is forwarded...

Page 70: ...and remove the phone number in the Forward Number field Note To force a line to use the global settings set the Mode field to Global 4 In the Forward Number field enter the call forward number for wh...

Page 71: ...ne dials the stored number and displays each digit as dialed in the LCD window When the suppression of DTMF playback is enabled the IP phone dials the stored number and displays the entire number imme...

Page 72: ...the Display DTMF Digits parameter the digits you are dialing from the keypad or from a programmable key display to the IP phone s LCD display This parameter is disabled by default no digits display w...

Page 73: ...Aastra Web UI Configuring Stuttered Dial Tone Use the following procedures to configure stuttered dial tone on the IP phone 1 Click on Basic Settings Preferences General 2 Stuttered dial tone is enab...

Page 74: ...re using the Aastra Web UI Configuring Call Waiting Tone Use the following procedures to configure a call waiting tone on the IP phone 1 Click on Basic Settings Preferences General 2 A call waiting to...

Page 75: ...s You can set incoming intercom settings and auto answer using the Aastra Web UI only Configuring Incoming Intercom and Auto Answer Use the following procedures to configure incoming intercom calls an...

Page 76: ...ed redial user interface that allows a user to quickly redial the last number that was dialed out from the phone You can Press the REDIAL button twice to redial the last number dialed Press the REDIAL...

Page 77: ...le disable these ring tones on a global or per line basis The following table identifies the valid settings and default values for each type of configuration method Ring Tone Settings Table Configurat...

Page 78: ...y tone congestion tones call waiting tone ring cadence pattern You configure global ring tones and tone sets using the Aastra Web UI and the IP Phone UI Configuring Ring Tones and Tone Sets Use the fo...

Page 79: ...on page 71 for valid values For per line configuration 4 In the Ring Tone section select a line for which you want to set ring tone 5 Select a value from the LineN field Note See the Ring Tone Settin...

Page 80: ...ions List 2 Select Time and Date 3 Select Set Time 4 Using the keys on the keypad enter a time to set on the IP phone 5 Press Done to save the time you entered 6 Select Time Format 7 Valid values are...

Page 81: ...ime Zone from the list of options For valid time zone values see Appendix B Note The default Time Zone is US Eastern 4 Press Done to save the Time Zone you selected Daylight Savings Time 1 Select Dayl...

Page 82: ...want to use on your phone Valid values are 12h 12 hour format default 24h 24 hour format Note The time displays on the phone s idle screen in the format you select for this field 3 In the Date Format...

Page 83: ...uide 77 Additional Features MMM DD Note The date displays on the phone s idle screen in the format you select 4 Click to save your settings 5 Click on Operation Reset 6 In the Restart Phone field clic...

Page 84: ...cy dial plan An emergency dial plan can be 911 999 112 110 or all of the above The default emergency dial plan is 911 999 112 110 The following procedures describe locking the phone setting an emergen...

Page 85: ...wing message Phone is unlocked Resetting a User Password If you forget your password you can reset it and enter a new password The reset user password feature resets the password to the factory defaul...

Page 86: ...ber that allows a caller to contact local emergency services for assistance when required The emergency telephone number may differ from country to country It is typically a three digit number so that...

Page 87: ...cal area to contact emergency services For multiple numbers enter a between each emergency number For example 911 110 Default for this field is 911 999 112 110 3 Click to save the emergency dial plan...

Page 88: ...pendant on the language packs currently loaded to the IP phone Use the following procedure to specify which language to use for the IP Phone UI 1 Press on the phone to enter the Options List 2 Select...

Page 89: ...language to apply to the Aas tra Web UI The IP phone supports the following languages English default French Spanish German Italian Note All languages may not be available for selection The available...

Page 90: ...change the Set Audio option Why can t I get a dial tone Check for any loose connections and that the phone has been installed properly For installation instructions please refer to the Installation an...

Page 91: ...urrent user password Note By default the user name is user all lowercase and the password field is left blank If you have forgotten your password contact your system adminis trator for assistance 3 In...

Page 92: ...one Status and press the key to select 3 Press the key to scroll to the Restart Phone option 4 Press the key to confirm and restart the phone If you do not wish to restart your phone press the key to...

Page 93: ...consequential damages including but not limited to loss damage or expense directly or indirectly arising from the customers use of or inability to use this telephone either separately or in combinati...

Page 94: ......

Page 95: ...AU Lord Howe AU Tasmania AU Melbourne AU Sydney AU Broken Hill AU Brisbane AU Lindeman AU Adelaide AU Darwin AU Perth AW Aruba CET AST AST CET AST ART BST CET LHS EST EST EST CST EST EST CST CST WST...

Page 96: ...rague NST AST EST EST CST MST PST PST CET CKS CLS EAS CST COS CST CST EES CET DE Berlin DK Copenhagen DM Dominica DO Santo Domingo CET CET AST AST EE Tallinn ES Madrid ES Canary EET CET WET FI Helsink...

Page 97: ...ST CET EET CET EET MC Monaco MD Chisinau MK Skopje MQ Martinique MS Montserrat MT Malta MX Mexico City MX Cancun MX Merida MX Monterrey MX Mazatlan MX Chihuahua MX Hermosillo MX Tijuana CET EET CET AS...

Page 98: ...Anadyr EET EET MSK SAM YEK OMS NOV KRA IRK YAK VLA SAK MAG PET ANA SE Stockholm SG Singapore SI Ljubljana SK Bratislava SM San Marino SR Paramaribo SV El Salvador CET SGT CET CET CET SRT CST TR Istan...

Page 99: ...disturb DND 25 documentation 1 DTMF suppressing playback 65 E emergency dial plan defining 80 F features 53i 1 Flash key 29 G getting started 3 H headset using 41 I idle screens 4 incomplete configura...

Page 100: ...ow do I restart the IP phone 86 Why can t I get a dial tone 84 Why does my phone display bad encrypted config 85 Why doesn t my phone ring 84 Why is my display blank 84 Why is my speakerphone not work...

Page 101: ......

Page 102: ...s owner s manual and consulted the Troubleshooting section and still have problems please visit our website at www aastra com or call 1 800 574 1611 for technical assistance Aastra Telecom Inc 2007 41...

Reviews: