background image

3


1. COMPLIANCE 

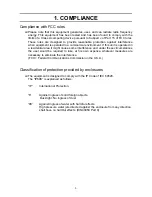
Compliance with FCC rules 

‰

 Please note that this equipment generates, uses and can radiate radio frequency 

energy. This equipment has been tested and has been found to comply with the 
limits of a Class A computing device pursuant to Subpart J of Part 15 of FCC rules. 
These rules are designed to provide reasonable protection against interference 
when equipment is operated in a commercial environment. If this unit is operated in 
a residential area it might cause some interference and under these circumstances 
the user would be required to take, at his own expense, whatever measures are 
necessary to eliminate the interference. 
(FCC = Federal Communications Commission in the U.S.A.) 


Classification of protection provided by enclosures 

‰

 The equipment is designed to comply with the IP Code of IEC 60529. 

The “IP69K” is explained as follows: 
 
“IP” International 

Protection. 


“6” 

Against ingress of solid foreign objects. 

Dust-tight. No ingress of dust. 

“9K”


Against ingress of water with harmful effects. 
High pressure water jets directed against the enclosure from any direction   
shall have no harmful effects. (DIN40050 Part 9) 


Summary of Contents for SW-150KL

Page 1: ...S SW W S Se er ri ie es s S Su up pe er r W Wa as sh h D Do ow wn n S Sc ca al le es s SW 6KS SW 15KS SW 15KM SW 30KM SW 60KM SW 150KM SW 60KL SW 150KL 1WMPD4002080 ...

Page 2: ...oduced transmitted transcribed or translated into any language in any form by any means without the written permission of A D Company Limited The contents of this manual and the specifications of the instrument covered by this manual are subject to change for improvement without notice ...

Page 3: ...SIC OPERATION 12 8 1 Turning the power ON and OFF 12 8 2 Selecting a weighing unit 13 8 3 Basic weighing operation 13 8 4 Weight display resolution 14 9 COUNTING MODE 15 10 COMPARATOR 16 10 1 The formula to compare 16 10 2 Entering the comparator values 18 11 CALIBRATION 19 11 1 Gravity acceleration correction 19 11 2 Calibration using a weight 20 11 3 Restoring the factory set values 21 12 FUNCTI...

Page 4: ... OUTPUT 27 13 2 1 Installing OP 03 27 13 2 2 OP 03 Specifications 28 13 2 3 Command mode 31 13 3 OP 04 RS 422 485 34 13 3 1 Installing OP 04 34 13 3 2 OP 04 Specifications 35 14 MAINTENANCE 38 14 1 Notes on maintenance 38 14 2 Error codes 38 15 SPECIFICATIONS 39 15 1 Specifications 39 15 2 External dimensions 41 GRAVITY ACCELERATION MAP 43 ...

Page 5: ...area it might cause some interference and under these circumstances the user would be required to take at his own expense whatever measures are necessary to eliminate the interference FCC Federal Communications Commission in the U S A Classification of protection provided by enclosures The equipment is designed to comply with the IP Code of IEC 60529 The IP69K is explained as follows IP Internatio...

Page 6: ...lay with a broad viewing angle Three types of weight display resolution are available to cover various applications 1 3 000 1 6 000 1 7 500 for some models and 1 12 000 or 1 15 000 for some models To be selected in the function settings The counting mode easily counts the number of objects of the same weight The comparator mode compares the displayed value weight value with the previously set comp...

Page 7: ...which produces magnetic fields Do not install the scale in a place where it is possible to be charged with static electricity or where the relative humidity is lower than 45 RH Insulators such as plastic are often charged with static electricity Use a stable power source Calibrate the scale before use or after having moved it to another location In addition calibrate it periodically to maintain th...

Page 8: ...of the following items are included Instruction manual SW series scale The scale components are different depending on the type of scale With a display pole no display stand With a display stand no display pole With no display pole or display stand ...

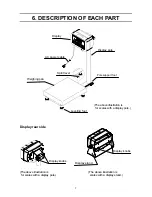
Page 9: ...isplay pole Display rear side The above illustration is The above illustration is for scales with a display pole scales with a display stand Display knobs Display knobs Display stand AC power cable Pole support foot Display Display pole Weighing pan Leveling foot Spirit level ...

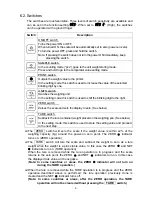
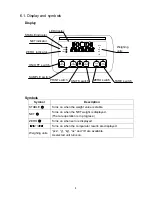
Page 10: ...s ZERO Turns on when zero is displayed Turns on when the comparator results are displayed Weighing units pcs g kg oz and lb are available A selected unit turns on LO OK HI pcs g kg oz lb STABLE NET ZERO SAMPLE ON OFF PRINT UNITS ZERO TARE SAMPLE switch LED display Weighing units STABLE indicator ZERO indicator ON OFF switch PRINT switch TARE switch NET indicator UNITS switch ZERO switch ...

Page 11: ...elow TARE switch Subtracts the tare container weight placed on the weighing pan See below In the setting mode this switch is used to store the setting value and proceed to the next step The ZERO switch will zero the scale if the weight value is within 2 of the weighing capacity kg around the power on zero point The ZERO indicator turns on ZERO operation The TARE switch will tare the scale and subt...

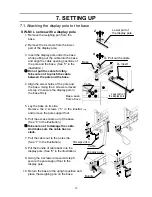
Page 12: ...play pole to the base firmly 5 Lay the base on its side Remove the 4 screws 5 in the illustration and remove the pole support foot 6 Pull the excess cable out of the base See 6 in the illustration Take care not to damage the cable And make sure the cable has no slack 7 Pull the cable out to the pole side See 7 in the illustration 8 Put the bundle of cable back into the display pole See 8 in the il...

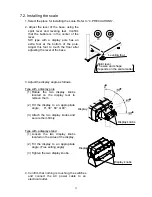
Page 13: ...with a display pole 1 Rotate the two display knobs located on the display rear to remove them 2 Tilt the display to an appropriate angle 0 30 60 or 90 3 Attach the two display knobs and secure them firmly Type with a display stand 1 Loosen the two display knobs located on the sides of the display 2 Tilt the display to an appropriate angle Free setting angle 3 Tighten the two display knobs 4 Confir...

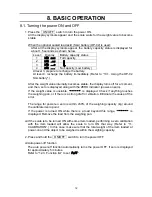
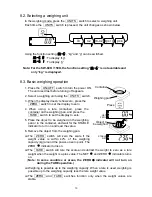
Page 14: ...ndicator power on zero If the weight value is unstable is displayed Check if anything touches the weighing pan or if there is a strong draft or vibration Eliminate the cause of the error The range for power on zero is within 50 of the weighing capacity kg around the calibrated zero point If the power is turned ON while there is a load beyond this range is displayed Remove the load from the weighin...

Page 15: ... set the display to zero 5 Place the object to be weighed on the weighing pan or in the container and wait for the STABLE indicator to turn on and read the value 6 Remove the object from the weighing pan The ZERO switch will zero the scale if the weight value is within 2 of the weighing capacity kg around the power on zero point The ZERO indicator turns on The TARE switch will tare the scale and s...

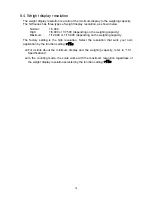
Page 16: ...he weighing capacity Maximum 1 12 000 or 1 15 000 depending on the weighing capacity The factory setting is the high resolution Select the resolution that suits your own application by the function setting re5o For details about the minimum display and the weighing capacity refer to 15 1 Specifications In the counting mode the scale works with the maximum resolution regardless of the weight displa...

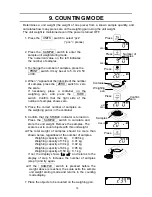
Page 17: ...ect number of samples on the weighing pan or in the container 6 Confirm that the STABLE indicator is turned on Press the SAMPLE switch to calculate and store the unit weight Remove the samples The scale is set to count objects with this unit weight The total weight of samples should be more than shown below regardless of the number of samples Weighing capacity of 6 kg 0 005 kg Weighing capacity of...

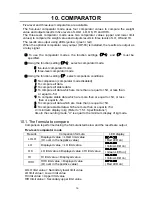
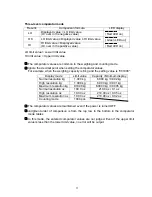
Page 18: ... stable data 3 To compare all data which are more than or equal to 5d or less than or equal to 5d 4 To compare stable data which are more than or equal to 5d or less than or equal to 5d 5 To compare all data which are more than or equal to 5d 6 To compare stable data which are more than or equal to 5d d minimum display in kg Refer to 15 1 Specifications Also in the counting mode d is equal to the ...

Page 19: ...ity is 6 kg and the setting value is 001000 Display mode Limit value Capacity Minimum display Normal resolution kg 1 000 kg 6 000 kg 0 002 kg High resolution kg 1 000 kg 6 000 kg 0 001 kg Maximum resolution kg 0 1000 kg 6 0000 kg 0 0005 kg Normal resolution oz 100 0 oz 210 0 oz 0 1 oz High resolution oz 10 00 oz 210 00 oz 0 05 oz Maximum resolution oz 10 00 oz 210 00 oz 0 02 oz Counting mode 1000 ...

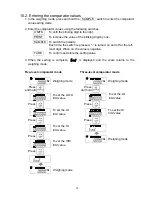
Page 20: ...s pressed is turned on and off at the left most digit When on the value is negative TARE To confirm and store the setting value 3 When the setting is complete end is displayed and the scale returns to the weighing mode Five level comparator mode Three level comparator mode Weighing mode Press and hold To set the LOLO limit value To set the LO limit value To set the HI limit value To set the HIHI l...

Page 21: ...vity acceleration correction is not required when the scale will be calibrated using a calibration weight at the place where it is to be used Make sure that the scale is in the weighing mode displaying kg g lb oz or pcs 1 Press and hold the TARE switch until the gravity acceleration value in this example 9 7985 appears and release the switch 2 Press the TARE switch to enter the gravity acceleratio...

Page 22: ...bration weight value is equal to the weighing capacity factory setting When you enter with kg g or pcs mode the value is in kg With Ib or oz then Ib If SPAN calibration is not to be performed turn the power OFF to exit from the calibration procedure 6 To calibrate with a weight different from the weighing capacity change the displayed value using the following switches UNITS To shift the digit tha...

Page 23: ...n value appears and release the switch 2 Press the UNITS switch twice to display ClrC 3 Press the TARE switch to display ClrC no with no blinking 4 Press the PRINT switch ClrC no changes to ClrC go with go blinking 5 When ClrC go is displayed press the TARE switch The factory setting values are restored and end is displayed To finish the restoring procedure turn the power OFF To cancel the restori...

Page 24: ...ess the TARE switch to store the setting value After end the power is turned OFF automatically To cancel the setting procedure without storing the value press the ZERO switch The power is turned OFF automatically 12 2 To restore the function settings to the factory setting values 1 Turn the power OFF 2 Press and hold the TARE switch and press the ON OFF switch to turn the power ON Only release the...

Page 25: ...inimum display in kg 0 Weak stability fast response 1 Normal stability normal response Stability Response speed Cond 2 Strong stability slow response Filtering 0 2400 bps 1 4800 bps Serial interface baud rate bp5 2 9600 bps 0 7 bits EVEN 1 7 bits ODD Serial interface data bits parity btpr 2 8 bits Non parity 0 Stream mode Command mode 1 Command mode only 2 Print switch mode Command mode 3 Auto pri...

Page 26: ...4 Compares stable data of 5d or 5d 5 Compares data of 5d Comparison conditions Cp 6 Compares stable data of 5d Sets comparison conditions d minimum display in kg 0 Low 1 Medium Switch sensitivity key 2 High Factory setting d minimum display in kg the minimum mass that can be weighed in kg Even the counting mode uses d for judgment ...

Page 27: ...5 hours to be fully charged The battery life will vary depending on how the scale is used the ambient temperature and so on A battery NP4 6 6V 4Ah manufactured by YUASA is commercially available Caution There will be risk of leakage fire or explosion if the battery is connected improperly or replaced with the incorrect type Dispose of a used battery according to the local laws and regulations Do n...

Page 28: ...e scale works normally 13 1 2 Charging the battery When the weight display shows lb Low battery the battery voltage is low and should be recharged Turn the scale OFF and connect the AC power cable to an electrical outlet The charging process will start Charging will be performed when the AC power cable is connected to an electrical outlet and the scale is turned OFF If the scale is turned ON trick...

Page 29: ...e dust tight and water tight performance of the scale will be degraded OP 03 includes an interface board two connector cables 7 and 10 pins two cable glands and two screws M3x8 13 2 1 Installing OP 03 1 LOLO 2 LO 3 OK 4 HI 5 HIHI 6 COM 7 SHLD 1 RXD 2 TXD 3 DSR 4 SG 5 SHLD 6 mm AWG 26 16 Terminal block M4 screw 10 pcs Display rear cover Cable glands Interface board M3x8 screws Peel Connector cable ...

Page 30: ...n the cable glands and attach the rear cover to the display and secure it with the screws loosened at step 2 7 Connect the AC power cable to the electrical outlet 8 Set the function settings bp5 btpr prt 5if and aCk as necessary To use the OP 03 RS 232C the function setting of 5if must be set to 0 13 2 2 OP 03 Specifications RS 232C interface Transmission form Asynchronous bi directional half dupl...

Page 31: ...mal point There are 5 units _ k g Weighing mode kg _ _ g Weighing mode g _ l b Weighing mode lb _ o z Weighing mode oz _ PC Counting mode pcs As a terminator CRLF is always output 1 Receive data RXD 2 Transmit data TXD 3 Data set ready DSR 4 Signal ground SG 5 Shield SHLD SW is designed as DCE Data Communication Equipment 1 Relay output LOLO 2 Relay output LO 3 Relay output OK 4 Relay output HI 5 ...

Page 32: ...edures Print switch mode prt 2 When the weight display is stable data is sent by pressing the PRINT switch At this time the display flashes once to indicate that the data is sent Auto print mode data prt 3 When the weight display is stable at 5d d minimum display in kg and above 5d or below 5d the data is sent The next transmission can not occur until after the weight display falls between 4d and ...

Page 33: ... is used Send the current LO limit value When the three level comparator mode is used Not used L2 When the five level comparator mode is used Send the current LOLO limit value When the three level comparator mode is used Send the current LO limit value Send a setting value Function settings Five level Cp l 0 Three level Cp l 1 H2 When the five level comparator mode is used Set the HIHI limit value...

Page 34: ...ion is possible Switch the weighing unit No reply for the function setting aCk 0 Command U CR LF Reply U CR LF Switch the weighing unit to the next weighing unit Five level comparator mode Send the current HIHI limit value Three level comparator mode Send the current HI limit value Command H 2 CR LF Reply H 2 0 0 0 4 0 0 CR LF Five level comparator mode Send the current HI limit value Three level ...

Page 35: ...e excluding the polarity and decimal point Command L 1 0 0 0 2 0 0 CR LF Reply L 1 0 0 0 2 0 0 CR LF Five level comparator mode Set the LOLO limit value Three level comparator mode Set the LO limit value No reply for the function setting aCk 0 Send the six digit value excluding the polarity and decimal point Command L 2 0 0 0 1 0 0 CR LF Reply L 2 0 0 0 1 0 0 CR LF Replies to the commands other th...

Page 36: ...ll be degraded OP 04 unit includes an interface board a connector cable 10 pins two cable glands and two screws M3x8 13 3 1 Installing OP 04 Terminal block M4 screw 10 pcs Display rear cover Cable glands Interface board M3x8 screws Peel Connector cable Connect to 1 SDA 2 SDB 3 RDA 4 RDB 5 TRM 6 SG 7 SHLD 6 mm AWG 26 16 1 SDA 2 SDB 3 RDA 4 RDB 5 TRM 6 SG 7 SHLD an external device other SW ...

Page 37: ...tem EIA RS 422 485 Transmission form Asynchronous bi directional half duplex Data format Baud rate 2400 4800 9600 bps Data bits 7 bits parity 1bit EVEN ODD or 8 bits non parity Start bit 1 bit Stop bit 1 bit Code ASCII Terminator CRLF CR 0Dh LF 0Ah LSB 0 1 2 3 4 5 MSB 6 Circuit diagram Stop bit A B 1 2V 5V 0 2V 15V Start bit Data bits Parity bit 1 SDA RS 422 Out 2 SDB RS 422 Out 3 RDA RS 422 In RS...

Page 38: ...e as the RS 232C both in commands and replies When used with the RS 485 interface function setting 5if 2 note the following When sending commands continuously leave an interval of 500 ms or more between commands Do not use stream mode function setting prt 0 when sending commands Commands will not be received correctly and will be invalid Connect TRM to RDB at the farthest SW from the host computer...

Page 39: ... 2 3 S T 0 0 1 2 3 4 5 _ k g CR LF Stable data 2 3 U S 0 0 0 7 8 9 0 _ k g CR LF Unstable data 2 3 O L 9 9 9 9 9 9 9 _ k g CR LF E display Zero the scale No reply for the function setting aCk 0 Command 2 3 Z CR LF Reply 2 3 Z CR LF The scale is in a condition that zero operation is possible Send the current LO limit value Command 2 3 L 1 CR LF Reply 2 3 L 1 0 0 0 2 0 0 CR LF ...

Page 40: ...ghing capacity has been placed on the weighing pan Remove the object from the weighing pan Unit weight error Indicates that the sample weight is too light to set the unit weight in the counting mode CAL error Indicates that the calibration procedure is canceled because the calibration weight is too light Check that the weighing pan is installed properly and the mass of the calibration weight Low b...

Page 41: ...0005 kg 0 0001 kg 0 0001 kg 0 0002 kg Repeatability Std deviation 0 001 kg 0 002 kg 0 002 kg 0 005 kg Linearity 0 002 kg 0 005 kg 0 005 kg 0 01 kg Sensitivity drift 20 ppm C 5 C to 35 C 41 F to 95 F Display Weight display 7 segment LED display character height 14 6 mm Comparison results red yellow green yellow red LED Display update 10 times per second Operating conditions 10 C to 40 C 14 F to 104...

Page 42: ... C to 35 C 41 F to 95 F Display Weight display 7 segment LED display character height 14 6 mm Comparison results red yellow green yellow red LED Display update 10 times per second Operating conditions 10 C to 40 C 14 F to 104 F Power supply AC main 100V to 240V or optional SLA battery continuous operation of 90 hours depending on how the scale is used Weighing pan size 300 x 380 mm 11 8 x 15 0 in ...

Page 43: ...rnal dimensions SW 6KS SW 15KS with a display pole SW 15KM SW 30KM SW 60KM SW 150KM with a display pole Unit mm 0 3 0 60 90 φ42 7 202 179 AC power cable 98 353 5 0 3 0 60 90 φ42 7 331 228 722 5 117 5 AC power cable ...

Page 44: ...42 SW 60KL SW 150KL with a display pole Display with a stand attached Unit mm 315 283 152 5 197 5 250 90 70 6 5 φ 135 9 110 0 3 0 60 90 481 φ42 7 318 126 5 722 5 AC power cable ...

Page 45: ... m s2 Cape Town 9 796 m s2 Rio de Janeiro 9 788 m s2 Chicago 9 803 m s2 Rome 9 803 m s2 Copenhagen 9 815 m s2 San Francisco 9 800 m s2 Cyprus 9 797 m s2 Singapore 9 781 m s2 Djakarta 9 781 m s2 Stockholm 9 818 m s2 Frankfurt 9 810 m s2 Sydney 9 797 m s2 Glasgow 9 816 m s2 Taichung 9 789 m s2 Havana 9 788 m s2 Tainan 9 788 m s2 Helsinki 9 819 m s2 Taipei 9 790 m s2 Kuwait 9 793 m s2 Tokyo 9 798 m s...

Page 46: ...44 World map ...
Reviews: