background image


Appendix B – I/O Information 


60


Net
work 

Ap

plian
ce


FW

S-

73

60


B.1  I/O Address Map 


Summary of Contents for FWS-7360

Page 1: ...Last Updated June 19 2018 FWS 7360 Network Appliance User s Manual 1st Ed...

Page 2: ...n this manual is intended to be accurate and reliable However the original manufacturer assumes no responsibility for its use or for any infringements upon the rights of third parties that may result...

Page 3: ...ademark of Microsoft Corp Intel Pentium Celeron and Xeon are registered trademarks of Intel Corporation Core Atom are trademarks of Intel Corporation ITE is a trademark of Integrated Technology Expres...

Page 4: ...Packing List Before setting up your product please make sure the following items have been shipped Item Quantity FWS 7360 1 If any of these items are missing or damaged please contact your distributo...

Page 5: ...tailed descriptions and explanations on the product s hardware and software features if any its specifications dimensions jumper connector settings definitions and driver installation instructions if...

Page 6: ...ystem s hardware 6 No connections should be made when the system is powered as a sudden rush of power may damage sensitive electronic components 7 If the device is not to be used for a long time disco...

Page 7: ...18 If any of the following situations arises please the contact our service personnel i Damaged power cord or plug ii Liquid intrusion to the device iii Exposure to moisture iv Device is not working...

Page 8: ...osion if the battery is incorrectly replaced Replace only with the same or equivalent type recommended by the manufacturer Dispose of used batteries according to the manufacturer s instructions and yo...

Page 9: ...Preface IX Network Appliance FWS 7360 China RoHS Requirements CN AAEON Embedded Box PC Industrial System Pb Hg Cd Cr VI PBB PBDE O SJ T 11363 2006 X SJ T 11363 2006...

Page 10: ...O O O Wires Connectors for External Connections O O O O O O Chassis O O O O O O CPU RAM O O O O O O Hard Disk O O O O O O PSU O O O O O O O The quantity of poisonous or hazardous substances or element...

Page 11: ...der CN8 12 2 4 3 LCM KeyPad Header CN9 12 2 4 4 Digital IO Pin Header CN14 12 2 5 Installing the 2 5 x2 Hard Disk Driver 14 Chapter 3 AMI BIOS Setup 18 3 1 System Test and Initialization 19 3 2 AMI BI...

Page 12: ...43 3 8 2 IntelRCSetup Server ME Configuration 44 3 8 3 IntelRCSetup North Bridge Chipset Configuration 45 3 8 4 IntelRCSetup South Bridge Chipset Configuration 46 3 8 4 1 SATA Configuration 47 Chapter...

Page 13: ...ppliance FWS 7360 C 2 1 Introduction 82 C 2 2 LAN Bypass Configuration 82 C 2 3 Sample Code 84 C 3 Software Reset button General Propose Input 86 C 3 1 Introduction 86 C 3 2 LAN Bypass Configuration 8...

Page 14: ...Network Appliance FWS 7360 Chapter 1 Chapter 1 Product Specifications...

Page 15: ...tel Denverton C3000 Series C3758 C3858 C3958 Chipset SoC System Memory DDR4 U DIMM ECC DIMM Up to 64GB Network Ethernet Intel i211 Gigabit Ethernet x 2 Marvell 88E1543 x 1 2 Port RJ45 SFP from CPU Byp...

Page 16: ...e maxima x 2 Option IPMI Keyboard and Mouse USB USB 3 0 x 2 Miscellaneous RTC Internal RTC Watchdog Timer 1 255 steps by software programmable Software Button TPM Optional GPIO Fan 1 MTBF Hours TBD Co...

Page 17: ...D 1 5 Grms 5 500Hz no operation Shock 10G peak acceleration 11 m sec duration operation 20G peak acceleration 11 m sec duration non operation Dimension W x D x H 430mm x 305mm x 44mm I O Interface Fr...

Page 18: ...Network Appliance FWS 7360 Chapter 2 Chapter 2 Hardware Information...

Page 19: ...Chapter 2 Hardware Information 6 Network Appliance FWS 7360 2 1 Dimensions System...

Page 20: ...Chapter 2 Hardware Information 7 Network Appliance FWS 7360 Component Side...

Page 21: ...Chapter 2 Hardware Information 8 Network Appliance FWS 7360 Solder Side...

Page 22: ...Chapter 2 Hardware Information 9 Network Appliance FWS 7360 2 2 Jumpers and Connectors Component Side...

Page 23: ...Chapter 2 Hardware Information 10 Network Appliance FWS 7360 Solder Side...

Page 24: ...Chapter 2 Hardware Information 11 Network Appliance FWS 7360 2 3 Jump Settings 2 3 1 Auto Power Button JP1 Normal 1 2 Auto power on 2 3 2 3 2 Clear CMOS CN10 Normal 1 3 2 4 Clear CMOS 3 5 4 6...

Page 25: ...B_PWSIN 2 GND 3 RESET 4 GND 5 Power LED 6 Power LED 7 HDD LED 8 HDD LED 2 4 2 CASEOPEN Pin Header CN8 Pin Signal Pin Signal 1 CaseOpen 2 GND 2 4 3 LCM KeyPad Header CN9 Pin Signal Pin Signal 1 Down 2...

Page 26: ...Chapter 2 Hardware Information 13 Network Appliance FWS 7360 7 DIO bit7 8 DIO bit8 9 5V 10 GND...

Page 27: ...Chapter 2 Hardware Information 14 Network Appliance FWS 7360 2 5 Installing the 2 5 x2 Hard Disk Driver 1 Unscrew the upper lid 2 Remove the four screws...

Page 28: ...Chapter 2 Hardware Information 15 Network Appliance FWS 7360 3 Secure the HDD to the HDD bracket with eight screws...

Page 29: ...Chapter 2 Hardware Information 16 Network Appliance FWS 7360 4 Secure the HDD bracket to the chassis with four screws 5 Connect the SATA and power cables to the lower hard disk...

Page 30: ...Chapter 2 Hardware Information 17 Network Appliance FWS 7360 6 Connect the SATA and power cables to the upper hard disk...

Page 31: ...Network Appliance FWS 7360 Chapter 3 Chapter 3 AMI BIOS Setup...

Page 32: ...eck the current system configuration against the values stored in the CMOS memory If they do not match an error message will be outputted in which case you will need to run the BIOS setup program to s...

Page 33: ...the power is turned off To enter BIOS Setup press Del or F2 immediately while your computer is powering up The function for each interface can be found below Main Date and time can be set here Press...

Page 34: ...Chapter 3 AMI BIOS Setup 21 Network Appliance FWS 7360 3 3 Setup Submenu Main...

Page 35: ...Chapter 3 AMI BIOS Setup 22 Network Appliance FWS 7360 3 4 Setup Submenu Advanced Options summary Case Open Warning Disabled Optimal Default Failsafe Default Enabled Clear Case Open detecting function...

Page 36: ...ll not be available Pending operation None Optimal Default Failsafe Default TPM Clear Schedule an Operation for the Security Device NOTE Your Computer will reboot during restart in order to change sta...

Page 37: ...2 protocol and event Physical Presence Spec Version 1 2 1 3 Optimal Default Failsafe Default Select to Tell O S to support PPI Spec Version 1 2 or 1 3 Note some HCK tests might not support 1 3 Device...

Page 38: ...Default Failsafe Default Console Redirection Enable or Disable Console Redirection Settings Legacy Console Redirection Legacy Console Redirection Settings Serial Port for Out of Band Management Window...

Page 39: ...Emulation ANSI Extended ASCII char set VT100 ASCII char set VT100 Extends VT100 to support color function keys etc VT UTF8 Uses UTF8 encoding to map Unicode Bits per second 9600 19200 38400 57600 115...

Page 40: ...evices may Flow control None Optimal Default Failsafe Default Hardware RTS CTS Flow control can prevent data loss from buffer overflow When sending data if the receiving buffers are full a stop signal...

Page 41: ...ion of Legacy OS and Legacy OPROM Messages Resolution 80x24 Optimal Default Failsafe Default 80x25 On Legacy OS the Number of Rows and Columns supported redirection Redirection After POST Always Enabl...

Page 42: ...management The next best choice is VT100 and then VT100 See above in Console Redirection Settings page for more Help with Terminal Type Emulation Bits per second 9600 19200 57600 115200 Optimal Defau...

Page 43: ...vent data loss from buffer overflow When sending data if the receiving buffers are full a stop signal can be sent to stop the data flow Once the buffers are empty a start signal can be sent to re star...

Page 44: ...USB Configuration Options summary Legacy USB Support Disabled Enabled Optimal Default Failsafe Default Enables Legacy USB support AUTO option disables legacy support if no USB devices are connected DI...

Page 45: ...Chapter 3 AMI BIOS Setup 32 Network Appliance FWS 7360 3 4 4 Advanced SIO Configuration...

Page 46: ...Device Disabled Enabled Optimal Default Failsafe Default Enable Disable this Logical Device Possible Use Automatic Settings Optimal Default Failsafe Default IO 3F8 IRQ 4 DMA IO 2C8 IRQ 11 DMA Allow u...

Page 47: ...s nDisabled FAN is always running with full speed FAN Control Mode Automatic Mode Optimal Default Failsafe Default Manual Mode Manual Mode Depends on PWM Duty nAutomatic Mode FAN Speed is depends on C...

Page 48: ...s running with full speed FAN Control Mode Automatic Mode Optimal Default Failsafe Default Manual Mode Manual Mode Depends on PWM Duty nAutomatic Mode FAN Speed is depends on CPU Temperature Spin PWM...

Page 49: ...FAST BLINK LAN Bypass Status LED Mode for Power on ByPass PassTru Optimal Default Failsafe Default Configure LAN kit behavior when system in power on state Bypass Pass Through Mode for Power off ByPas...

Page 50: ...upply mode Restore AC Power Loss Last State Optimal Default Failsafe Default Always On Always Off Select power state when power is re applied after a power failure RTC wake system from S5 Disabled Opt...

Page 51: ...iguration Options summary DIO Port1 4 Output Optimal Default Failsafe Default Input Set DIO as Input or Output Output Level High Optimal Default Failsafe Default Low Set output level when DIO pin is o...

Page 52: ...provide access to many of the features in the Setup utility Select the password you wish to set press Enter to open a dialog box to enter your password you can enter no more than six letters or number...

Page 53: ...ed Enabled Optimal Default Failsafe Default Enable Disable Quiet Boot option Launch PXE Rom Disabled Optimal Default Failsafe Default Enabled Controls the execution of UEFI and Legacy PXE OpROM Boot O...

Page 54: ...Chapter 3 AMI BIOS Setup 41 Network Appliance FWS 7360 3 7 Setup submenu Save Exit...

Page 55: ...Chapter 3 AMI BIOS Setup 42 Network Appliance FWS 7360 3 8 Setup submenu IntelRCSetup...

Page 56: ...ilsafe Default Enabled Enable Disable EIST GV3 and TM1 must be enabled for TM2 to be available GV3 must be enabled for Turbo Auto Enable for B0 CPU stepping all others disabled change setting to overr...

Page 57: ...Chapter 3 AMI BIOS Setup 44 Network Appliance FWS 7360 3 8 2 IntelRCSetup Server ME Configuration...

Page 58: ...Chapter 3 AMI BIOS Setup 45 Network Appliance FWS 7360 3 8 3 IntelRCSetup North Bridge Chipset Configuration...

Page 59: ...Chapter 3 AMI BIOS Setup 46 Network Appliance FWS 7360 3 8 4 IntelRCSetup South Bridge Chipset Configuration...

Page 60: ...Chapter 3 AMI BIOS Setup 47 Network Appliance FWS 7360 3 8 4 1 SATA Configuration...

Page 61: ...7360 3 8 4 1 1 SATA 1 Options summary Enable controller Enabled Optimal Default Failsafe Default Disabled Enable or disable the Chipset SATA Controller The Chipset SATA Controller support the 2 black...

Page 62: ...Enables Disables SATA Controller port if supported by current cpu SKU Hot Plug Disabled Optimal Default Failsafe Default Enabled Hot Plug Spin up Disabled Optimal Default Failsafe Default Enabled Spi...

Page 63: ...Network Appliance FWS 7360 Chapter 4 Chapter 4 Drivers Installation...

Page 64: ...ktop network appliance fws 7360 It contains all the drivers and utilities you need to set up your product Follow the steps below to install the drivers For Windows 1 Open the Step 1 LAN 22_4_0_1_CD fo...

Page 65: ...Network Appliance FWS 7360 Appendix A Appendix A Watchdog Timer Programming...

Page 66: ...P Mode Data Register 0x2F or 0x4F Table 2 Watchdog relative register table LDN Register BitNum Value Note Timer Counter 0x07 Note3 0x73 Note4 Note24 Time of watchdog timer 0 255 This register is byte...

Page 67: ...This parameter is represented from Note24 define byte UnitLDN This parameter is represented from Note5 define byte UnitReg This parameter is represented from Note6 define byte UnitBit This parameter i...

Page 68: ...work Appliance FWS 7360 VOID Main Procedure AaeonWDTConfig byte Timer Time of WDT timer 0x00 0xFF boolean Unit Select time unit 0 second 1 minute AaeonWDTConfig Procedure AaeonWDTEnable This procudure...

Page 69: ...ableReg EnableBit 0 Clear Watchdog Timeout Status WDTClearTimeoutStatus WDT relative parameter setting WDTParameterSetting VOID WDTEnableDisable byte LDN byte Register byte BitNum byte Value SIOBitSet...

Page 70: ...0x01 IOWriteByte SIOIndex 0x55 IOWriteByte SIOIndex 0x55 Break Case 0x4E IOWriteByte SIOIndex 0x87 IOWriteByte SIOIndex 0x01 IOWriteByte SIOIndex 0x55 IOWriteByte SIOIndex 0xAA Break VOID SIOExitMBPn...

Page 71: ...SIOEnterMBPnPMode SIOSelectLDN byte LDN IOWriteByte SIOIndex Register TmpValue IOReadByte SIOData TmpValue 1 BitNum TmpValue Value BitNum IOWriteByte SIOData TmpValue SIOExitMBPnPMode VOID SIOByteSet...

Page 72: ...Network Appliance FWS 7360 Appendix B Appendix B I O Information...

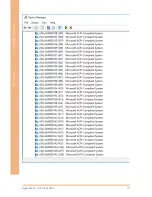
Page 73: ...Appendix B I O Information 60 Network Appliance FWS 7360 B 1 I O Address Map...

Page 74: ...Appendix B I O Information 61 Network Appliance FWS 7360...

Page 75: ...Appendix B I O Information 62 Network Appliance FWS 7360 B 2 Memory Address Map...

Page 76: ...Appendix B I O Information 63 Network Appliance FWS 7360...

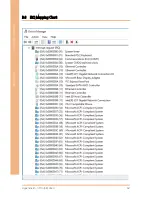
Page 77: ...Appendix B I O Information 64 Network Appliance FWS 7360 B 3 IRQ Mapping Chart...

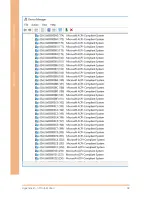
Page 78: ...Appendix B I O Information 65 Network Appliance FWS 7360...

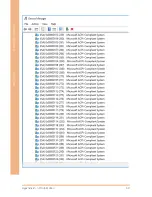
Page 79: ...Appendix B I O Information 66 Network Appliance FWS 7360...

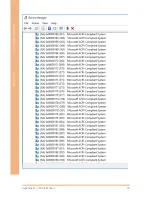
Page 80: ...Appendix B I O Information 67 Network Appliance FWS 7360...

Page 81: ...Appendix B I O Information 68 Network Appliance FWS 7360...

Page 82: ...Appendix B I O Information 69 Network Appliance FWS 7360...

Page 83: ...Appendix B I O Information 70 Network Appliance FWS 7360...

Page 84: ...Appendix B I O Information 71 Network Appliance FWS 7360...

Page 85: ...Appendix B I O Information 72 Network Appliance FWS 7360...

Page 86: ...Appendix B I O Information 73 Network Appliance FWS 7360...

Page 87: ...Appendix B I O Information 74 Network Appliance FWS 7360...

Page 88: ...Appendix B I O Information 75 Network Appliance FWS 7360...

Page 89: ...Appendix B I O Information 76 Network Appliance FWS 7360...

Page 90: ...Appendix B I O Information 77 Network Appliance FWS 7360...

Page 91: ...Network Appliance FWS 7360 Appendix C Appendix C Standard LAN Bypass Platform Setting...

Page 92: ...atus LED Configuration Table 1 Turth Table of Status LED STA_LED2 STA_LED1 STA_LED0 LED States 0 0 0 LED Off 0 0 1 Red 0 1 0 Red Blinking Slowly 0 1 1 Red Blinking Quickly 1 0 0 Reserved 1 0 1 Green B...

Page 93: ...arameter is represented from Note2 bData aaeonSmbusReadByte CPLD_SLAVE_ADDRESS OFFSET switch LED_FLAG case 0 LED Off BIT2 0 BIT1 0 BIT0 0 bData bData 0xF8 break case 1 Red LED On BIT2 0 BIT1 0 BIT0 1...

Page 94: ...e FWS 7360 BIT2 1 BIT1 1 BIT0 1 bData bData 0xF8 0x07 break case 5 Green LED Blink BIT2 1 BIT1 0 BIT0 1 bData bData 0xF8 0x05 break case 6 Green LED Fast Blink BIT2 1 BIT1 1 BIT0 0 bData bData 0xF8 0x...

Page 95: ...scription LAN_ID3 Use for selecting which LAN kit will be configured refert to Table 1 of ID Select table of LAN kit They should be set before ACT_EN LAN_ID2 LAN_ID1 LAN_ID0 PWR_ON Use for configuring...

Page 96: ...CPLD Slave Address 0x90 Note1 Attribute Offset SMBUS BitNum Value LAN_ID3 R W 0x01 Note2 3 Table 1 LAN_ID2 R W 0x01 Note2 2 Table 1 LAN_ID1 R W 0x01 Note2 1 Table 1 LAN_ID0 R W 0x01 Note2 0 Table 1 P...

Page 97: ...E_ADDRESS OFFSET Set Reg01h bit3 if bLanSel 0x08 bData bData 0x08 else bData bData 0xF7 Set Reg01h bit2 if bLanSel 0x04 bData bData 0x04 else bData bData 0xFB Set Reg01h bit1 if bLanSel 0x02 bData bDa...

Page 98: ...T Reset bData bData 0xEF else Bypass bData bData 0x10 SmbusWriteByte CPLD_SLAVE_ADDRESS OFFSET bData Apply Settings Reg01h bit7 bData SmbusReadByte CPLD_SLAVE_ADDRESS OFFSET SmbusWriteByte CPLD_SLAVE_...

Page 99: ...on which gets its status by the AAEON SDK C 3 2 LAN Bypass Configuration Table 2 LAN Bypass relative register table Function Description BTN_STS Reading this register returns the pin level status whic...

Page 100: ...ne Word BTN_STS This parameter is represented from Note1 define ByteBTN_STS_R This parameter is represented from Note2 Byte GET_Value Word IoAddr Byte BitNum Byte Value BYTE TmpValue TmpValue inportb...

Reviews: