


RoadRunner 84AP
GERMAN
DEUTSCH
DUTCH
NEDERLANDS
FRENCH
FRANÇAIS
POLISH
POLSKI
CZECH
Č
ESKY
HUNGARIAN
MAGYAR
SPANISH
ESPAÑOL
ITALIAN
ITALIANO
No
Windows XP
Installationsanweisung
Beknopte installatiegids
Guide d’installation rapide
Krótka instrukcja instalacji
Stru
č
ná p
ř
íru
č
ka pro instalaci
Üzembe helyezési útmutató
Guía de instalación rápida
Guida di installazione rapida
Netzwerkeinstellungen
Netwerkinstellingen
Réglages de réseau
Ustawienia sieci
Sí
ť
ová nastavení
Hálózati beállítások
Configuración de red
Impostazioni di rete
1.
- Öffnen Sie das Menü
Start
.
- Wählen Sie
Systemsteuerung
.
- Doppelklicken Sie auf das
Symbol
Netzwerkverbindungen
.
- Open het menu
Start
.
- Selecteer
Configuratiescherm
.
-
Dubbelklik op het pictogram
Netwerkverbindingen.
- Ouvrez le menu
Démarrer
.
- Sélectionnez
Panneau de
configuration
.
- Cliquez deux fois sur l’icône
Connexions de réseau
.
- Otwórz menu
Start
.
- Wybierz polecenie
Panel
sterowania
.
- Kliknij dwukrotnie ikon
ę
Po
łą
czenia sieciowe
.
- Otev
ř
ete nabídku
Start
.
- Vyberte p
ř
íkaz
Ovládací
panely
.
- Poklepejte na ikonu
Sí
ť
ová
p
ř
ipojení
.
- Nyissa meg a
Start
menüt.
- Válassza a
Vezérl
ő
pult
menüpontot.
- Kattintson duplán a
Hálózati
kapcsolatok
ikonra.
- Abra el menú
Inicio
.
- Seleccione
Panel de Control
.
- Haga doble clic en el icono
Conexiones de red
.
- Aprire il menu
Start
.
- Selezionare
Pannello di
controllo
.
- Fare doppio clic sull'icona
Connessioni di rete
.
2.
- Führen Sie den Mauszeiger
über das Symbol
LAN-
Verbindung
- Klicken Sie mit der rechten
Maustaste.
- Wählen Sie die Option
Eigenschaften
.
- Plaats de muis boven het
pictogram
LAN-verbinding
.
- Klik op de rechtermuisknop.
- Kies
Eigenschappen
.
- Déplacez la souris sur l’icône
Connexion locale
- Faites un clic droit.
- Choisissez
Propriétés
- Umie
ść
kursor myszy na ikonie
Po
łą
czenie lokalne.
- Naci
ś
nij prawy przycisk myszy.
- Wybierz polecenie
W
ł
a
ś
ciwo
ś
ci
.
- P
ř
esu
ň
te ukazatel myši na
ikonu
P
ř
ipojení k místní síti
.
- Stiskn
ě
te pravé tla
č
ítko myši.
- Vyberte volbu
Vlastnosti
.
- Vigye az egér mutatóját a
Helyi
kapcsolat
ikonra.
- Nyomja meg az egér jobb oldali
gombját.
- Válassza a
Tulajdonságok
menüpontot.
- Sitúe el
mouse
(ratón) sobre
el icono
Conexión de área
local
- Pulse el botón secundario del
mouse
- Seleccione
Propiedades
.
- Spostare il mouse sull'icona
Connessione all'area locale.
- Premere il tasto destro del
mouse.
- Selezionare
Proprietà
.
For Internet connection
For Internet connection
For Internet connection
For Internet connection
For Internet connection
For Internet connection
For Internet connection
For Internet connection
3.
- Wählen Sie die Option
Internetprotokoll (TCP/IP)
.
- Klicken Sie auf
Eigenschaften
.
-
Stellen Sie sicher, dass
IP-
Adresse automatisch
beziehen
aktiviert ist.
- Klicken Sie auf
OK
.
- Kies
Internet-protocol (TCP/IP)
- Klik op
Eigenschappen.
- Controleer of
Automatisch een
IP-adres verkrijgen
is
geselecteerd.
- Klik op
OK.
- Choisissez
Protocole Internet
(TCP/IP)
- Cliquez sur
Propriétés.
-
Cochez
Obtenir une adresse IP
automatiquement
.
- Cliquez sur
OK
.
- Wybierz pozycj
ę
Protokó
ł
internetowy (TCP/IP).
- Kliknij przycisk
W
ł
a
ś
ciwo
ś
ci.
-
Upewnij si
ę
,
ż
e pole wyboru
Uzyskaj adres IP automatycznie
jest zaznaczone.
- Kliknij przycisk
OK
.
- Vyberte volbu
Protokol sít
ě
Internet (TCP/IP)
.
- Vyberte volbu
Vlastnosti
.
-
Zkontrolujte, že je vybrán
p
ř
epína
č
Získat adresu IP ze
serveru DHCP automaticky
.
- Stiskn
ě
te tla
č
ítko
OK
.
- Válassza a
TCP/IP protokoll
lehet
ő
séget.
- Nyomja meg a
Tulajdonságok
gombot.
-
Gy
ő
z
ő
djön meg arról, hogy az
IP-cím automatikus kérése
lehet
ő
ség van kiválasztva.
- Nyomja meg az
OK
gombot.
- Seleccione
Protocolo
Internet (TCP/IP)
- Pulse
Propiedades.
-
Compruebe que la opción
Obtener una dirección IP
automáticamente
está
seleccionada.
- Pulse
Aceptar
.
- Scegliere
Protocollo Internet
(TCP/IP).
- Selezionare
Proprietà.
-
Assicurarsi che sia
selezionato
Ottieni
automaticamente un
indirizzo IP
.
- Premere
OK
.
Verwaltung mithilfe des
Browsers
Browserbeheer
Gestion avec navigateur
Zarz
ą
dzanie za pomoc
ą
przegl
ą
darki
Správa pomocí prohlíže
č
e
Kezelés böngész
ő
segítségével
Administración con un
navegador
Gestione del browser
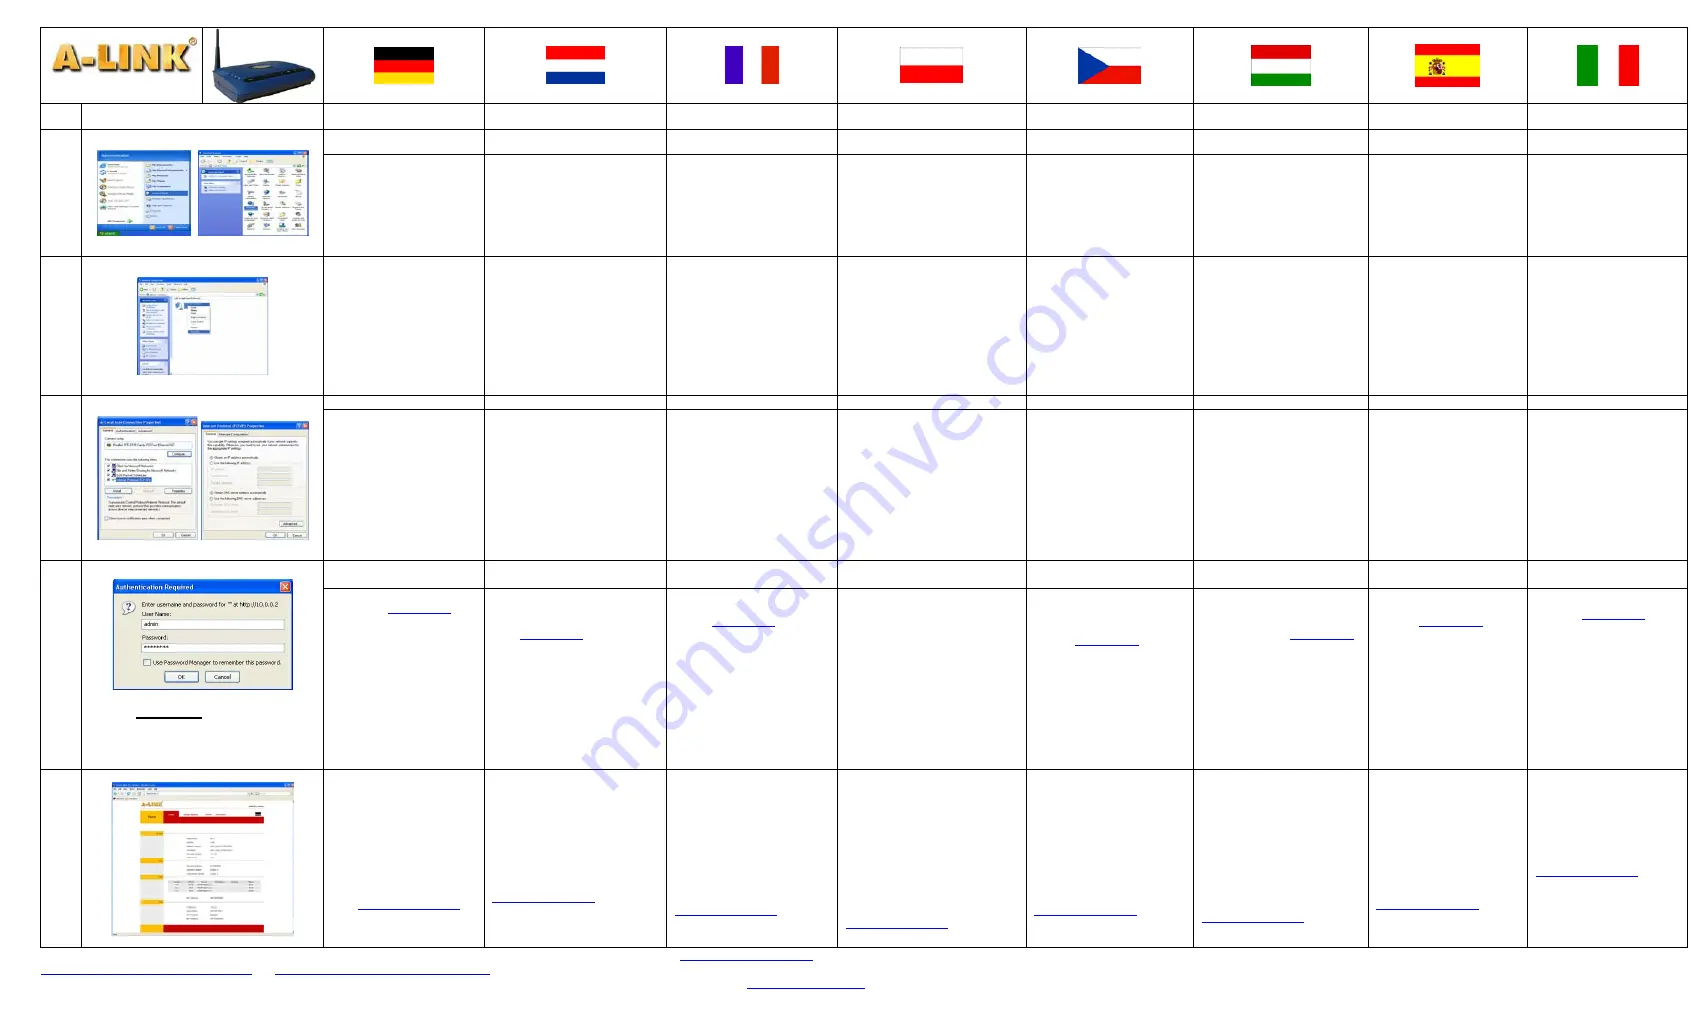
4.
Full access:
User ID = admin
Password = password
- Öffnen Sie den Browser.
- Geben Sie
in
das Adressfeld ein.
- Drücken Sie die
EINGABETASTE
.
- Benutzerkonten und
Kennwörter werden zu
Beginn dieses Schritts
erwähnt.
Unterstützte und getestete
Internetbrowser sind:
Internet
Explorer 6
oder höher und
Netscape 7
oder höher.
- Open de browser.
- Typ
in het adresvak.
- Klik op
Enter
.
- Aan het begin van deze stap
worden de accounts en
wachtwoorden genoemd.
Ondersteunde en geteste Internet-
browsers zijn:
Internet Explorer 6
of later en
Netscape 7
of later.
- Ouvrez votre navigateur.
- Tapez
dans le
champ d’adresse
- Appuyez sur
Entrée
.
- Les comptes d’utilisateur et les
mots de passe sont mentionnés
au début de cette étape.
Les navigateurs Internet
supportés et testés sont :
Internet
Explorer 6
ou plus récent et
Netscape 7
ou plus récent.
- Otwórz przegl
ą
dark
ę
.
- W polu adresu wpisz
„
http://10.0.0.2
”.
- Naci
ś
nij klawisz
Enter
.
- Konta u
ż
ytkowników i has
ł
a zosta
ł
y
omówione na pocz
ą
tku tego kroku.
Obs
ł
ugiwane i przetestowane
przegl
ą
darki internetowe to:
programy
Internet Explorer 6
lub
nowszy oraz
Netscape 7
lub nowszy.
- Otev
ř
ete prohlíže
č
.
- Do pole pro adresu zadejte
- Stiskn
ě
te klávesu
Enter
.
- Uživatelské ú
č
ty a hesla jsou
uvedena v úvodu tohoto kroku.
Podporované a testované
prohlíže
č
e Internetu:
Internet
Explorer 6
nebo nov
ě
jší a
Netscape 7
nebo nov
ě
jší.
- Nyissa meg a böngész
ő
t.
- A Cím mez
ő
be írja be a
következ
ő
címet:
- Nyomja meg az
Enter
billenty
ű
t.
- A felhasználói fiókokról és a
jelszavakról a lépés elején
olvashat.
A támogatott és tesztelt
internetböngész
ő
k a következ
ő
k::
Internet Explorer 6
vagy újabb,
illetve
Netscape 7
vagy újabb.
- Abra el navegador.
- Escriba
en el
campo de dirección
- Pulse
Entrar
- Las cuentas y las contraseñas
de los usuarios se indican al
inicio de este paso
Los navegadores de Internet
compatibles son:
Internet
Explorer 6
o superior y
Netscape 7
o superior.
- Aprire il browser.
- Digitare
nel
campo dell'indirizzo.
- Premere
Invio
.
- All'inizio di questa procedura
vengono menzionati gli
account utente e le password.
I browser supportati e
collaudati sono:
Internet
Explorer 6
o le versioni
successive e
Netscape 7
o le
versioni successive.
5.
- Auf der Hauptseite können
Sie feststellen, ob die ADSL-
Leitung des Routers aktiv.
Das vollständige Handbuch,
ISP-Anleitungen und sonstige
Dokumentationen erhalten Sie
unter
- Na stronie g
ł
ównej mo
ż
na
sprawdzi
ć
, czy us
ł
ugodawca
internetowy przydzieli
ł
routerowi
lini
ę
.
Ca
ł
y podr
ę
cznik, instrukcje
korzystania z ustawie
ń
us
ł
ugodawców internetowych i inn
ą
dokumentacj
ę
mo
ż
na pobra
ć
pod
adresem
- Na hlavní stránce uvidíte, zda
je linka ADSL pro sm
ě
rova
č
dostupná.
Úplné verze p
ř
iru
č
ek, návody
pro nastavení poskytovatele
služeb Internetu a další
dokumentaci naleznete na adrese
- A f
ő
oldalon láthatja, hogy az
útválasztón aktív-e az ADSL-
vonal.
A következ
ő
helyen teljes
használati útmutatót,
internetszolgáltatókkal kapcsolatos
útmutatókat és egyéb
dokumentációkat találhat:
- Sur la page principale, vous
pouvez vérifier si le routeur
dispose d’une ligne ADSL
active.
Le manuel complet, les guides de
FAI et d’autres documents sont
disponibles à :
- En la página principal puede
verse si el router tiene la
línea ADSL activada.
Para consultar un manual
completo, las guías de ISP u
otra documentación, acceda a
- Nella pagina principale si può
vedere se sono disponibili la
linea ADSL.
Presso il sito
sono disponibili il manuale
completo, le guide ISP ed altra
documentazione.
- Op de hoofdpagina ziet u of de
router ADSL-line-up.
De complete handleiding, ISP-
gidsen en andere documentatie kunt
u vinden op
This product contains open source software. You can download the source code for this product software release from the Internet at
. The license conditions can be found at the following websites:
7d26T RoadRunner 84AP Europe
http://www.fsf.org/licensing/licenses/gpl.txt
http://www.fsf.org/licensing/licenses/lgpl.txt
. Additionally you can request the corresponding source code CD from A-Link by paying a 7€ for the physical act of transferring
the
copy.
Copyright
©
2007
A-Link
Please send your name and post address together with a date of purchase, EAN code, serial number and software release number of the product to:
All rights reserved


