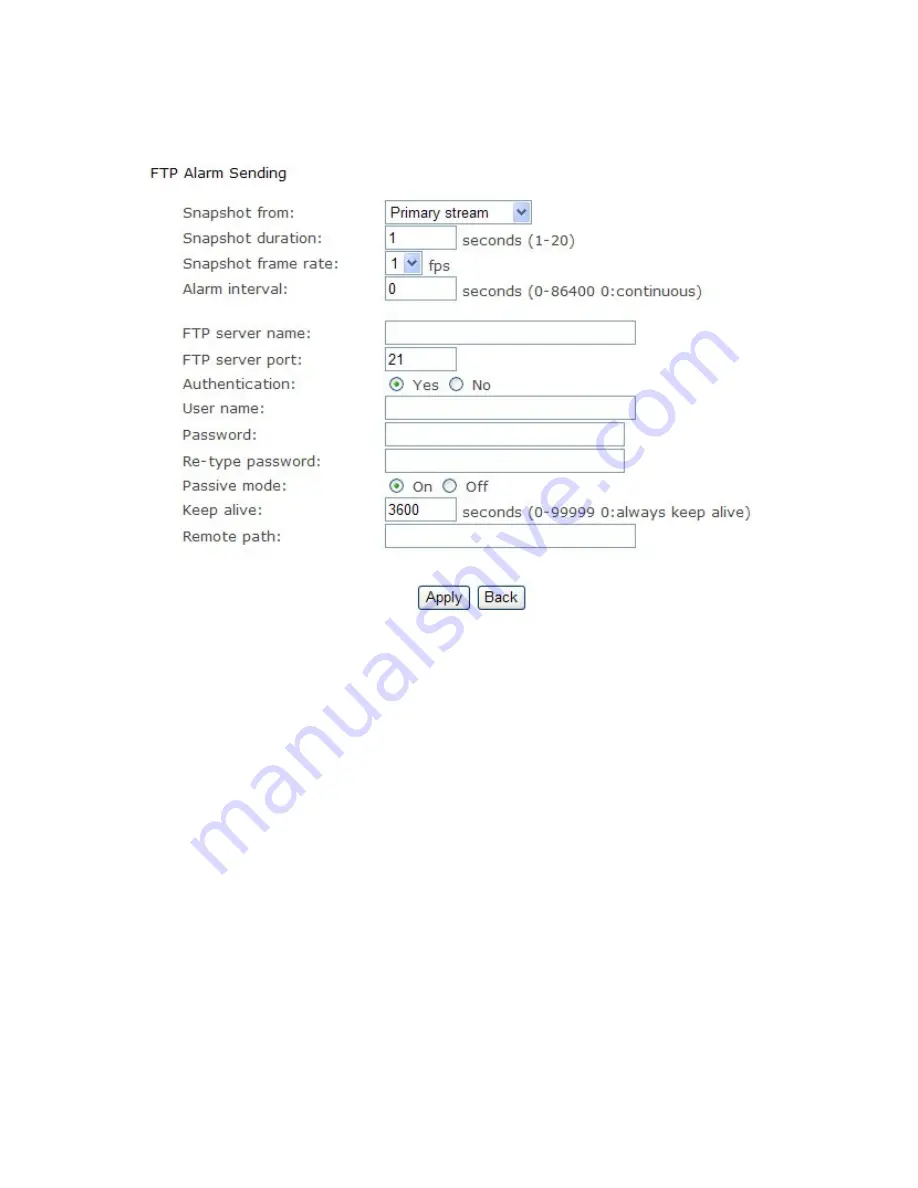
background image


43

FTP alarm sending 


[Snapshot from] 

Primary stream.


[Snapshot duration] 

Input the duration time. 

[Snapshot frame rate] 

Select the number of frame per second. 

I Alarm interval] 

Type the interval time.


[FTP server name] 

Input the FTP server name.


[FTP server port] 

As default 21. 

[Authentication] 

Select Yes. 

[User name] 

Type your FTP user name. 

[Password] 

Type your FTP password.


[Re-type password] 

Re-type FTP password. 

[Passive mode] 

Select on or off.


[Keep alive] 

Input the time. 

[Remote path] 

Input the file directory. 


Click 

Apply 

to confirm your setting. 


Summary of Contents for AWB-IR

Page 1: ... Installation Manual AWS IR Indoor Alpha Image Wireless Square Network Camera with IR Please read this manual carefully before you attempt to install this product and retain it for your future reference ...

Page 2: ...ital I O Setup 38 Schedule Setup 38 Task Management 39 Email alarm sending 40 Email periodic sending 41 FTP alarm sending 42 FTP periodic sending 43 HTTP alarm sending 44 HTTP periodic sending 45 Snapshot to storage on alarm 46 Snapshot to storage periodically 46 Record to storage on alarm 47 Record to storage continuously 47 Sending files in storage to FTP server 48 Tools 49 System Identity 49 Us...

Page 3: ...rference in a residential installation This equipment generates uses and can radiate radio frequency energy and if not installed and used in accordance with the instructions may cause harmful interference to radio communications However there is no guarantee that interference will not occur in a particular installation If this equipment does cause harmful interference to radio or television recept...

Page 4: ...o direct sunlight 4 Do not place the product near any magnetic objects 5 Avoid putting the product in places where there is constant temperature and humidity change 6 Keep the product away from heat sources 7 Do not use the camera near aggressive chemicals 8 Do not use this camera near water 9 Do not use the camera in the places which are enclosed by metal The surrounding metal may shield the elec...

Page 5: ... to protect you from illegal intrusion 3GPP Mobile Surveillance The camera provides the ability to view the cameras monitored through your mobile phone as a live video stream it supports the telecommunications standard of 3GPP streaming format All 3G enabled mobile devices and most 2G phones that support the streaming standard of 3GPP are compatible Simultaneous High Speed MPEG 4 and Motion JPEG T...

Page 6: ...registered users from accessing your camera Users can select Basic Authentication method or Digest Access Authentication method Multi Client Access The camera allows up to 16 users to view the video simultaneously Please note that it is possible that as the number of simultaneously connected users to camera increases the overall motion performance will decrease Infrared Night Vision AWS IR Alpha I...

Page 7: ...e network must meet the following technical specifications for camera to work properly 1 Processor Intel Pentium III 1GHz or Higher Pentium IV 2 GHz or Higher recommended 2 RAM 256 MB or more 3 Color Monitor Suggest at least 800x600 and the latest driver for the Display Adapter 4 OS Operating System Windows 2000 XP Vista 5 Web Browser Internet Explorer Version 5 0 or above DirectX 9 0c or later 6 ...

Page 8: ... the other end into an electrical socket see figure below Check that the power indicator is lit on the front of the camera Note Please handle the power adapter carefully to avoid the risk of accidental electric shock Camera Setup Installation Usage The camera Setup utility can easily and quickly detect cameras connected to your local network and list them on the Camera Setup window also you can us...

Page 9: ...matically See image below If it does not click Start then Run In the text field enter D autorun exe if D is the letter of your CD ROM Drive 2 Click on Install Camera Setup and the following screen will be displayed 3 If you want to change the default folder click Change to replace otherwise click Next ...

Page 10: ... Finish to end the installation You should now find a icon on the desktop 6 Double click the Camera Setup icon on the Desktop to launch the program The Camera Setup utility should automatically find your camera if is correctly connected See image below ...

Page 11: ...ess to the Camera with Camera Setup 1 Launch Camera Setup program to detect cameras on the local network 2 Click on Setup button and the following setup interface will pop up 3 Enter a unique name for the camera the location optional and leave the default port number as 80 Obtain an IP address automatically and Obtain DNS server address automatically are selected by default if you are confident en...

Page 12: ... the secondary DNS server 6 Enter the details noted in step 5 into the relevant fields Note The default IP address of the camera is 192 168 168 100 This can be changed to any IP address on your IP range For example if the IP address of your PC is 192 198 1 52 then the IP address of your camera should be unique and on the same subnet i e 192 198 1 X where X is any number between 1 and 255 except 52...

Page 13: ... choose to click on the item Enter to access the picture viewing interface or the item Setting to access the system setting interface The below dialog will appear Input the correct username the default is admin in lowercase and password the default is admin in lowercase You are allowed to enter the picture viewing interface or the system setting interface The general users assigned by the administ...

Page 14: ...14 2 If your OS is Windows XP click My Network Places double click the icon You will see the home page 3 Run the Camera Setup and double click the relevant camera item ...

Page 15: ...15 Operating Bar Click Enter you will see the screen ...

Page 16: ...16 ...

Page 17: ...17 Viewing the camera from your mobile devices iOS requires iOS4 3 version or later Android OS requires version2 3 or later View on iPhone iPad Android devices ...

Page 18: ...assword in order to avoid unauthorized access to the camera To do this follow the instructions by clicking on the underlined link here to access administrator password editing page 2 Type the password in both fields then click Save Please take note of the password If you forget the password the camera will have to be reset to its default settings in order to gain access to the settings page and th...

Page 19: ...19 3 You are required to re login with the changed password After successful login the following page will appear ...

Page 20: ...dio parameters of the camera Enable privacy mode Videos will not be seen Light frequency Two options 50Hz 60Hz Set according to the mains frequency in the country of use For UK Belgium or the Netherlands this would be 50Hz Microphone Enable or disable the microphone Speaker Choose to allow speaker function And choose the volumn of the speaker Click Apply to confirm your settings ...

Page 21: ...21 Stream Setup ...

Page 22: ...176 x 144 and also 0 3 Megapixel Frame rate Twelve options 1 2 3 4 5 6 8 10 15 20 25 30 frames per second fps H 264 MPEG4 bit rate Select H 264 MPEG4 bit rate Eight options 64 128 256 512 768 1024 1536 2048 kbps JPEG quality Type MJPEG video quality 20 100 20 is low quality 100 is high quality Audio Enable or disable audio Authentication Enable or disable ...

Page 23: ...am list as below You can use RealPlayer VLC Player or QuickTime Player to play the live stream from camera in Intranet or Internet Secondary stream Enable or disable secondary stream Mobile stream Enable or disable Mobile stream You can use mobile phone Realplayer and QuickTime Player to play the live stream from camera The size of video is 176x144 ...

Page 24: ...en OSD Enable or disable OSD function Transparent Users can select whether change OSD to transparent or not Display date and time OSD is date and time of camera Display system name OSD is system name of camera Display the text OSD is user defined text Click Apply to confirm your settings ...

Page 25: ...e environment is dark the LED will be opened automatically due to a photosensitive component Users also can select open or close the infrared LED manually Black and white mode When the environment is dark the moving images will be changed to Black and White automatically Users also can select whether change the images to black and white or color manually IR cut filter control Click to choose Auto ...

Page 26: ...ta communication SSID Type the ID of the wireless network you want to connect to using up to 32 ASC characters or click Search to search for available networks Mode Infrastructure mode and Adhoc mode Adhoc Mode Select Adhoc mode when the camera is directly connected to your computer Infrastructure Mode Select Infrastructure mode when the camera is connected via an access point or router ...

Page 27: ...decimal or ASC characters WEP key Index Specify up to 4 WEP keys WEP Key Type the password R type WEP Key Re confirm the password When select Infrastructure mode See figure above Security mode Security mode is not only WEP64bit or WEP128bit but also WPA PSK or WPA2 PSK Encryption type TKIP and AES WPA key Type 8 63 characters as password Re type WPA key Re confirm the password ...

Page 28: ...whether connection is successful Note These settings have to match those of your access point or router Please consult your access point or router manual on how to verify or modify these settings TCP IP Setup The camera is set up to obtain the IP address automatically DHCP by default Should you may wish to assign the IP address manually use the TCP IP Setup page to enter the address details Obtain...

Page 29: ...r address automatically If your network supports a DHCP server e g router select this option to have the DNS Server address is assigned automatically Use the following DNS server address Primary DNS IP address Type the IP address of the primary DNS server Secondary DNS IP address Type the IP address of the secondary DNS server if necessary HTTP RTSP port The default HTTP port number is 80 it is al...

Page 30: ...s and route your Domain name to that address when you wish to connect to the camera from a remote location DDNS Enable or disable DDNS connection How to add DDNS 1 Enable the Dynamic DNS function 2 Select your preferred DDNS service provider from the list then click Register 3 Enter the Host Name details and password supplied by your DDNS service provider when you registered 4 Click Apply to confi...

Page 31: ... rule automatically In this rule the internal port is camera default port 80 the external port is 8150 IP address is camera s IP Use this setting users can visit the camera from Internet through the router with this URL http routeripaddress 8150 If there are several cameras in Local Network the first one which first be opened will use 8150 as external port and second one will use 8151 third one us...

Page 32: ...32 If DDNS setup successfully and go into effect Internet URL will show DDNS host name instead See figure below for example ...

Page 33: ...p Click P2P Setup then click Enable and apply to add P2P functions Now we can use P2P to view cameras on PC or iPhone iPad and Android Only need to input UID and passward Take viewing on PC and iPhone for example ...

Page 34: ...Storage Select Enable Store to NAS or SD Card Store directory The file that Videos will be saved to Max Space Unlimited The capacity of all videos Max files The Max quantity of all the videos Click Apply to confirm your setting ...

Page 35: ... 50 ipcam_files Authorization Select Yes User name Input the NAS user name Password Input NAS password Re type password Re type the NAS password Click Apply to confirm your setting Browse Storage When click Browse Storage and you can browse download delete the snapshot and recording files in it ...

Page 36: ...36 Format SD Card To format SD card all files will be lost after formatting the card Task ...

Page 37: ...tocol You can set up to four different Motion Detection windows Window Check this box to enable the window Threshold Set the threshold bar to the amount of motion required to trigger the alarm Sensitivity Set the measurable difference between two sequential images that would indicate motion Click Apply to confirm your setting ...

Page 38: ...38 ...

Page 39: ...output s active state is Open or Grounded Click Apply to confirm your setting Schedule Setup Alarm Sending Periodical Sending and Buffer Sending sends images via e mail or FTP according to schedule setup Every day Select every day or not Sunday Saturday Select Sunday Saturday or not Always Enable in any time Range Enable between start time and end time ...

Page 40: ...40 Except Enable except start time to end time Click Apply to confirm your setting Task Management ...

Page 41: ...name Input your E mail s SMTP server name SMTP server port 25 as default Secure SSL connection Select No For Gmail select Yes It depends on the mail system Authentication Select Yes User name Input your E mail user name Password Input your E mail password Sender mail address Input the sender mail address Receiver mail address Input the receiver mail address Click Apply to confirm your setting ...

Page 42: ...42 E mail Period Sending Periodic interval Input the interval time The rest setting is the same as E mail Alarm Sending Click Apply to confirm your setting ...

Page 43: ...nterval Type the interval time FTP server name Input the FTP server name FTP server port As default 21 Authentication Select Yes User name Type your FTP user name Password Type your FTP password Re type password Re type FTP password Passive mode Select on or off Keep alive Input the time Remote path Input the file directory Click Apply to confirm your setting ...

Page 44: ...44 FTP periodic sending Periodic interval Input the interval time The rest setting is the same as FTP Alarm Sending Click Apply to confirm your setting ...

Page 45: ...HTTP server name HTTP server port As default 80 Authentication Select Yes I User name Type your HTTP user name Password Type your HTTP password Re type password Re type your HTTP password Sending URL Input Input the URL the camera will give an alarm to it Click Apply to confirm your setting ...

Page 46: ...46 HTTP periodic sending Period interval Input the interval time The rest setting is the same as HTTP Alarm Sending Click Apply to confirm your setting ...

Page 47: ...n Select the time Snapshot frame rate Select the frame IAlarm interval Input the interval time Click Apply to confirm your setting Snapshot to storage periodically Period interval Input the interval time The rest setting is the same as Snapshot to storage on alarm Click Apply to confirm your setting ...

Page 48: ...duration time The videos will be split Record thumbnail Select Enable or Disable Click Apply to confirm your setting Record to storage continuously Record from Select Primary stream Split duration Input the split duration time The videos will be split Record thumbnail Select Enable or Disable Click Apply to confirm your setting ...

Page 49: ...rver port As default 21 Authentication Select Yes IUser name Type the FTP user name Password Input the FTP password IRe type password Re input the FTP password Passive mode Select on or off Keep alive Input the time Remote path Input the file directory Click Apply to confirm your setting ...

Page 50: ...camera System Contact Type the contact name of the administrator of the camera System Location Type the location of the camera TIP The information you fill in can be displayed on the camera It can help to distinguish different Network Cameras in the network See figure below ...

Page 51: ... increase the overall performance will decrease This is dependant on the Network bandwidth Adding users 1 Click Add on the Camera User List page 2 Enter the User name Password and re confirm the password then click Add To edit a user s password click on the user name then enter the new password for that user twice and click Save To delete a user click on the user name then click Delete ...

Page 52: ...s called in many countries is a way of getting more light out of the day by advancing clocks by one hour during the summer Date and time format Select date and time format Auto time setting SNTP Enable or disable this function Time server Type one SNTP server name in the box Click Apply to confirm your settings Note 1 If the SNTP server is not found the camera s time will be synchronized with the ...

Page 53: ...current configuration of the camera for future reference Browse Click Browse to search for a backup configuration you wish to upload to the camera then click Restore Note Do not turn off the power during the Reset Backup or Restore functions since this might corrupt the camera s firmware Tip The camera can also be reset to the default settings by pressing the reset switch on the side of the camera...

Page 54: ... you first need to download this firmware from Network Camera Technical Support Site 1 Click Continue 2 Click Browse to search for the newest Firmware you downloaded and then click Upgrade 3 Click Reboot when the upgrade terminates IMPORTANT Do not unplug or power off the camera while the upgrade is in progress ...

Page 55: ...here is a Wizard that helps non technical users setup the camera easily Click on Wizard at the top of the window to launch the wizard The Quick setup interface will pop up Follow the simple instructions on the screen and enter the required details clicking next to proceed to the Next page ...

Page 56: ...a of the software activity of the camera and recorded in this It includes data that are useful when a problem occurs Support Click Support to see the support information Reboot Click Reboot to restart the camera Rebooting the camera will retain all the settings and configurations ...

Page 57: ...router for remote access to your camera Check your router s user manual for specific instructions on how to open and route ports on you router Important Some ISPs block access to port 80 and other commonly used Internet ports Check with your ISP in order to open the appropriate ports If your ISP does not pass traffic on port 80 you will need to change the camera s default port number from 80 to a ...

Page 58: ...cted to the internet The proxy server may cause lack of image quality and delays in refresh intervals Consult your ISP or network administrator for further details 1 Start Internet Explorer 2 Select Tools Internet Options Connections tab and click LAN Settings Verify that the Use a proxy server check box is not checked When checked click Advanced When not checked click Cancel Your proxy server set...

Page 59: ...pened windows Reset the camera There are two ways to reset the camera back to its factory defaults 1 Press the Reset button on the side of the camera through the pin hole 2 Through the camera setup under the heading Backup or Reset ...

Page 60: ...Disable Image size 512 x 288 Frame rate 30fps H 264 MPEG4 bit rate 512kbps MJPEG quality 50 Snapshot quality 90 Audio Enable RTSP authentication Enable Mobile stream Enable Image size 176 x 144 Frame rate 10fps H 264 MPEG4 bit rate 64kbps Snapshot quality 70 Audio Disable RTSP authentication Enable OSD Setup OSD Disable Transparent Enable Display Display date and time Night Vision Setup Infrared L...

Page 61: ...ble Gateway HTTP RTSP port forwarding Enable External HTTP RTSP port range 8150 8350 Gateway RTP port forwarding Enable External RTP port range 30000 30200 Alarm Motion Detection Window 1 Blank Window 2 Blank Window 3 Blank Window 4 Blank Schedule Setup Every day Always Alarm Sending Alarm mode Arm FTP alarm sending Disable Trigger time 5 Trigger FPS 1 FTP server ID 1 Remote path Blank Snapshot fr...

Page 62: ...ays e Mail periodical sending Disable Interval time 0H 1M 0S 0mS e Mail server ID 1 File attachment On Snapshot from Primary stream Image file name P Suffix of file name Date time Effective period Always HTTP periodical sending Disable Interval time 0H 1M 0S 0mS HTTP server ID 1 Sending URL Blank Use MAC address as URL suffix Disable Effective period Always Buffer Sending Image buffer Disable Buff...

Page 63: ...nk Subject Warning from Network Camera Message Blank HTTP Server HTTP server ID 1 HTTP server name Blank HTTP server port 80 Authorization No User Name Blank Password Blank Re type Password Blank Tools System Identity System Name Network Camera System Contact Default Contact System Location Default Location User Management 1 Admin Administrators Date Time Current Device Time Current PC Time Time Z...

Page 64: ...64 SPECIFICATIONS ...

Page 65: ...ure viewing interface does not appear 1 Check that your internet explorer settings allow you to download and install ActiveX controls 2 Maximum 16 users are allowed to access the camera simultaneously through network 3 Network traffic may prevent the viewing interface from appearing quickly Wait for a while How many users can view the same camera at the same time 16 How many cameras can we view in...

Page 66: ...Because the Mac OS only support QuickTime player in browsers So it delays 2 seconds Other OS will not delay Why we see strips in the videos Because of the electricity Some country like USA is 60Hz yet Europe is 50Hz For example In USA the camera should choose 60Hz otherwise we will see strips in the videos The following picture is the steps How to set the video quality in iPhone iPad Android devic...

Page 67: ...67 ...

Page 68: ...68 ...

Page 69: ... functioning of the Internet Each computer connected to the Internet is identified by a unique IP Address 9 SMTP Simple Mail Transfer Protocol 10 FTP File Transfer Protocol Network cameras equipped with an embedded operating system such as Linux can use FTP to send images to a website 11 DHCP Dynamic Host Configuration Protocol is a set of rules used by communications devices such as a computer ro...

Page 70: ...70 ...

Reviews: