background image

Creating “Humanness” and Motion (con't)

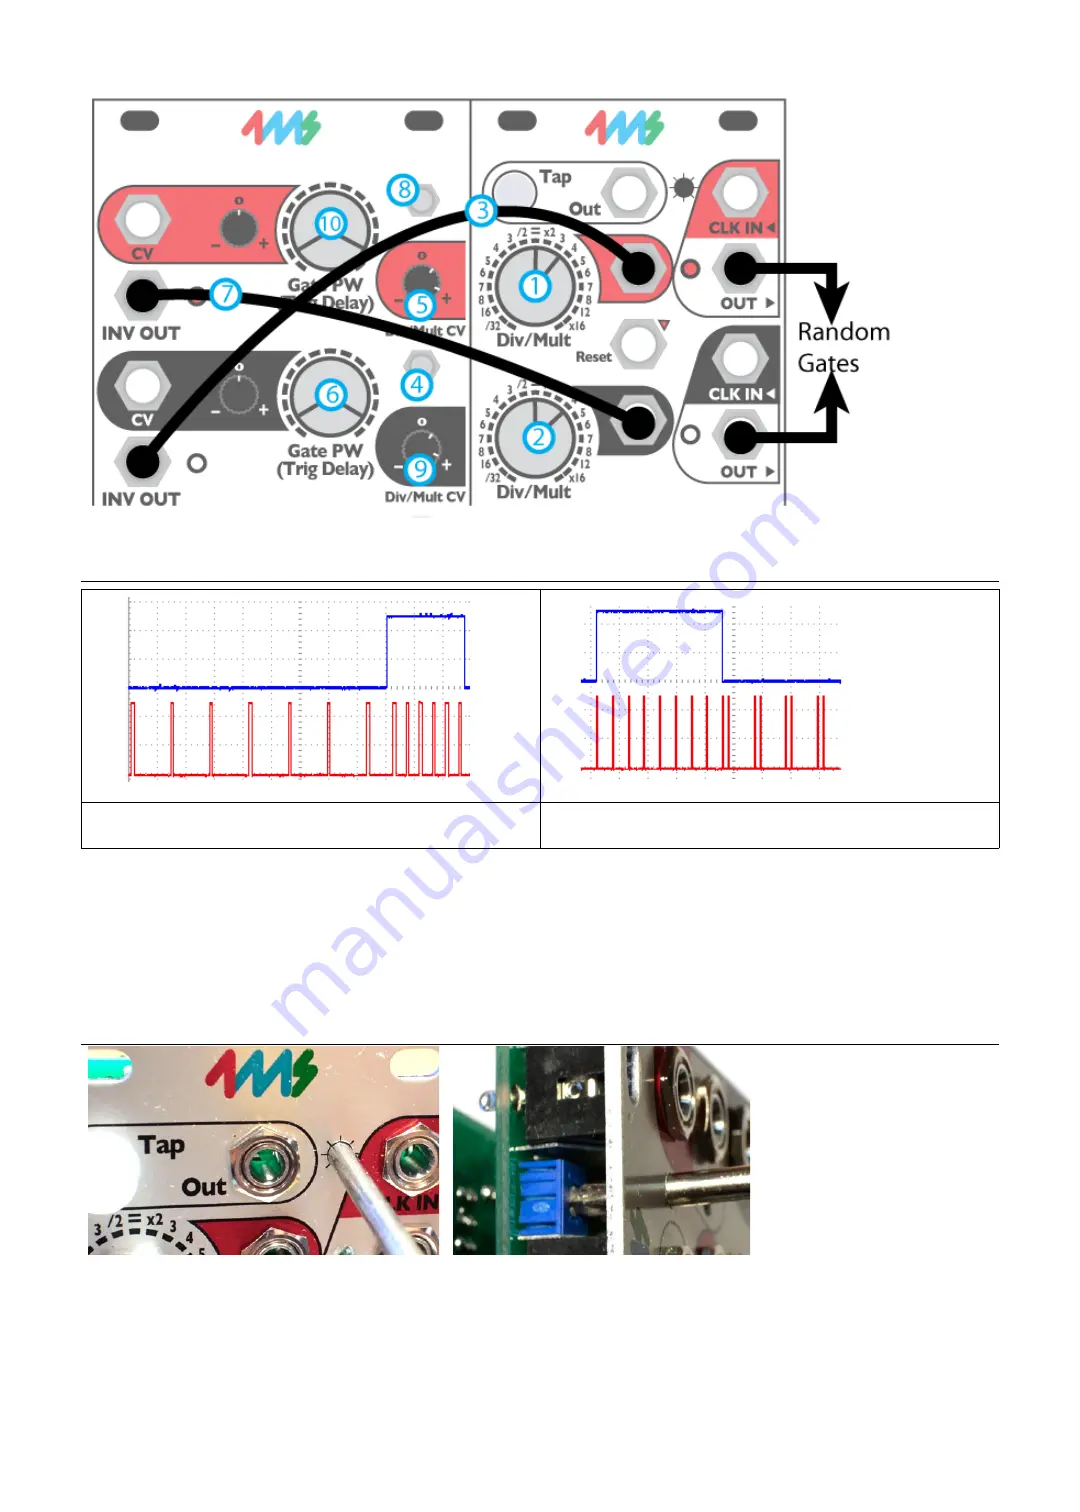
In the patch below, different settings of the knobs (Gate PW, Div/Mult, and Div/Mult CV attenuator on red and black channels)
will give different “random” patterns. Try combining the two gate outputs to get a four-note random melody.

Creating Fills

Bottom channel speeding up a the end of the measure via 
top channel patched into Div/Mult CV.

Bottom channel changing shuffle, via top channel patched 
into PW CV.

This is an easy patch with the QCD. Just run the INV OUT of a slow channel (/8, for example) into the Div/Mult CV jack of a 
faster channel (x4, for example). Set the slower channel's Mode Switch to center (Inverted Gate mode). Turn the faster 
channel's Div/Mult CV attenuator slightly to the right of center to set how fast the fill will be. Adjust the slower channel's Gate 
PW to set the length of the fill (number of beats).
Another way of making a fill is to use the PW CV jack instead of the Div/Mult CV jack. If the faster channel is in Shuffle Mode, 
then the shuffle amount will change at the end of the “measure”. Of course for either of these patches, the OUT jack of the 
slower channel could be used to make the change happen at the beginning of the “measure”.

Adjusting LED Brightness

The brightness of the LEDs can 
be adjusted from very dim to 
very bright (producing a light 
show on your face). 
 
You should leave the unit 
powered on while you do this, 
so you can watch the LEDs 
change. You will need a small 
screwdriver (#0 size phillips tip, 
and 1/8" [3mm] or smaller 

diameter shaft). Carefully insert the screwdriver into the LED adjustment hole as shown in the photo. Make sure the 
screwdriver is perpendicular to the panel. You should feel contact with the trim pot, which is a short distance below the 
surface of the panel. Turn the screwdriver slowly. If you turn all the way to the left (counter-clockwise) the LEDs will turn 
almost off. If you turn all the way to the right (clockwise) the LEDs will be painfully bright to view (sunglasses optional).

If you're not sure if the screwdriver is the right size to turn the trimpot, remove the QCD Expander from the rack. The trimpot 
is visible from the top edge of the module, so you can visually inspect if the screwdriver is fitting. Forcing the wrong 
screwdriver can damage the trimpot.

Summary of Contents for QCD Expander

Page 1: ... each INV OUT jack Delayed Trigger Mode Inverted Gate Mode Shuffle Mode delayed original trigger PW Delay knob controls trigger delay time on INV OUT jack or pulse width in Inverted Gate Mode Also controls Pulse Width of main QCD OUT jack CV input jack for external control Attenuverter allows for one channel to precisely modulate another channel s delay or pulse width Div Mult CV attenuator knob C...

Page 2: ...inverted and or shuffled Three position Mode Switch each channel Only effects the INV OUT jack on the Expander no effect on the main QCD output Left Delayed Trigger mode Center Inverted Gate mode Right Shuffle mode delayed undelayed effectively doubles the tempo Trigger Delay Pulse Width big knob attenuverter and jack Depending on the Mode Switch either trigger delay time or pulse width is control...

Page 3: ...imum for example Div Mult would sweep from to x16 A 10V signal will sweep the parameter from minimum to maximum 32 to x16 Turning the knob slightly to the left means a positive signal will decrease the parameter slightly for example Div Mult might sweep from to 2 At fully counter clockwise a 5V signal will sweep from half way to minimum e g to 32 When patching one QCD channel into another s Div Mu...

Page 4: ...nob to the right Adjust black Gate PW To the left the red channel will spend more time being slow To the right it ll spend more time being fast Set red Mode Switch to the left or right Try both and listen for the difference more hits to the right Adjust red PW Delay if you want to play with a timing offset Now let s add some phase shifting hi hats The blue channel is set to shuffle mode and Trig D...

Page 5: ...ing to how it changes the hats pattern Kick conga pitch Turn Green Div Mult to 32 Run the Green OUT to your kick drum patch to modulate the pitch every 4 bars Hint Really you might want to run Green OUT into an RCD or another QCD and use one of those outputs to modulate pitch This gives you more flexibility since the Green channel will also be tied to the Clap sound Flip Green Mode Switch to the r...

Page 6: ...ways ranges from 0V to 5V positive voltage so technically it s an inverted and shifted gate output What this means is when the main QCD output goes high from 0V to 5V the INV OUT goes low from 5V to 0V and vice versa Gate PW Trig Delay always controls the pulse width of the main QCD OUT and so in Inverted Gate Mode it inversely controls the pulse width of the INV OUT Thus if Gate PW is set to 75 t...

Page 7: ...to set one channel to x2 and a second channel to 4 Patch the slower channel s main OUT jack into the faster channel s Div Mult CV jack both jacks are located on the main QCD panel Make sure the Pulse Width of the main channel is reasonable start with 50 Now adjust the faster channel s Div Mult CV attenuator carefully Listen to how each setting sounds It s a sensitive control so turn it a little bi...

Page 8: ... end of the measure Of course for either of these patches the OUT jack of the slower channel could be used to make the change happen at the beginning of the measure Adjusting LED Brightness The brightness of the LEDs can be adjusted from very dim to very bright producing a light show on your face You should leave the unit powered on while you do this so you can watch the LEDs change You will need ...

Reviews: