4M Green Science Potato Clock Manual Download Page 7

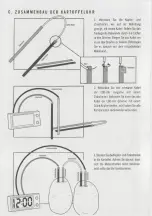
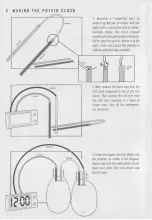
D .   S E T T I N G   T H E   C L O C K

1 . 

Setting the  clock

When  all  the  m etal  plates  are  first  inserted  into  the  potatoes,  the  LE D  

screen  will  light  up  and  will  show  a  static  display of  “ 12 :0 0 ” .

Press  A   once,  the  clock  will  start  working.  You  will  see the  tw o  dots  in  the 

m iddle  start  flashing.

Press  B  twice  to  obtain  the  set  month  mode,  then  press  A   to  adjust  to  the  right  m onth.  Press  B   to  confirm  an d  the 

display  will  switch to the  set  day  mode.

Press  A  to adjust to  the  right  day.  Press  B to  confirm  and  switch  to  the  set  hour  m ode.

Press  A  to  adjust  to the  right  hour.  Press  B  to  confirm  and  sw itch to the set  m inute  mode.

Press  A  to  adjust to  the  right  m inute  and  press  B  to  confirm.

After th e   m inute  is  confirmed,  press  A   once.  Th e  set time  will  be  displayed.
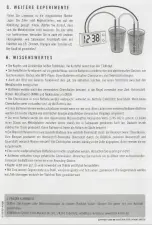
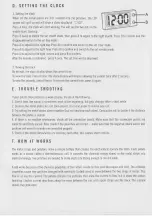
2 . 

Viewing the  clock

By  default, the  clock  display  shows the  current tim e.

To view  the  Date:  Press  A  once.  The  clock display  will  resume  showing the  current tim e  after  2  seconds.

To  view  the seconds,  press A  twice.  To  resume th e   current tim e,  press A   a g ain .

If your  potato  clock  produces  a  weak  display,  try one  of the following:

1 .  Give  it  tim e,  the  signal  is  sometim es  weak  a t the  beginning,  but  gets  stronger  after  a  short  while.

2 .  Exam ine the  metal  plates  fo r  rust  (oxidization).  Use  sand  paper to  remove  any  rust.

3.  Try  putting the  m etal  plates  closer together  (but  not  touching  each  other).  Conduction will  be  better if the  distance 

between  the  plates  is  shorter.

4 .  If  there  is  no  reaction  whatsoever,  check  all  the  connection  points.  M ake  sure  th a t  the  connection  points  are 

correctly and  firmly  placed.  A lso ,  check  if  the  polarities  are  correct  -   make  sure  th a t  the  negative  (black  wires)  and 

positive  (red  wires)  term inals  are  connected  properly.

5 .  Check  if the  metal  plates/wires  are  touching  each  other,  th is   causes  short  circuits.

The  m etal  strips  and  potatoes  make  a  simple  battery  tha t  creates  the  electricity  to   operate  the  clock.  Ea c h   potato 

works  as  a  device  called  a  electrochemical  cell.  It  converts  the  chemical  energy  stored  in  the  metal  strips  into 

electrical  energy.  Two  potatoes  are  needed  to   make  electricity  strong enough  to  run  the clock.

A   cell  works  because  of the  chemical  properties  of the  m etals  inside  (in  th is   case th e   copper  and  zinc).  The  different 

properties  cause  tiny  particles  charged  with  electricity  (called  ions)  to  move  between  the  tw o  strips  of  m etal.  This 

flow  is  an  electric  current.  Th e  potato  contains  the  particles  th a t  allow  th e   current  to  flow,  but  it  stops  th e   metals 

touching.  Electric  current  also  flows  along  th e   wires  between  the  zinc  and  copper  strips  an d  the  clock.  Th is  current 

makes  the  clock work.

E .   T R O U B L E   S H O O T I N G

F.   H O W  I T  W O R K S

Summary of Contents for Green Science Potato Clock

Page 1: ...n haben Die Hilfe eines Erwachsenen wird beim Zusam m enbau benötigt 5 Schließen Sie keines der mitgelieferten Teile an eine Wechselstrom Wandsteckdose oder Batterie an Es besteht die Gefahreines Stromschlages oder Kurzschlusses 6 Die LC D U hr könnte ihre Funktion durch elektrostatische Entladung verlieren Die Funktion wird durch einen Neustart wiederhergestellt A S I C H E R H E I T S H I N W E ...

Page 2: ...Kabelende durch die Löcher in den Streifen Biegen Sie das Kabel um es an den Streifen zu fixieren Befestigen Sie es danach mit dem mitgelieferten Klebeband 2 Verbinden Sie das schwarze Kabel der LCD Uhr negativ mit einem Zinkstreifen Verbinden Sie dann das rote Kabel der LCD Uhr positiv mit einem Stück Kupferstreifen Jetzt haben Sie alle Komponenten miteinander verbunden ...

Page 3: ...tallstreifen auf Rost Oxidierung Entfernen Sie gegebenenfalls Roststellen mit Schmirgelpapier 3 Versuchen Sie die Metallstreifen so nahe wie möglich zusammenzurQcken ohne dass sie einander berühren Der Stromfluss verbessert sich je geringer die Entfernung zwischen den Streifen ist 4 Beobachten Sie keinerlei Reaktion sollten Sie den gesamten Stromkreis überprüfen Achten Sie darauf dass die Verbindu...

Page 4: ...rie werden die bei der Abgabe von elektrischer Energie ablaufenden chemischen Vorgänge umgekehrt Die erste Batterie wurde von dem italienischen Wissenschaftler Alessandro Volta 1745 1827 gebaut Er baute einen Stapel aus Metallplatten zwischen denen jeweils ein in Salzwasser getränktes Tuch lag Dadurch wurde elektrischer Strom produziert Diese Batterie ist heute als Voltaische Säule bekannt Ein Bre...

Page 5: ... finished product contain small parts which m ay cause choking if misused Keep away from children under 3 years old 5 Metal parts m ay have sharp edges Adult assistance is required when assembling these parts 6 Do not connect any of the parts provided to any AC wall socket or any batteries This may cause electric shocks or a short circuit 7 The LC D watch m ay temporary lose its function at electr...

Page 6: ...e wire s exposed metallic end through the holeon the plate Gently twist the wire to secure it to the plate Cover and secure the connection with the adhesive tape provided 2 Next connect the black wire from the LCD clock negative to one of the zinc plates Then connect the red wire from the LCD clock positive to a piece of copper plate Now all the components are connected ...

Page 7: ...idization Use sand paper to remove any rust 3 Try putting the metal plates closer together but not touching each other Conduction will be better if the distance between the plates is shorter 4 If there is no reaction whatsoever check all the connection points Make sure that the connection points are correctly and firmly placed Also check if the polarities are correct make sure that the negative bl...

Page 8: ... when it produces electricity The first battery was made by Italian scientist Alessandro Volta 174 5 18 2 7 He built a pile of metal discs with card soaked in salty water between them It produced a small electric current The battery is now known as a Voltaic pile A fuel cell is a special type of battery It produces electricity by the reaction between two chemicals For example a hydrogen fuel cell ...

Page 9: ...roduit de l électricité La première pile a été inventée par un scientifique italien appelé Alessandro Volta 1745 1827 Il a réalisé un empilement de disques métalliques séparés par du carton trempé dans de l eau salée et intercalé entre eux Elfe produit un léger courant électrique lia pile est maintenant connue soüs le nom de pïïe voltaïque ou aussi pïïe volter Une pïïe à corntsustitoîe est un type...

Page 10: ...maar de stroom stopt als de metalen elkaar raken De elektrische stroom vloeit ook längs de draden tussen de zinken en de koperen strips en de klok Deze stroom doet de klok werken G V ER D E R E EXP ER IM EN TEN Doe wat frisdrank in de meegeleverde potten steek de koperen en zinken platen in de potten zoals op de tekening getoond wordt en let erop dat de metalen platen elkaar niet raken De klok zou...

Page 11: ...pezar a funcionar D AJUSTE DEL RELOJ 1 Ajuste del reloj La primera vez que inserte todas las placas de metal en las patatas la pantalla LED se encenderá y mostrará la imagen estática 12 00 Presione A una vez el reloj comenzará a funcionar Verá dos puntos en el medio que aparecerán en forma intermitente Presione B dos veces para pasar al modo mes luego presione A para elegir el mes deseado Presione...

Reviews: